Red-rob Rothkopf
Forum Replies Created
-

Hey Oscar,
I’m honestly not surprised by the behavior you’re describing.
I’m guessing your Vegas Project Settings are 29.97. When you launched Title Studio it saw the project settings of 29.97 and based the length of its text event/render on that.
When you then rendered 59fps, that’s double the # of frames that you wanted it to render, but it didn’t know that.
If you want it to work the way you expect, easiest thing to do is change your project settings in Vegas to a 59fps framerate and then create the Title Studio event… should work the way you want.
NOW — if you want to know how to get your existing event to by the full length that you want — I don’t have a clue LOL. Try posting on the BorisFX forums and I suspect you’ll get a pretty fast response (I’d be curious to know the answer to since this has snagged me on occassion!).
🙂 Rob
-
Hi Oscar!
I’ve often thought it would be great to have the exact thing you’re asking for.
Although you can’t apply a “pan/crop” effect at the media level, here are a few ideas:
1. Crop the first event on the timeline the way you’d like, then “COPY” the event. Right-click the event and choose “select in project media”, then right-click the project media (which that event is from) and choose “select all timeline events”. With all the timeline events now selected (which are using that media), right-click one of them and choose “paste event attributes”… done! OR use “selectively paste event attributes” to just paste the pan/crop without affecting other FX that might exist on those other events.
2. If you’re OK with black borders, you can add a “cookie cutter” to the media (or track)
3. Do similar to what you did in #1 (above) to select the events using that media, and put them onto their own track, then use the “Track Motion” to change the size of the events on the track
-
Hey Nick…
On your 2nd question about chapter marks — go to “View–>Windows–>Edit Details”, then change the drop-down for “Show” to “Markers”.
Regarding docking windows — you can absolutely do this. Just drag your floating window where you want it to go and it’ll “snap” into an existing window if you hold down the CTRL key while dragging.
Cheers!
–Rob
-
Hey Rich — wish I knew the answer… (I don’t)
You may want to cross-post on the VegasCreativeSoftware forums if you don’t get an answer here.
-
Hi John!
So you’re splitting an event (“s” key) and want to delete the previous event (on the left of the split), yes?
Try ALT-[ to invoke “trim start” — it deletes from the start of the event where the scrubber is on the timeline up to the scrubber position 🙂
Unrelated — I’m curious why you seem to post here instead of on the forum at http://vegascreativesoftware.info ?
🙂 Rob
-
As with most things in Vegas Pro, there are multiple, simple, ways to do a PIP. Some are more flexible/customizable than others.
It’s not clear from your post whether you want identical cropping applied to a bunch of photos, or different cropping on each.
Anyhow, here are few thoughts/methods/ideas, using Vegas Pro 18:
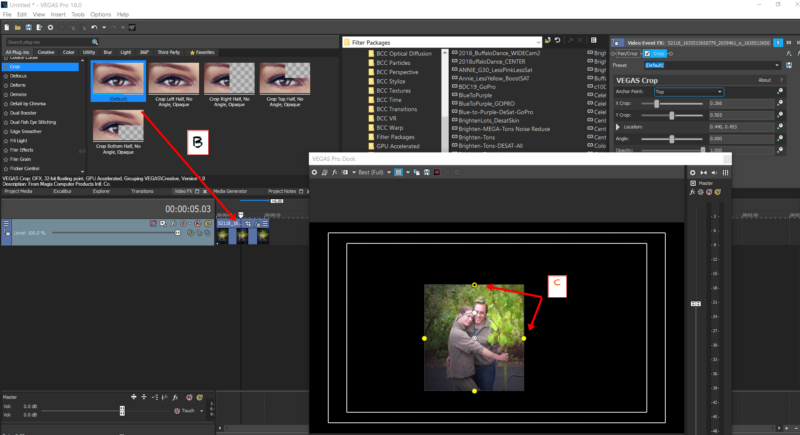
1. CROP Video FX — I think this is what you are looking for
a. Drag image onto timeline
b. Drag “Crop” Video FX on top of the image
c. Use the visual guides on the preview to crop the image
If you want to apply the same crop settings to other images, you can save this as a Preset and just drag that preset onto those images… or copy/paste FX to paste it onto other images.. whatever you want really.
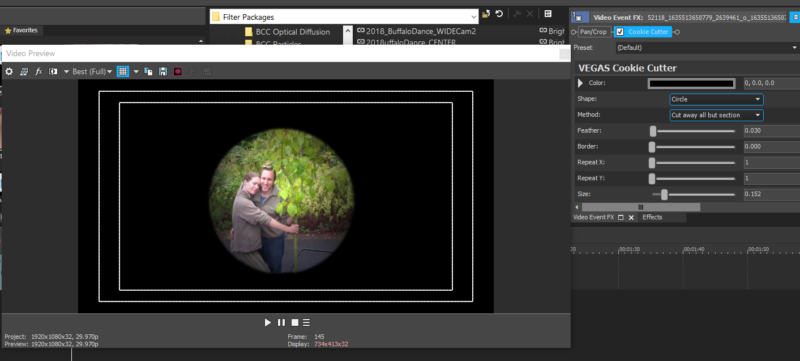
2. Use COOKIE CUTTER effect. Gives you more shape options for a crop, but not as visual an interface (it’s an older effect)
3. Use the PAN/CROP button, and create a “Mask” which will crop the image.

-
Hey John,
I didn’t go so far to test this to see if it works, but if you hold the SHFT key down and go to the Options menu, you’ll see the “Internal” menu show up at the bottom. Search for “Media” and you’ll see “Enable Media Manager” show up there! It’s set to FALSE… change it to TRUE, restart Vegas and see what happens?
🙂 Rob
-
When you write “I want my final result to have more than one audio track” — what do you mean by “final result”? Are you talking about in the Vegas timeline, or in some final render file you want there to be two different audio tracks that the viewer/listener can choose from (like on a DVD with multiple languages)?
If you’re talking about just having a 2nd audio track in Vegas for you to place the commentary, what Setiawan wrote is accurate — right click on the left area of the timeline (where track numbers are) and choose “Insert Audio Track”. You also can do it from the menus up top.
-
Hey Sean.
I can’t comment on 19, but have been editing on Vegas the same length as you. Although I’ve had an occasional crash with 18 it sounds like my experience isn’t quite as bad as yours, and mine depends on the project, plug-ins, what my source file formats are and if I’ve built proxies, and whether I have GPU turned on or off inside of Vegas (off is almost always more stable, albeit lower performance in some areas).
More usual than not it’s pretty darned solid for me.
Have you posted in the VegasCreativeSoftware forums, or filed a report with MAGIX to try to get to the root cause? I’m not saying that submitting a report with MAGIX has *ever* actually led to identifying the cause of my own problems or a fix — but that would seem like the “normal” way to get it fixed.
–Rob
-
Red-rob Rothkopf
November 3, 2021 at 7:01 pm in reply to: 1920X1080 Origination Footage Dumbed Down to 720X480 DVDHey Rich!
A few thoughts/Q’s:
1. Why aren’t you burning directly from DVDA?
2. Despite it being possibly “unpopular”, years ago I decided to only render for DVD using a CBR and not VBR; VBR I found caused unpleasant results during fast moving scenes, crossfades and transitions, so much so that CBR just seemed better for my needs.
On the crashing — I suspect it may have to do with a plugin and scaling down for the DVD, but not knowing where it’s crashing or what plugins you’re using, it’s hard to help pinpoint.
What I do in a scenario like yours is take my high quality 1080p render, drop that into a new track at the top of the timeline and then render the lower-resolution DVD. It’s *significantly* faster since there is zero FX processing at that point, and very stable. I realize your first response might be “but it’s a 2nd generation render.. lower quality” — to my eyes, I’ve never been able to see degradation using this method.. so maybe it’ll work for you? 🙂