Forum Replies Created

Page 4 of 14
  • Tom Morton

    February 28, 2024 at 7:10 am in reply to: playback randomly pauses

    Does it stop playing or just pause to buffer? If it stops playing, the play button will change from a || pause symbol to the > triangle play symbol.

    If it’s pausing to buffer, it will still keep trying to play, but will just hang while it’s loading, and the pause symbol will still show.

    If it’s buffering then it’s down to system specs, issue with GPU, footage quality etc, something that is stopping it rendering.

    If it’s stopping playback after a few seconds, not sure what to think. I hate trashing prefs myself, always seems a poor “fix” but I’d support it in this case. Could be keyboard mappings have changed to “play around” or “play preview” which is causing it to stop. Else it could be some other setting, either way, a clean prefs should rule out any of these things.

  • Tom Morton

    February 20, 2024 at 7:58 am in reply to: How to use a checkbox to enable or disable an expression?

    There’s lots of info on the web generally on this so I’ll try and offer a brief outline. Not sure how much of this you already know so let know if you want more specifics on anything.

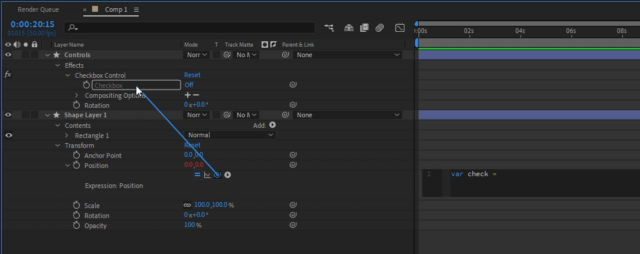
    You first need a layer to hold your checkbox, this is an Expressions effect. I usually add a blank Shape layer but you can use a null layer or any other layer too. I rename it “Controls” and then right click on it and go to Effects > Expression controls > checkbox

    Now open a layer you want to control with the checkbox, work out which property you want to change and Alt + click on the stopwatch sign for that property. This will open a code panel for the property. For instance if you want to move the layer, you might want to open the Position property in the Transform section. Or you might want to change the Scale property etc.

    In the code panel you just opened, type:

    var check = 

    and then you’ll see a little twirly spiral symbol near the code panel. Click and drag it to the checkbox effect you added to the Controls layer, and it will automatically link it to the “check” variable. The code text should look something like this:

    var check = thisComp.layer("Controls").effect("Checkbox Control")("Checkbox")

    Now you can do a simple if statement. The “check” variable will link to the checkbox, and the value will be 0 (zero) if unchecked or 1 (one) if checked. Thus:

    var check = thisComp.layer("Controls").effect("Checkbox Control")("Checkbox");
    var pos = [0,0];
    if (check == 0) {
    pos = [200,300];
    } else {
    pos = [400,600];
    };
    pos

    When you check the box on or off, it will change the position variable in this script. The position is an array of 2 numbers hence the use of square brackets to encapsulate the x and y position. Putting the pos variable at the end basically returns the value of that variable for the layer to use.

    That’s the basics of using a checkbox to control expressions. Play with that for starters – do you need some more tips on how to set up the keyframing too?

  • Tom Morton

    February 19, 2024 at 8:25 am in reply to: OS Updates

    This is a big bugbear for me, the updates (and upgrades) are generally buggy and cause a problem somewhere. I have all the auto-updates turned off for anything Adobe, just because I can’t risk getting bugs that make it impossible to work.

    The only time I update is when I have a problem. Whenever I look at the new features listed in the updates, there’s almost never any features that seem useful to me, certainly nothing that makes me want to update to a potentially buggy version that hasn’t been tried and tested properly. Most features seem to be something like “we’ve added an AI chatbox so that if you don’t know what an MP4 file is, you can now find the answer through AI without leaving Premiere Pro” – for the last few years, adobe have focused on providing features for new and inexperienced users to dampen the learning curve for them.

    When I do have an issue, I manually update to the next version on from what I’m working with (not the latest version). Good advice from the others not to do this mid project. I also tend to run both versions for a couple of months (there’s an option box to uninstall previous versions when updating which I keep off) until the new version has bedded in.

    Call me paranoid, but I’ve had my workflow upset plenty of times due to Premiere Pro playing up.

  • Tom Morton

    February 19, 2024 at 7:57 am in reply to: Green Screen Keying Problem

    Green screen is an art in itself, and I would say most of the work is in the initial keying. If you don’t get that right, you’ll ultimately spend a lot of time adding effects on top of effects on top of effects… it’s not an ideal way to go. I’d recommend spending more time getting the keying right, and then everything else is more likely to fall into place.

    One of the most tricky parts of green screening that I’ve found is when the green screen itself is poorly lit. This leads to lots of problems when trying to key it out. One method I have found works well for difficult shots is this:

    1. Drop the footage into a new sequence that exactly matches the shot settings – resolution, frame rate, etc.

    2. Add a Lumetri Color effect, and start tweaking the colors of the footage. What you’re aiming for is to get the green screen looking a much more consistent tone and hue. At this point, ignore what the subject looks like, it doesn’t matter if this looks off. Just focus on making the green screen much more even, without bleeding color into the subject. Also try and make sure none of the subject colors turn green in the process.

    3. Sometimes it helps to turn the tint down slightly away from green, but use the saturation and hue curves to pull the greens back into a strong hue. If the green screen has a lot of shadows and highlights, you can isolate the greens and reduce the contrast using the HSL Secondary section.

    4. Once you have prepared the shot so the green screen has flatter, more consistent colours, you can now drop the Keylight effect onto the shot (ensure it sits BELOW the lumetri effect or the color adjustments won’t change anything). Now when you eyedropper the green section, you should get a much better shot straight away. Play with the adjustments under the “Screen Matte” section a little, but don’t overdo it.

    5. If you can’t easily get the Keylight effect to remove all of the green screen, then just focus on keying the darker green areas. Then stack a second Keylight effect on the clip and key out the light green areas. Much better to stack several keying effects on each other then to start messing around with rotoscoping etc.

    6. If you can’t get a good key, sometimes you can go back and play with the lumetri colours again and try and enhance the greens a little more once you know what works and what doesn’t work.

    7. Once you’ve got it keyed out, great! But the subject colors are probably looking wrong now. What I do is to use this keyed footage as a transparency mask – drop the same footage onto the timeline below the footage you’ve just keyed (or duplicate and delete out the effects).

    8. Now you can use the track matte feature that is built in – you might have to “Toggle switches / modes” at the bottom of the Timeline panel to see this column. Then on the new footage, change the track matte to the the first footage where you keyed out the green screen.

    Hope that helps! You’re on the right track doing this in After Effects too, this sort of thing is much harder to do in Premiere Pro.

  • Tom Morton

    February 16, 2024 at 7:42 am in reply to: Sound stutters on export and on playback

    41000 Hz doesn’t match exactly, not sure if it matters but a 22050 Hz track doubles to 44100 Hz (or 44.1KHz) – surprised there’s not an option for this.

    So just to clarify a few things – is it this one track it happens to, or several / all? If it’s one track, is it 100% not an issue with the track? – try playing it through a few different media players – VLC, KMP, WMP – make sure the stutter isn’t a track issue.

    If the track is 100% clean, I would transcode to a different format – I use ffmpeg myself but you could use handbrake, audacity or an online tool. Try doubling the Hz artificially and seeing if that clears the issue.

    Another thing to try – you’re using Premiere Pro, do you have Adobe Audition? Separate the audio track on the timeline and right click and convert to Adobe Audition project. See if it plays through in Audition, be interested to know what the results are.

  • You can literally stretch (scale) the image to whatever dimensions you want in Resolve, click on the clip, go to the inspector tab, uncheck the link aspect ratio option, and change scale to whatever you want. Lots of tutorials on youtube if you’re not sure how.

    If you don’t want it stretched then I guess you’re best off pulling this into photoshop and changing the dimensions of the image there?

    If you’re working with several different size aspect ratios, you’re best off cutting the image in half, and then you can scale both halves to fit the height of the comp, and the middle will overlap but won’t be noticeable because the centre section has no vertical patterns.

  • Tom Morton

    February 8, 2024 at 3:55 pm in reply to: Reduce unused footage and work tidy and orginzed

    If the main point of this is for tidyness, then I wouldn’t worry about removed unused footage. I have OCD, like to keep everything organised, named up correctly and so on, but I still wouldn’t bother going this far.

    Footage isn’t stored in your project, it’s only linked so it won’t increase project size much and won’t affect performance unless you pull it into a timeline and render it. Personally I’d just lean towards leaving the footage in and not worrying about being quite so tidy!

    Don’t know how you work but also I tend to find that AFX projects are disposable – I use it to do some deeper editing and tweaking, but once I’ve done that and got the results I need, it’s likely I’ll never open the project again, so I try and keep it organised without spending time going overkill. For re-usable templates, I create MOGRTs in AFS that I can easily drop into a Premier Pro timeline.

    Not sure if that helps or not, but if you’re sure you want to do it as you’ve described then I think you’ll need a third party plugin or something – not sure how to achieve the results you want.

  • Difficult to help when we don’t know anything about what’s going on, all you’ve given us is 2 images… really need some more details.

    Can you post some screenshots of the After Effects projects and how the effect is built? What machine are you editing on, what’s the OS, and what GPU?

    What export settings did you use in After Effects? Have you tried rendering with different settings, different codecs or the like?

  • Tom Morton

    February 1, 2024 at 7:24 am in reply to: Toggle comp set up from one state to another state.

    Interesting… I use C4D and AFX, familiar with the takes system. I get what you’re saying but also interested in an example where this would be useful – I’m not sure what I would do with it personally.

    If I wanted to do anything like this, I wouldn’t split it out into project files personally, I’d prefer to split it out into different comps within a single project – much easier to manage. I guess my best alternative to the takes system is if I set up the a master comp, scripted out loads of the variables so they could be controlled with expressions, and then tie all the expression controls into a single null layer to make it easy to control from one place.

    Then it would be easy to just duplicate the master comp and make changes in the duplicates very easily using the expression controls.

    Depending on what I was trying to achieve I’d also look at pre-comping a master template that I can use in multiple comps in different ways.

    But ultimately, there’s nothing built in like the takes system in C4D, would definitely recommend keeping all your “takes” in one project as various comps tho, rather than multiple comps.

  • Tom Morton

    January 26, 2024 at 7:42 am in reply to: Home screen blank

    Or… uninstall Adobe and install Davinci Resolve instead!

    These errors are sadly part of the Premiere Pro workflow – Adobe always like Premiere Pro to run into a few errors occasionally, this is part of a special user selection process. If you’re good enough to solve the errors and keep working, then you’ve passed the test and you can keep using Premiere Pro.

    However, if you keep passing the tests, then Premiere Pro is programmed to make the tests harder and harder to see how much you can take. Unfortunately this has backfired on Adobe more recently as video editors have been finding out that this isn’t standard practise with other software developers and NLE’s like Davinci Resolve and Final Cut Pro try and avoid this workflow where possible, and this actually makes their programs more enjoyable to use.

    PS: Warning, my writing may be infused with sarcasm and/or cynicism.

Page 4 of 14

We use anonymous cookies to give you the best experience we can.
Our Privacy policy | GDPR Policy