Creative Communities of the World Forums

The peer to peer support community for media production professionals.

Activity Forums Adobe After Effects Green Screen Keying Problem

  • Green Screen Keying Problem

    Posted by Nik Yordanov on February 18, 2024 at 9:10 pm

    Hi folks.

    I’m currently doing a composite using one of Action VFX’s free green screen shots (an astronaut walking). I’m still in the beginning of the project, but I’m facing a problem with the green screen keying. When I keyed it out, the space suit had some transparency, probably because it is very bright and it eats away its pixels too. I tinkered with the Keylight effect to make it look complete, but in this case there are a lot of other grey parts that need to be removed, so I’m stuck.

    I’d like to ask what would the workaround be in the green screen removal of a shot like this? Should I start otherwise? Should I create a second type of key with other settings? Should I leave it like this and let’s say use the Rotobrush to isolate the astronaut, then add a shadow to him all over again?

    I’ve done some masks on the cables and stands, but I’ve turned them off for now, because I’m planning on using them for 3D tracking so I can match the movement of the new ground surface (Mars’ ground texture) I’m adding, as well as as the Earth and the Sun I’m going to add in the sky.

    I’ve had green screen removals done before, but I’m not a pro at this, and they were more simple and I never faced such a case to resolve. I’m uploading a screen shot of the project, as well as a screen recording video of the preview render.

    I’ll be grateful for any suggestions.

    Andy Kiernan replied 1 year, 1 month ago 3 Members · 8 Replies
  • 8 Replies
  • Tom Morton

    February 19, 2024 at 7:57 am

    Green screen is an art in itself, and I would say most of the work is in the initial keying. If you don’t get that right, you’ll ultimately spend a lot of time adding effects on top of effects on top of effects… it’s not an ideal way to go. I’d recommend spending more time getting the keying right, and then everything else is more likely to fall into place.

    One of the most tricky parts of green screening that I’ve found is when the green screen itself is poorly lit. This leads to lots of problems when trying to key it out. One method I have found works well for difficult shots is this:

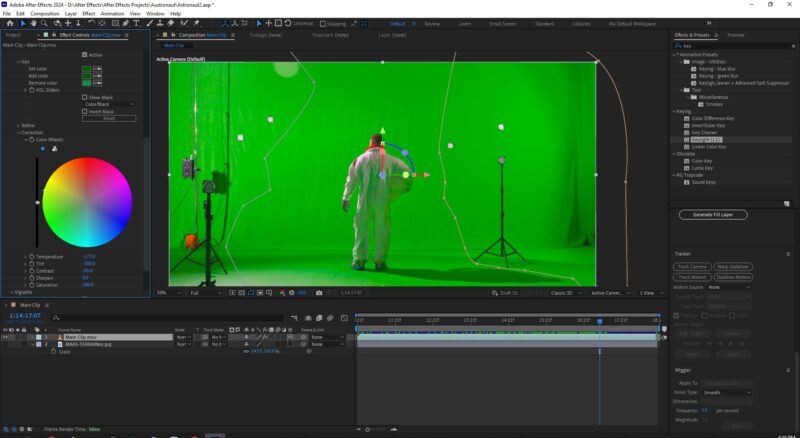
    1. Drop the footage into a new sequence that exactly matches the shot settings – resolution, frame rate, etc.

    2. Add a Lumetri Color effect, and start tweaking the colors of the footage. What you’re aiming for is to get the green screen looking a much more consistent tone and hue. At this point, ignore what the subject looks like, it doesn’t matter if this looks off. Just focus on making the green screen much more even, without bleeding color into the subject. Also try and make sure none of the subject colors turn green in the process.

    3. Sometimes it helps to turn the tint down slightly away from green, but use the saturation and hue curves to pull the greens back into a strong hue. If the green screen has a lot of shadows and highlights, you can isolate the greens and reduce the contrast using the HSL Secondary section.

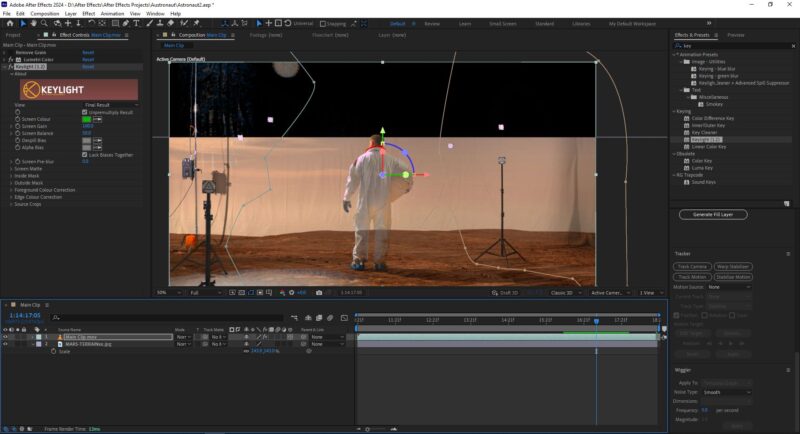
    4. Once you have prepared the shot so the green screen has flatter, more consistent colours, you can now drop the Keylight effect onto the shot (ensure it sits BELOW the lumetri effect or the color adjustments won’t change anything). Now when you eyedropper the green section, you should get a much better shot straight away. Play with the adjustments under the “Screen Matte” section a little, but don’t overdo it.

    5. If you can’t easily get the Keylight effect to remove all of the green screen, then just focus on keying the darker green areas. Then stack a second Keylight effect on the clip and key out the light green areas. Much better to stack several keying effects on each other then to start messing around with rotoscoping etc.

    6. If you can’t get a good key, sometimes you can go back and play with the lumetri colours again and try and enhance the greens a little more once you know what works and what doesn’t work.

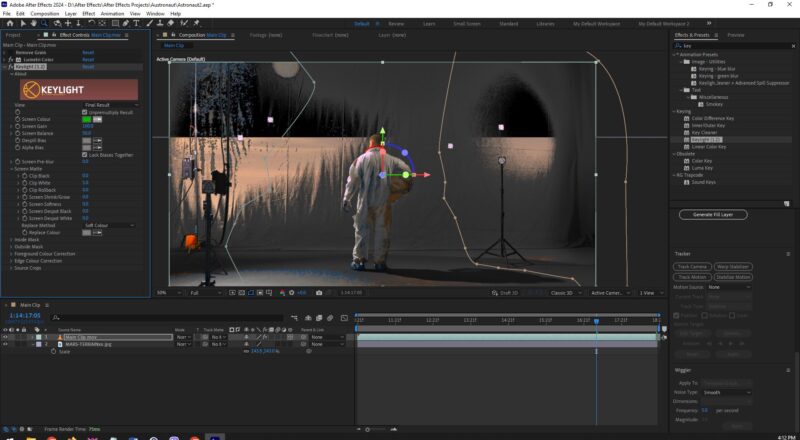
    7. Once you’ve got it keyed out, great! But the subject colors are probably looking wrong now. What I do is to use this keyed footage as a transparency mask – drop the same footage onto the timeline below the footage you’ve just keyed (or duplicate and delete out the effects).

    8. Now you can use the track matte feature that is built in – you might have to “Toggle switches / modes” at the bottom of the Timeline panel to see this column. Then on the new footage, change the track matte to the the first footage where you keyed out the green screen.

    Hope that helps! You’re on the right track doing this in After Effects too, this sort of thing is much harder to do in Premiere Pro.

  • Nik Yordanov

    February 19, 2024 at 10:47 am

    Hi Tom,

    Thank you for this detailed input! I’ll try to follow the workaround you suggest and I’ll update on this.

    I usually use AE for all visual effects-related tasks, and use Premiere for plain video/sound editing and color grading. I know that green screen keying is best done in Nuke, but after spending 1.5 years in AE doing compositing and effects creation, and seeing that I still have a lot to practice with it until I’m comfortable with dealing with all sorts of cases, I don’t see myself switching to Nuke anytime soon.

  • Nik Yordanov

    February 19, 2024 at 2:38 pm

    Unfortunately, color correcting didn’t help that much either. I did bring more saturation and lightness to the shot. It also introduced more brightness to the subject, but I didn’t change his colors. I can’t remove the shadows on the green screen that much in the HSL section, because that starts eating away the shadows of the subject too. Then, when I apply the keylight effect and sample the green, I again end up with a semi-transparent subject. The only setting I can change to bring back 100% opaqueness is “clip white”, but that starts to add back the background in grey color. I tried to do a garbage mask around the subject and add the keylight, but it’s still the same thing. I’m attaching screenshots below.

    I guess I hit a dead end with this one 🙁

  • Andy Kiernan

    February 19, 2024 at 3:19 pm

    as there is so much spill on the space suit I dont think a simple 1 key will do it. Try using the set channel effect, basically make a copy of footage, set to red channel, copy again, set to blue, add together, precomp… you will then have a black and white image which you can use to matte the actor out. It wont be perfect but it will get you some of the way, then use other techniques mentioned above to continue. But i think some roto may be needed.

    Good luck with it

  • Nik Yordanov

    February 19, 2024 at 6:13 pm

    Hi Andy,

    Thank you for joining the thread. I tried to do what you said, but didn’t end up with a black and white matte on the pre comp. Most likely I’m doing something wrong. I duplicated the clip and added Set Channels, then selected the duplicated clips as the source for the red channel. Then I duplicated again and selected the 3rd clip as source for the blue channel (I returned the red channel to “none”). So the only clip that doesn’t have the set channels effect is the original. I precomposed either the 2 duplicates or all 3 clips and and tried to apply keylight, but still nothing different. I’m uploading a screen recording video of this. Could you please tell me where I’ve gone wrong?

  • Andy Kiernan

    February 20, 2024 at 10:29 am

    dont change source, just set all the colours to red , then on copy layer, all to blue, youll then have two B/W layers. use levels to fiddle, then hopefully toull have a partial matte of the actor, and use other methods to move further

  • Nik Yordanov

    February 27, 2024 at 11:53 am

    Hey, I found out another way to create a black-white matte copy – by using the Boris FX’s Sapphire Tint effect. I then used other effects such as levels, key light, advanced spill suppressor, simple choker, and set the copy comp as a luma matte to cut out the object. However, I have grey residues that I just can’t remove. I’m uploading a screen recording to the current state again. Did I mess something in the workflow? Or is there a way to remove that grey residue from this point on?

  • Andy Kiernan

    February 27, 2024 at 12:11 pm

    sometimes there’s only so far you can take it ( its what i find anyway!) For what’s left, i would suggest using RotoBrush3 on it, this will give you a fairly decent mask with a bit of work. Then use as another layer or matte or whatever. Id suggest rendering out the RotoBrushed layer to a mov and reimporting as the effect can get in the way sometimes!

We use anonymous cookies to give you the best experience we can.
Our Privacy policy | GDPR Policy