Forum Replies Created

Page 5 of 14
  • Tom Morton

    January 24, 2024 at 4:35 pm in reply to: Image sequence

    Yes, I thought same as Andy, I think it only imports if all the filenames end in the frame number but they have to be prefixed with the right amount of zeros so the quantity of digits at the end of the name is the same. So it could be 4 digits which would run from filename_0000.tiff, filename_0001.tiff through to filename_9999.tiff.

  • Tom Morton

    January 24, 2024 at 11:11 am in reply to: 2 layers controlling each other

    simplicity is best in AFX expressions!

  • Tom Morton

    January 24, 2024 at 11:03 am in reply to: .MGRT created on AE with an Adjustment Layer

    2 things stand out straight away.

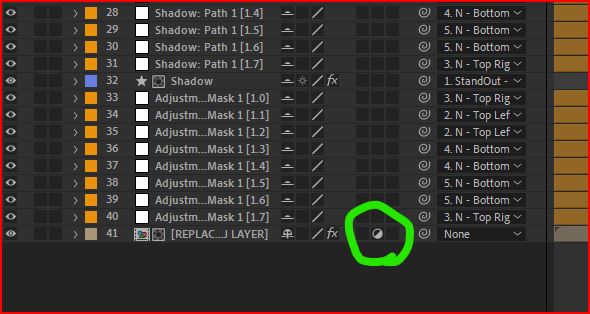
    Firstly, the precomp that holds the replaceable media is at the bottom of your comp. This is fine, but you also have “adjustment layer” turned on (the half filled circle). Adjustment layers affect layers beneath them and as there are no layers beneath this layer, this just hides the layer.

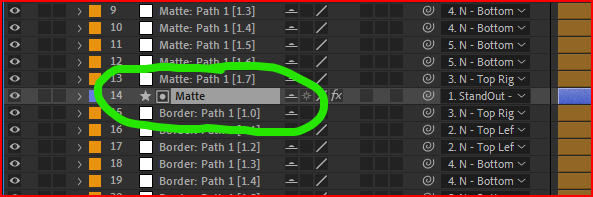
    Secondly, you have a red matte on layer 14. This covers the comp when it is visible, and hides everything beneath it including the replaceable media.

    When I hide the color matte and then turn adjustment layer off on the bottom layer, everything seems to work as it should – the layer gets transformed within the mask very nicely.

    I am wondering if you’ve got mixed up on the layer order? The top layer is at the front of the comp, and then as you go down the list, the layers are stacked behind the previous layer, so the bottom layer is at the back of the comp.

  • Tom Morton

    January 24, 2024 at 10:32 am in reply to: infographic model

    Personally, if I was recreating this, I’d use 2D shapes in Illustrator. Just cos it looks 3D doesn’t mean it has to be 🙂

    There are no real 3D effects involved here, no lighting, no shadows, no reflections etc, so 3D is overkill. Just create a few ellipses, make them wider than they are high and stack them, you’ll get this same effect much more simply.

  • Tom Morton

    January 23, 2024 at 2:03 pm in reply to: .MGRT created on AE with an Adjustment Layer

    A mogrt can’t interact with anything else on your timeline so it won’t work as an adjustment layer like you found out 🙂

    However, using the replaceable media function should work ok if it’s setup right – sounds like it’s still not working for you?

    Do you want to share your mogrt with me or attach it here? Happy to take a look at it, sometimes that’s a bit quicker then trying to understand from screenshots. Otherwise, just give a brief step by step of what you’re doing and what’s going wrong vs what you expected?

    As I understand so far, you’ve created a mogrt that uses replaceable media and animates it in your magnifying effect, but when you replace the media in Premiere Pro, it doesn’t work? Can you give us a bit more detail to help us understand what doesn’t work?

  • Tom Morton

    January 23, 2024 at 1:57 pm in reply to: Paths don’t have any reaction, is that a bug?

    The smart snapping guides work off points by default, not splines. Illustrator also intelligently adds “midpoint” point for snapping – it isn’t a real point but appears when snapping to objects.

    On the first example, the snapping guides appear because the end points of the line are vertically in line with the right point on the circle. The auto-generated midpoint also appears as a helpful guide. because it’s between the 2 points.

    On the second example, you’re putting a spline near a spline so no snapping guides appear. Snapping also occurs horizontally and vertically by default, so because no points relate to one another, you don’t get any snapping guides. If you move the end point of the line near the circle, you should get snapping guides by default, but not for splines.

    The reason for this is because splines are not controllers, they are the output of the points – so you can’t put a spline in a location without using a point to give it directions to go there. A bezier point with handles will give directions for where the spline path should go, and you can snap the point and the handles, but the line just an output so snapping guides would be irrelevant.

  • Tom Morton

    January 23, 2024 at 1:07 pm in reply to: .MGRT created on AE with an Adjustment Layer

    Just trying to understand what you’re trying to do – if I understand right, you’re trying to use an adjustment layer in the replaceable media part of a MOGRT?

    As far as I know, you can’t do this, and also not sure if would do anything if you could? An adjustment layer has no output on it’s own – on a timeline it will affect layers beneath it but on it’s own it does nothing.

    If you want to do this, you want to precompose / nest the timeline and then drag the timeline into the MOGRT as the media to use. Can’t remember if this is possible, but if not you’ll need to export the timeline as a video and then use the video as the replaceable media.

    Any good?

  • Tom Morton

    January 23, 2024 at 7:24 am in reply to: Creating text animation .mogrt template

    Hello Amy,

    One of my most-used expressions for this sort of things is the “linear()” expression. Here’s the Adobe ref guide on it: https://helpx.adobe.com/after-effects/using/expression-language-reference.html#:~:text=Interpolation%20methods%20(expression,range%20of%20values.

    But here’s some quick and simple ideas. If you write this in the position property of an object:

    x = linear(time, 0, 3, 10, 200);
    [x, 0]

    This will make the object move from position 10 to position 200 in between 0 and 3 seconds on the X axis.

    And then you can use variables to make sure the positions and timings are correct:

    var s = thisComp.layer(“text here:)”);

    var start = s.inPoint;

    var end = s.outPoint;
    var mid = (end-start)/2;
    var w = s.sourceRectAtTime(mid).width/2;
    var h = s.sourceRectAtTime(mid).height/2;
    var t = s.sourceRectAtTime(mid).top;
    var l = s.sourceRectAtTime(mid).left;


    x = linear(time, start, end, l, w);
    y = h+t;
    [x, y];

    I’m not 100% sure that will work correctly for you, I haven’t tested it, but that might give you an idea of how to work it.

    As you continue to build this, you could also use the “Trim paths” effect to grow the line down and up, and when you do this you can also use the linear() expression to grow the line.

    Hope that helps and shout if there’s anything you don’t understand on this! I’ve built a few things like this, so if you want to share what you’ve done at any time I’d be happy to comment! I’m a big fan of templating things properly so I lean on Afx fairly heavily.


  • Tom Morton

    January 22, 2024 at 4:45 pm in reply to: Redshift render not identical

    Well….. the cynical part of me does question if something somewhere could have been changed accidentally!!

    But aside from that, other settings that could make a difference outside of your project:

    – GPU driver update? Shouldn’t affect colours, but it could on a major update.

    – GPU driver settings change? In my Nvidia GPU settings I have different profiles for various pieces of software. Changing these settings can have a knock on affect on render quality and output. Or if you haven’t used any profiles and the default ones have been tweaked in an update, this could affect it.

    – Different GPU? Any chance one of the renders used a built-in graphics card and the other didn’t etc?

    – C4D uses linked files a lot, rather than storing a copy in your project. Is there any chance any of the linked files could have been changed by you or someone else (think shared drives, shared cloud storage etc) which could have had a knock on affect?

    – Quite out there and unlikely but C4D has a daylight node that can match the light position and output to your current time and time zone, so rendering at different times of the day will produce different results!

    Not sure if I’ve helped but maybe this might give you some ideas!!

  • Tom Morton

    January 16, 2024 at 8:39 am in reply to: Infinite Background Problem

    If you want to use a background that is visible in reflections, you’re best off using a plane and adding the material to it, this will be located in 3D space and will be treated like a normal object.

Page 5 of 14

We use anonymous cookies to give you the best experience we can.
Our Privacy policy | GDPR Policy