Forum Replies Created

Page 9 of 14
  • Tom Morton

    December 6, 2023 at 11:54 am in reply to: Exports have a colour cast

    is it just your screen? Get the exported version up on your screen side by side with AE (on the same screen), do they look different or the same?

    If the exported version looks different to what you’re seeing in AE, then your export settings are probably at fault. However, if they look the same then it means that AE has exported accurately, but your screen has probably got different color settings to your editors / graders.

  • Tom Morton

    December 4, 2023 at 4:18 pm in reply to: Little help please..

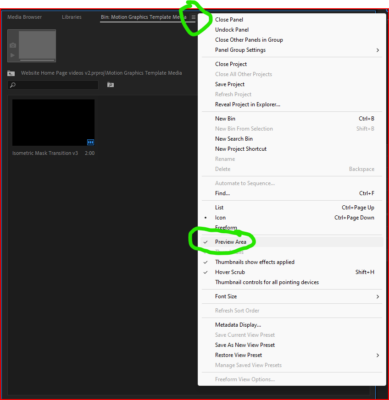
    Yes, click on the project panel menu ( 3 lines next to tab name) and uncheck the “Preview area”

  • Lots of reasons:

    Is AE using your built in GPU? This is very slow.

    If you’re using CPU only effects in your project, and your CPU is throttled then this could cause it.

    What rendering method have you chosen? Software only will only use CPU.

    If you can’t work it out, tell us more about your project, and your setup.

  • Tom Morton

    November 8, 2023 at 7:06 am in reply to: Clips show stretched

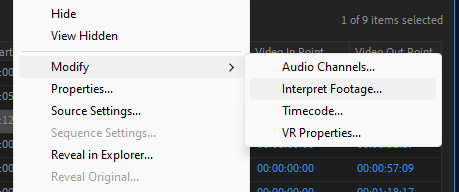
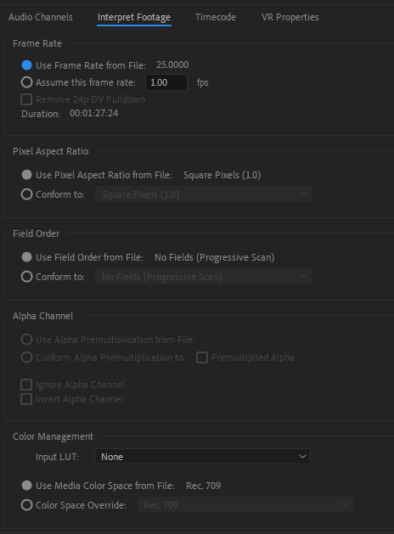
    First check the Motion properties and ensure the Scale is set to 100% for width and height. If so, then go to the footage in your project panel, right click and go to Modify > Interpret footage. Check that the pixel aspect ratio here matches the actual footage. By default it should pick it up correctly but on unusual footage it can get it wrong.

    Failing that, create a fresh new project as a test, import your footage and see if the same thing happens. If not, then your project may be corrupted.

  • Tom Morton

    November 7, 2023 at 7:45 am in reply to: Orient a child 3D layer along the world Z axis

    Use a central null that is rotating, and group the spinning layers inside another null. Link the rotation of the inside null to the central null, but put a minus in front of it, so that it rotates the opposite way from the central null at exactly the same speed and your inside null should always be facing the same direction?

  • Tom Morton

    November 6, 2023 at 7:56 am in reply to: Save a Copy…

    I don’t love this either, it is a pain to get used to. The main benefit I see is that “Save as” saves your file with all the photoshop features retained as editable features and not burnt into the output. Adobe are gearing their software much more to newbie users and dumbing things down, and I suppose they just had so many users save their multi-layer file as a JPG and then complain they can’t see the smart filters when they open it again that they implemented this. Hopefully means that the newbies that don’t know the difference between and SVG and a PNG will have half a chance of saving things down right.

    I would say in Adobe’s favour that there’s actually no extra clicking or time added. You can access the “Save a copy” feature right from the menu, or you can use the new keyboard shortcut if you prefer which either way round is just as quick as the standard “save as”

  • Tom Morton

    November 3, 2023 at 7:56 am in reply to: Multicamera switching creates additional cuts

    Sorry I’m not big on using the multi cam edit tool, but if this is a recent thing, maybe try rolling back to the last version of Premiere Pro?

    I have auto-update turned off for everything Adobe due to these types of issues. If a version works with me, I thank my lucky stars and don’t touch it. If there’s problems I’ll update manually, version by version until I find one that works ok, then I don’t touch it again. Adobe are always introducing new features that lead to undocumented behaviour and crashes so this helps me manage this.

  • Tom Morton

    November 1, 2023 at 7:33 am in reply to: Unrealistic performance issues because of audio

    This is a curious one, could you try something else for me? I’m guessing you have past projects you can test this on:

    When you are done with step 2, copy back to the original PC. Don’t open it – but now open a brand new project and test it is all running well. Then import the project into the new project using File > Import. This will force some cache rebuilds that you can’t do from the UI.

    Give that a go and let me know if it still runs slowly when importing it rather than just opening it!

    PS: (while we’re at it, just give us a quick idea of what edits you do on the second PC? Just thinking about some effects that could clash on different hardware. What effects do you commonly use, do you use audition for audio, do you use nested comps and how many levels?)

  • Tom Morton

    October 27, 2023 at 6:52 am in reply to: Best resolution for stills to be used in a movie

    I would tend to disagree with you slightly, as I believe it makes a lot of sense using high resolution footage even if you’re exporting at lower resolution. For example, I shoot everything in 4K. However, I edit and export at 1080p. However, if I shoot at 1080p to begin with, the final export is not as clear and sharp as when I shoot at 4K.

    When 4K is resampled down to 1080p, you get a much sharper, better looking footage then shooting at 1080p to begin with. Another bonus I find is that because I’m exporting at 1080p, I can also crop into a 4K shot without losing quality. Because a 4K shot is 4x the size of a 1080p video, I effectively get the option of zooming in up to 2x (at 2x zoom I’ll get a 1080p shot from a 4K video, which is acceptable). Therefore a 4K shot gives me wide and close shots all at the same time and I can cut to different zoom levels to make the video more interesting. Same applies to stills too 😜

    Anyway, my personal rule of thumb is to export the stills at about 2x bigger than required in final export. One of the reasons is that any NLE you use will sample the images and compress them into a slightly lower quality, so at the expense of some GPU power, I prefer to give some extra “elbow room” so that images can be manipulated in Premiere Pro, and when they are resampled they will still maintain a really good quality in post.

  • Tom Morton

    October 27, 2023 at 6:37 am in reply to: Animate compositions with expressions

    Hello there, in the position property of the layer you want to animate you can ALT + click on the stopwatch to open the expressions for that property. So in your case, ALT+click on the stopwatch that is on the “position” property for the layer and it should drop down / add a text box with a default expression in (which will do nothing yet)

    Then the expression you probably want is the “linear()” expression. Type in this:

    —script—

    y = 540; // or whatever the default height is, this won’t change

    x = linear(time, 0, 5, 150, 2000); //change the x position over time

    [x, y] // position property is an array of 2 values for x and y position

    —script—

    That should do the trick. The linear expression takes 5 arguments, just off the top of my head but in “linear(time, 0, 5, 0, 2000)”

    1. The first argument is what you’re measuring, in this case “time”

    2. the second argument is when it starts from, in this case 0 seconds

    3. the third one is where it ends, so it will keep animating until 5 seconds

    4. the fourth one is the value it starts ag

    5. the fifth one is the value it finishes at.

    So, from 0-5 seconds, the X position will change from 150 to 2000, if that makes sense! The y position is set at the beginning and is static, but you could also put a linear() expression in here to change the height of the layer over time. And if you want to go extra pro, you can add / subtract multiple linear() expressions over different times to get a range of different movement!!

    Enjoy!

Page 9 of 14

We use anonymous cookies to give you the best experience we can.
Our Privacy policy | GDPR Policy