Forum Replies Created

Page 28 of 51
  • You’re welcome, Eugene! I’m glad you’ve solved the problem, even partially. It may require looking at the file, but I think that baking the hair to Polygon might solve the problem since the situation has improved after making the Connect editable. I’ve put a link below showing the best way to do that.

    I hope this will be helpful to you.

    https://www.youtube.com/watch?v=Yn8X4ef_YM8

    Some contents or functionalities here are not available due to your cookie preferences!

    This happens because the functionality/content marked as “Google Youtube” uses cookies that you choosed to keep disabled. In order to view this content or use this functionality, please enable cookies: click here to open your cookie preferences.

  • Hi Eugene,

    When we rendering dynamics on the editor, it will ignore the previous frames to make the rendering faster, so you can’t know if everything is okay until you use the picture viewer that it calculate the dynamics from the first frame to the frame you want to render, so the rendering will look different if there is any problem, however, maybe everything is fine in your scene, you just need to make sure that the hair effect is there in the render setting, if it is not, you have to add it manually by going to Effect, if the problem persists, copy only the main object without the environment and paste it in a new file and save it, then close the program and reopen the new file and check the rendering, if the problem is solved, then add the environment again, and it is preferable to use new elements for the environment and not the elements that were in the previous file. Try this and let me know how the result was with you.

  • Kouraib Abdmalek

    July 24, 2024 at 9:21 am in reply to: Vram management in Octane

    You’re welcome, Andy! thank you too for sharing with us what you’ve found.

  • Kouraib Abdmalek

    July 23, 2024 at 1:03 pm in reply to: Vram management in Octane

    Hi Andy,

    With the use of Instances as much as possible, because it has a significant effect in reducing the file size, one of the methods used is to render the scene in pieces and assemble the renderings in Photoshop or other programs. If you have several shots, you could in each scene keep only the visible things on the camera and delete everything else. You could also use the Polygon Reduction tool, in addition to some tips related to lighting and materials such as:

    • Check which material effects are computationally cheap vs costly as caustic or detailing displacement materials and use the cheap ones as much as possible if the costly ones are not significantly better.
    • Simplify lighting complexity as much as possible and prevent emissive surfaces from being blocked too closely by other geometry.
    • Consider faking volumetrics if possible and consider whether they’re worth it for the scene.

    I hope this is useful to you.

  • Hi Tom,

    I don’t have a way to make the process more evident, as you stated, and I rule out the existence of this because of the diversity of shapes and sources of spline each time, and as one of Maxon’s experts said in answer to a question related to this (I have no “one-size-fits-all” suggestion), but there are some helpful tricks, including using Mospline, because it gives you more control of the whole setup as the number of points and other things, including also using the hierarchy feature in the Extrude tool, which is useful when you have several splines so that you can turn them into one polygon with a clean mesh. I have put a video below explaining that. Also, one of the tricks is to use the surrounding spline to create the polygon and then use the inner lines to create the islands. As in the tutorial below, I also suggest you to use Extrude in the 2024 version because they have made performance improvements.

    I hope this is useful to you

    https://youtu.be/GsFjtVL28JY?feature=shared

    Some contents or functionalities here are not available due to your cookie preferences!

    This happens because the functionality/content marked as “Google Youtube” uses cookies that you choosed to keep disabled. In order to view this content or use this functionality, please enable cookies: click here to open your cookie preferences.

  • Kouraib Abdmalek

    July 20, 2024 at 7:08 am in reply to: Spot light VOLUME flickering on each frame

    They said on the Maxon website that using Brute Force will solve the flickering light problem, so we have to keep that and go to change the light parameters. I don’t know what’s the Falloff curve value for the spot. We should set the value to zero because with increasing values the light intensity will decrease faster between the center and the outer border of the spot cone. Are there other lights in the scene? Because if a light is visible, it will cast shadows from other lights.

    Also, you could post your file here or email me so I can check it for you.

    alasma3i10@gmail.com

  • Kouraib Abdmalek

    July 18, 2024 at 9:32 am in reply to: Book Pageturn Overlapping Issue

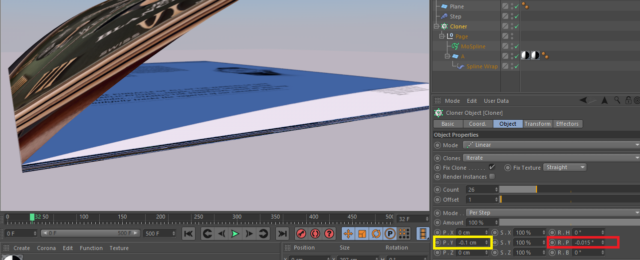
    Amazing! I worked on your file yesterday for several hours to fix it, but I could not radically solve the problem. I just reduced the overlap, so I left the matter to return to it later. Then I now saw your post. It was a smart move on your part. I congratulate you on that. What is strange is that I previously changed the height in the cloner, but did not occur to me to change the rotation value. In the attached screenshot, in the red box is the rotation value that you changed so that anyone who faces such a problem will know how to solve it. In the yellow box, I changed the height value slightly to a negative value to show that the book has several pages to give a realistic look.

    Thank you very much for sharing the solution and file with us.

  • Kouraib Abdmalek

    July 16, 2024 at 6:52 am in reply to: Spot light VOLUME flickering on each frame

    The same principle. I think the cause of the flickering is that the scene doesn’t have enough sample rays, especially since you are not using the light volume on an opaque model. So with RedShift, In the GI settings set both Primary and Secondary engines to “brute force” and increased the brute force GI rays from 16 to 512.

    I hope this helps you.

  • Kouraib Abdmalek

    July 16, 2024 at 5:51 am in reply to: Book Pageturn Overlapping Issue

    Welcome back! Please when you try that please let us know what you got.

  • Kouraib Abdmalek

    July 14, 2024 at 1:23 pm in reply to: Spot light VOLUME flickering on each frame

    Hi Alex,

    If you zoom in on the tip of the cone, you will find a distortion due to weak resolution, and as the light moves, that distortion becomes like a flickering, as happened to you. I don’t know, perhaps the reason for that is that the calculation of light and shadow is low with volumetric light. I think that to control that, you have to convert the shadow to Shadow Map, you will then find that the resolution is only 250. Raise it to the maximum possible value. The same applies to the Sample Radius, you will find it 5, raise it also to the maximum possible value (you could lower these two values ​​slightly from the maximum value if this affects your rendering speed). I hope this is helpful for you.

Page 28 of 51

We use anonymous cookies to give you the best experience we can.
Our Privacy policy | GDPR Policy