Forum Replies Created
-

Brendon Murphy
September 29, 2020 at 3:22 am in reply to: how to make the blending of an image like this?For the basic color treatment:
-Fill a new layer with the tan background color.
-Put your photo on top of that layer.
-Boost the contrast of your photo with a levels or curves effect, crushing the blacks and blowing out the highlights.
-Set your photo layer’s blending mode to “multiply”.
-Add a black and white effect to the photo layer, tinting it to taste for a sepia tone.
For the chromatic aberration around the edges of the photo (color splitting):
-Merge your layers into one
-Duplicate the resulting layer twice, so there are three instances
-Starting with the bottom, go into the Channel Mixer effect. Go to the green and blue dropdowns and change those values, which will say “100”, to 0.
-Apply a channel mixer to the middle layer, except this time turn the red and blue to 0.
-Add a channel mixer to the top layer, this time with the red and green to 0.
-Change the top two layers’ blend modes to “lighten”. It should now look like your original image again.
-Add a “Spherize” filter to the top two layers with a small positive value. Say, 5 and 8.
Done!
-
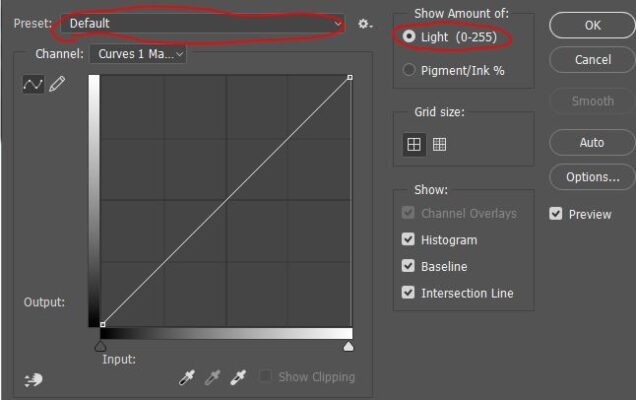
Is “Adjustments” not available under the Window menu?
-
Make sure you are using the “default” preset and “Light”, not “Pigment/Ink%” (see image).

-
Brendon Murphy
September 29, 2020 at 2:42 am in reply to: Replace part of an image in photoshop using a black and white matteHi, Keith.
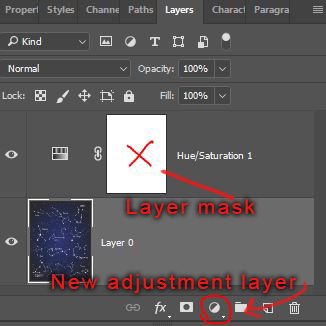
1. Drop your black and white mask into the document and copy it to the clipboard like this:
Ctrl+A to select all, then with your C4D mask selected, ctrl+C to copy. Turn off the layer and ctrl+D to deselect.
2. Add a new adjustment layer, then hold the alt key while clicking the layer mask (see red X in the image below). When it opens, ctrl+V to paste.
3. Click on another layer to return to the main view.
-
Brendon Murphy
September 28, 2020 at 10:35 pm in reply to: Need help learning how to remove text from a video clipIf you do not have access to the original test tube image – freeze-frame the first frame after the fade and paint out the text with the clone stamp. Then re-create the appearing hexagons and throw an animated overlay over the left side to mimic the previous look. Precomp and add a subtle push-in.
-
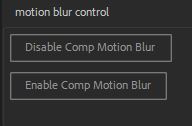
I scripted out a quick control for toggling comp motion blur – code below. To install it:
Open the script editor window under File>Scripts>Open Script Editor. Paste the code into the window and save the file somewhere. Move the file into the ScriptUI Panels folder and restart AE. You will then see the tool under your “Window” menu. The panel, shown in the image, is dockable.
function disableMoBlur(){
var items = app.project.items;
for (var i = 1; i <= items.length; i++) {
if (items[i] instanceof CompItem){
app.project.item(i).motionBlur = false
};
};
alert(“Motion Blur DISABLED On All Comps”);
};
function enableMoBlur(){
var items = app.project.items;
for (var i = 1; i <= items.length; i++) {
if (items[i] instanceof CompItem){
app.project.item(i).motionBlur = true
};
};
alert(“Motion Blur ENABLED On All Comps”);
};
//set up dockable GUI
{
function myScript(thisObj) {
function myScript_buildUI(thisObj) {
var myPanel = (thisObj instanceof Panel) ? thisObj : new Window(“palette”, “Motion Blur Control”, undefined, {resizable:true});
res = “group{orientation:’row’, alignment:[‘left’, ‘top’],\
groupOne: Group{orientation:’column’, alignment:[‘left’, ‘top’],\
myButton: Button{text:’Disable Comp Motion Blur’, alignment:[‘left’, ‘top’]},\
myButton2: Button{text:’Enable Comp Motion Blur’, alignment:[‘left’, ‘top’]},\
},\
}”;
//Add resource string to panel
myPanel.grp = myPanel.add(res);
//set up button functions
var runFirstButton = myPanel.grp.groupOne.myButton;
var runSecondButton = myPanel.grp.groupOne.myButton2;
runFirstButton.onClick = function(){
disableMoBlur();
};
runSecondButton.onClick = function(){
enableMoBlur();
};
//Setup panel sizing and make panel resizable
myPanel.layout.layout(true);
myPanel.grp.minimumSize = myPanel.grp.size;
myPanel.layout.resize();
myPanel.onResizing = myPanel.onResize = function () {this.layout.resize();}
return myPanel;
}
var myScriptPal = myScript_buildUI(thisObj);
if ((myScriptPal != null) && (myScriptPal instanceof Window)) {
myScriptPal.center();
myScriptPal.show();
}
}
myScript(this);
};
-
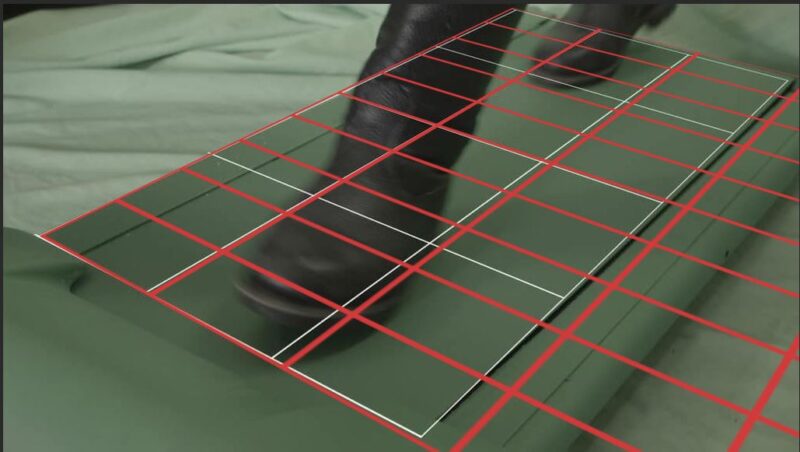
This is what I got with a quick manual lineup. 40mm lens when using a 35mm sensor.
-
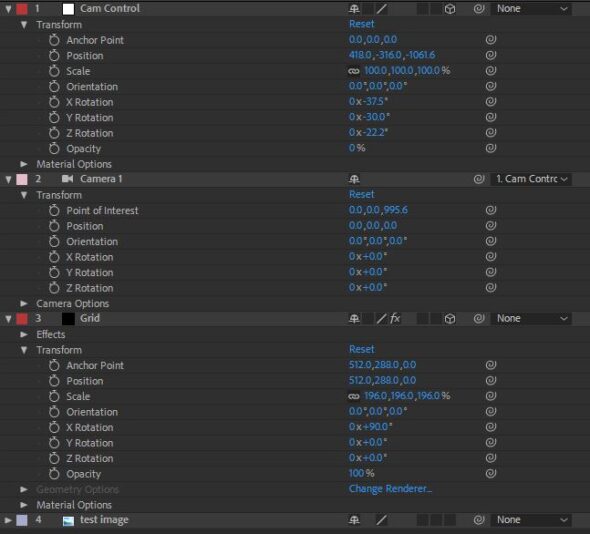
The classic method is to use some 3D solids with a grid effect on them. Depending on your image, it generally helps to set them up as a ground and two side walls. Then move the camera, not the solids, to line up your scene.
You will need to set the sensor size and focal length of your AE camera to match the real-life camera. Hopefully you have this info. If not, you’ll need to test several focal lengths until one fits your grids. If your image is a camera still, there may also be exif metadata embedded with some of the needed details. Some tracking apps, like pftrack, also have a focal length estimator.
I’ve also seen people use a software called fspy in conjunction with blender to assist with aligning a camera to an image. May be worth a quick look: https://fspy.io/
-
Brendon Murphy
September 17, 2020 at 1:36 am in reply to: Anyone know how to can print these exact circle size on a letter size (8.5×11)?Not sure what you’ve tried so far, but I have good luck saving to a photoshop pdf and printing through acrobat. Make sure you use “actual size” in the print dialogue. One issue I see in your design is that there’s no margin. Many printers cannot print all the way to the edge of the page.
So in short:
-Create your graphics in an 8.5″X11″ document at the exact size you would like them to print (use your rulers under the “view” menu, and guides to check everything).
-Keep graphics at least .25″ from the edge of the document
-Save as photoshop pdf (high quality or press quality preset should do it)
-Print through acrobat using “actual size”
-
By “under transform”, I mean within the fractal noise effect, not the layer properties.