Forum Replies Created
-

I haven’t rendered as .MOV in Vegas for a good while, but I believe you have to apply Levels with the Computer RGB to Studio RGB preset to the whole project.
To add an effect to the whole project click on the fx icon left of the video preview quality selection (top left of Video Preview tab).
-
If your project is already finished I suggest you go with your project resolution as then you will get exactly what you saw in the preview in terms of aspect ratio and potential black bars.
“Looks good enough” – personally I’d say if it looks good for you – then it’s probably good – your project, your vision. Rendering in a different format likely won’t make your film look much better, there’s no magic dial for that, just minor optimizations. Professionally, however, I’d recommend you go for the better format and a higher bitrate.
MP4 is very widely used for digital distribution, because of its compression capabilities.
ProRes on the other hand is used for professional production to maintain as much quality as possible. 4:4:4 option having the highest color accuracy and largest file sizes.So MP4 vs ProRes – ProRes is the superior format for your use case, but I honestly doubt the difference would be all that big in your case. Also Vegas Pro 17 does not have Apple ProRes rendering templates – they were added with version 19 or 20 so you won’t even find them.
Between MP4 and MOV – in your case I might stick with MOV. Just increase the bitrate. In my opinion 24Mbps at this framrate would be solid. The minimum of 30Mbps for an MP4 mentioned by Sebastian is already too safe I would say, at least at this framerate & resolution. I don’t think I could tell the difference without extensive pausing and pixel peeping.
I mainly deliver materials for digital distribution and mp4 is what I basically always use (MAGIX AVC/AAC MP4). Doesn’t matter what format the source footage is.
And I’ve set my audio bitrate to 320 000 bps. You can go lower, but perhaps not below 192 000.And I believe I’ve outlined this before, but really there is no universal standard, everyone has their own guidelines and you might even have to re-render this project in the future to adhere to them. Consult with the festival(s) to avoid misunderstandings.
-
Could have something to do with the project contents or maybe some deprecated features. Hard to guess without an error message or more context. Is it one project or all projects?
I have a couple of ideas in mind:
1) Enable all deprecated features in Vegas Pro 20. Options -> Preferences -> Deprecated Features
If you used .mkv files – that’s in the File I/O tab.2) Rename the folder(s) where your project assets are located in and try to open the project with all of the files in offline mode. Then it will be clear that the issue lies there
3) Have you tried to drag the project file in the timeline of a new Vegas Pro 20 project? Doubt this will have any effect, but I’m curious if anything different will happen – maybe an error message?
4) If you have the old version still installed – you could try and open your project in there. Select all, copy everything and then paste it in a new, blank project in Vegas Pro 20.
-
To answer your first question:
Yes and no. You are right that both results are HD, likely visually the same. The quality setting affects the following: Scaling, field handling, field rendering and framerate resample/IFR quality. So if your project doesn’t make use of these – you might not notice the difference. For scaling it’s a change between modes and the others it’s an on/off switch. So really I’d say that it has an impact, but in most modern cases it’s not too noticeable. Just set it to best and forget about it. Also I believe that the setting that matters is the one within Project Properties; not the one above the video preview. Plus this can also be overwritten by the setting in your rendering template, project tab.Second question:
I wouldn’t aim for lowest possible, I would aim for highest allowed. Yes, there is a point of diminishing returns, but that kind of depends on your footage. For example, comparing a video that consists of 5 still images and a video that consists of 5 action shots – the latter has a lot more information so it needs more bitrate to display it without visual degradation. Lower bitrate = more compression, higher bitrate = closer to lossless. Personally I want to show my projects as close to lossless as possible.I suggest you do some test renders of your most action-filled scenes and see at what point you start seeing artifacts. Add 1Mbps on top and that would be the lowest point. If you can go higher – just go higher to be safe. If it’s an on location showing – there’s no real reason to hold back unless they have specific guidelines – there isn’t a unified standard.
If it’s uploaded to some video service like youtube or vimeo – there will be extra compression on the platform end regardless (in those cases I suggest you re-render your rendered video at a higher resolution – allows for higher bitrates on the platform). -
I tried to replicate this by adding a random clip and making subclips of it. However, when I moved the original file – the subclips also went offline. They will remain in the project media list – that is correct, but they aren’t playable in the timeline, meaning they’re linked to the original file.
I can’t really explain why reversing a clip turns it into a subclip, but I also haven’t ran into any issues with it + I do find regular subclips pretty useful at times. This isn’t a glitch, there are no duplicate files, but there may be additional .sfk files
I believe the problem here is how you approached the replacing process. If I wanted to replace footage I would right click on it in the Project Media tab and click Replace. Then browse for the new footage and click Open. Then all of the subclips also get updated without issue.
-
Aivis Zons
July 24, 2023 at 3:51 am in reply to: A way to selectively paste event attributes more selectively?Color correction is a rather manual process as the results are often subjective, not much automation there. Or rather you can probably find some plugins that would give you a good LUT or automatic levels based on source, but I feel like that would be over-complicating what’s otherwise a simple task, plus I’d likely want to tweak the look afterwards anyway, which somewhat defeats the purpose.
What I can suggest is that you take the same approach for color correction as for sharpening. Create a separate track for the black and white footage and add a color correction to the whole track instead of individual clips. You could also stack effects if necessary – one major correction for all and if one or two clips slightly differ you can add an extra effect on those separately.
If you’re looking for a suggestion as to which effect to use – I’d go with Levels or Color Corrector.
-
Aivis Zons
July 23, 2023 at 4:17 am in reply to: A way to selectively paste event attributes more selectively?Hmm… that’s a shame. I’m using Vegas 20, not sure at which version this feature was introduced.
In this case I’d say you have to go with an alternative approach. Assuming you need to increase sharpen by the same amount or maybe two or three different amounts you can use Track FX. If you haven’t used Track FX before – basically this allows you to add effects to a whole track; works essentially the same as Event FX with some minor caveats.
So the setup would be you have your main track with your footage with no sharpen and then one, two or however many additional tracks with varying levels of sharpness (if necessary). And then you’d simply move footage up or down, depending on if they need sharpening or not. Won’t be perfect for cases where you also have crossfades/transitions and only one clip needs the sharpen though, but should still be quicker than adding the effects one by one.
As I described previously: seeing that you don’t have the button for Track FX visible, you can select it from the list you get when clicking on the three dots (in your case 3 lines) at the top left corner of a video track. If you click on “Edit visible button set” you can enable the button for Track FX.
Your setup with this approach should roughly look like the attached image. I’ve highlighted where you can find the Track FX button.
Another way that came to mind if separating your footage in multiple tracks like this isn’t an option is you can create sharpen presets (or use existing), highlight all the clips you want to apply it to and then double click the preset from the Video FX tab. This will add sharpen to each clip, but be careful as if you want to change the effect properties further on – you’ll have to do it one clip at a time.

-
This is either from some asset pack or a basic animation made in After Effects. Vegas Pro isn’t really built for such motion graphics, would be very hard to recreate this specific asset.
I suggest you search for something like “motion graphics border frame video asset”. Though I’d say it’s unlikely you’ll find something just like this as this example is super basic. Or in other words – I don’t see why someone would share this as a standalone asset, more likely made specifically for this project.
If you manage to find an animated frame asset you like – in Vegas Pro you’ll have to add a Clock Wipe transition on top if you want to match your example.
If you were to recreate this in After Effects you’d have to create a rectangle, remove its fill, enable stroke, add dashes and animate their offset. Do some customization and that’s it. Except in After Effects you’d add a “Radial Wipe” effect on top – same transition, different name.
-
Aivis Zons
July 22, 2023 at 4:25 pm in reply to: Does AEJuice Noir Film plugin work with Sony Vegas Pro 13 ?I haven’t used this plugin myself, but taking a closer look at it, and watching their video on this plugin, I’d say for Vegas this wouldn’t really be a plugin, but just an asset pack.
They had a demonstration within Filmora and it showed manual assembly of the whole scene, layer by layer, letter by letter. While in After Effects you could just edit already built compositions – much quicker, easier and more what you’d expect from such a pack.
So the compatibility here is bare minimum. If you get this pack I strongly suggest you use After Effects for it, because the Vegas Pro workflow here would be… tedious to say the least. Very time consuming.
-
Aivis Zons
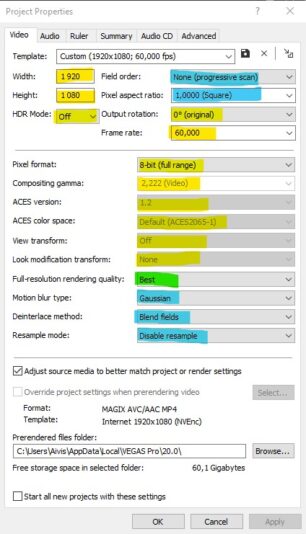
July 22, 2023 at 4:03 pm in reply to: What should my project properties be for best rendering?The “best” project properties tend to differ from project to project. Depends on where your video will be published, broadcast or shared.
For context: Most of my projects are either published on YouTube or
random personal projects. On occasion there’s some work for TV broadcast
and in that case you just have to go with their guidelines and match
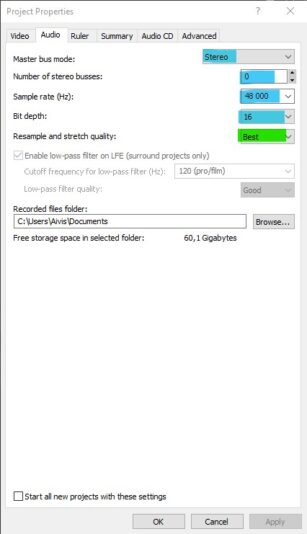
every setting you can, there are many standards.I’ve attached pictures with my settings and color coded the fields. These definitely are subjective, so take this info with a grain of salt.
Yellow: Settings that typically should match the project media and/or render settings, adjusted most often.
Blue: Settings that I practically never change, but there have been edge cases. Maybe 1/300 projects.
Green: Settings I never changeAudio settings I actually don’t remember ever changing besides first time setup, but if you’re exporting audio only or work with 5.1 then they likely come in handy.