Forum Replies Created

Page 5 of 10
  • There is a way to be more selective, but not sure if it will be right for your case.

    After the “Selectively Paste Event Attributes” window opens, you can select which attributes you want pasted. To be even more selective you need to click on the 3 dots on the left, which I’ve circled in the attached image. One thing to look out for is that “Delete existing FX on target event”. Basically the caveat here is that there isn’t an option to directly “replace/update” just one effect if you have multiple on there already. You can append, or remove all and append your selected effects (by default it removes all and adds what you copied).

    If you need to sharpen all clips for the same amount, you can add that effect to the track(s) instead. If you don’t have the button for Track FX visible, you can select it from the list you get when clicking on the three dots at the top left corner of a video track.

  • Aivis Zons

    July 22, 2023 at 3:09 am in reply to: Create video with varying framerates

    Could it be that Smart Resample is enabled on the project? Project Properties -> Resample mode, select Disable resample. Or alternatively, you could disable it only for the one clip. Right click on the clip -> Switches -> Disable Resample.

    If that didn’t help then maybe try changing Field order in project/render settings – set it to None (progressive scan). This setting can also be changed only on the clip – right click -> Properties -> Media and there should be a Field order dropdown.

  • Don’t know of any native solutions and didn’t find readily available basic scripts either. If your goal is to make the text smaller, you could just go with Pan/crop and copy/paste that.

    But luckily there is a tool that could do exactly what you’re looking for – Vegasaur. You can install it for free and you get a 30 day trial period without any restrictions.

    After you install it, it should appear as a new icon at the very end of the top toolbar. Select your text media, click on the new Vegasaur button -> Effects -> Titles & Text, a new tab should appear and in there check and set the new parameters and click apply at the top right corner.

    And in case it didn’t appear on its own – here’s some instructions from their website: https://vegasaur.com/install?p=Vegasaur&v=4.0.1

  • Wow, I had completely forgotten about quantize to frames toggle, you’re absolutely right! Was really wondering how you got extra precision there hahaha

    Glad I could help otherwise!

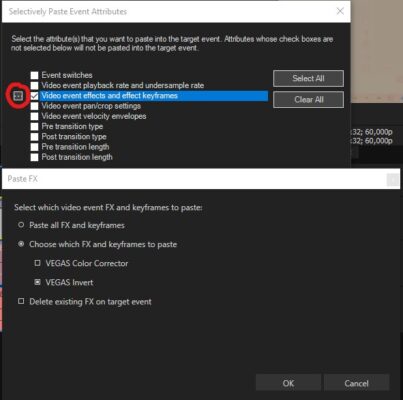
  • I was able to replicate the error by installing the script from the wrong folder. I believe you used the .dll files from the “Sony” folder, but you should’ve gone with the “Magix” folder contents. Vegas Pro changed ownership to Magix with version 14 and that Sony folder is reserved for older versions.

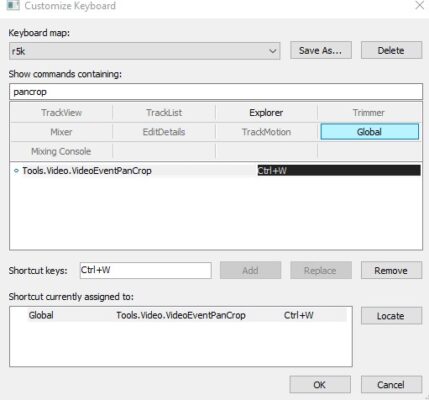
    As for the measures & beats – couldn’t find any mention of implementing them in scripts. However, I don’t think that they give any extra precision when it comes to video, they’re meant for audio production and easier syncing to audio. I tried zooming in all the way on my timeline and switching between Time & Frames, Measures & Beats, Absolute frames, but you can only ever cut frame by frame – there’s no extra frames from switching between time formats – they’re only visual guides.

    Technically, you could increase project framerate and then you get something “extra”. So if my project is 60fps, I switch to 120fps in project settings, cut 1 frame, back to 60fps – I will have footage the length of half a frame, but I’d say you can’t really work with that, might introduce additional problems along the way; better to stick with native/target framerates.
    Bottom line – if your video is a standard 30fps, then there’s exactly 30 frames in a full second of footage; no more, no less. The frame number is an integer – can’t snap video to frame 30.1, 40.72, 0.5, etc. Audio seems to be a different story.

  • Can you be more specific with the error description? Hard to say what “an error” could be.

    But to add a few miliseconds to the start of the clip – it only now occurred to me you could actually use the “Trim+Captured+Clips+v1.0” script I attached previously for slipping footage too. So you have to edit the script file and change the value for StartTrim in line 39 to a a negative value.
    Like so: Timecode clipStartTrim = Timecode.FromFrames(-5);

    This will add 5 frames to the start of your clip. And then if you don’t want to affect the end of the clip set the EndTrim value in line 40 to “0”. Or if you set it to “5” in this case – it will be the same as slipping the clip 5 frames – original start will be 5 frames in, original end will be 5 frames out and cut off.

  • Wouldn’t that be slipping the clips? So if you hold Alt and click and drag a clip to the right in your case – that would move the footage forward, but maintain the same position in timeline. Then the original beginning would be x frames into the clip and the original end would be x frames out of the clip, so cut off.

    There’s a tool for batch slipping here: https://tools4vegas.com/slipslide-tools/
    Installation instructions are on the site, and to use it you first have to run the config script, set the values and then the Slip Right script. Config script aside – the process is the same as for previously mentioned scripts.

    As for the time format – you’ll probably have to switch to time & frames for accuracy, but I believe it might be 5 frames? Not sure, honestly haven’t ever used measures and beats.

  • If I understood your problem correctly – you need to trim the beginning and end of many clips by the same amount – then you need a script for this.

    Luckily I did manage to find a couple of scripts just for this task. I’ve attached two that I tested and updated to work in latest versions (not taking any credit for these – I just edited 1 line).

    “Trim front and back.js” – as it is now it will trim 5 frames from the beginning and end of everything you have selected. It ignores grouped media that isn’t selected, so you have to select video and audio clips. After you run the script it will leave gaps – you can close these by first selecting the area you want to close the gaps for with a loop region, then right click within the appropriate track and click “Close Gaps”.
    If you want to edit the trim amount – open the script file with a text editor like notepad++ and in line 29 where it says “var trimAmt = new Timecode(“00:00:00:05″);” – that timecode value is what determines trim amount; right now it’s 5 frames.

    “Trim+Captured+Clips+v1.0.cs” – here you can define separate values for start and end trim amounts. Line 39 for start, line 40 for end of clip. As it is it’s also set to 5 frames for both. Same process as for previous script, but this one also closes the gaps. Didn’t test this as much, but also worked fine after fixing for latest versions.

    You can run these scripts by first selecting your clips and then going to Tools -> Scripting -> Run Script… and locate the script. One of them you have to extract first as that file format wasn’t supported to upload directly.
    If you want to add them to the list of existing scripts, you have to place them in the Script Menu folder (found where Vegas Pro is installed; for me – C:\Program Files\VEGAS\VEGAS Pro 20.0\Script Menu). Click on “Rescan Script Menu Folder” for them to show up.

  • To go to the next clip in your timeline you can tap the right square bracket ” ] “.

    To open pan/crop you have to create a new keybind as there isn’t one set by default. Go to Options -> Customize Keyboard and search for “pancrop” in the top field and make sure to select the “Global” tab. Then select “Tools.Video.VideoEventPanCrop” from the list, click in the Shortcut keys field and make up your keybind. It will show any potential conflicts at the bottom. Press Add and OK. I’ve set mine to Ctrl+W as it’s a function I use often and it’s right where my hand usually rests on the keyboard.
    In addition I suggest you save this as a custom keyboard map at the top!

    Also if you have to change framing for multiple segments for the same amount you can copy and paste the transforms. So Copy a clip that has the transforms, select the clips you want to paste these properties to, right click on them and look for “Selectively Paste Event Attributes”. Then from the list select “Video event pan/crop settings”.
    Might not work properly if the footage differs in resolution/aspect ratio.

  • This is likely down to the file format you’re trying to import.

    Did a bit of reading and you mentioning it working on Win7 was actually crucial information. With Win10 some file decoding is simply not supported on an operating system level and Vegas Pro relies on that.

    So it seems that you need to convert to another format, couldn’t find mention of any other workaround. Saw mention of this being an AC3 decoding issue at the core, MPEG suffering alongside.

Page 5 of 10

We use anonymous cookies to give you the best experience we can.
Our Privacy policy | GDPR Policy