Steve Bentley
Forum Replies Created
-

Steve Bentley
September 20, 2021 at 3:02 am in reply to: Beautiful translucent flowing fabric/fish tail effectI’ve been working with tracing particles so that’s all I saw – chock it up to tunnel vision. Here’s probably what it is – https://www.marvelousdesigner.com/
This is THE killer cloth sim that can produce (along with the 3D package of your choice), fabrics that look beyond real. Along with deep shader tricks in any of the main render engines there’s little you can’t do.
-
Steve Bentley
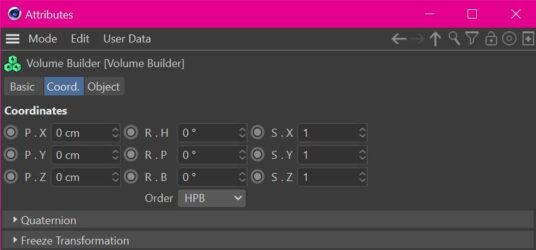
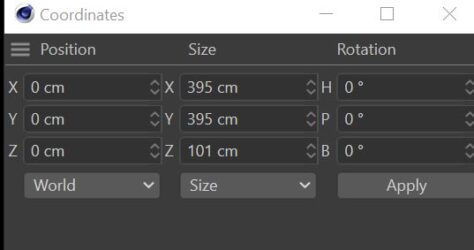
September 20, 2021 at 2:33 am in reply to: Coordinates dialogue and object coordinates still don't jiveHow did you add that image so nice and clean? Mine gets cut off by the image box in the Cow (which hides the header of the dialogue I was trying to show). Maxon isn’t programming the Cow now are they?
-
Steve Bentley
September 20, 2021 at 2:30 am in reply to: Coordinates dialogue and object coordinates still don't jiveOh good – at least it’s not screen dependent dyslexia. I can now officially call this dumb.
Thanks for the sanity check.
-
Steve Bentley
September 20, 2021 at 12:02 am in reply to: Beautiful translucent flowing fabric/fish tail effectHere’s quicky with particles being traced and a hair shader (I’m working on something now that is in the same family so it wasn’t much to make a left turn)
-
Steve Bentley
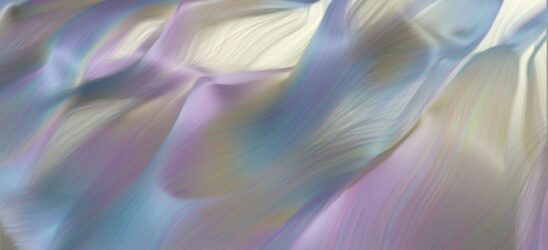
September 19, 2021 at 7:31 pm in reply to: Beautiful translucent flowing fabric/fish tail effectPretty! This is either a cloth sim or an Xparticles sim. (I’m betting the latter). I think this would be doable with TP native inside Cinema and combine it with a Volume object, but the key here is the shader. You might also be able to use a high rez cloth mesh and use a Field Effector to “kink” it along the fluttering length. Again, the shader will be the key.
In Xparticles, the “texture” the particles give off can become the texture of the “cloth” they make. So as the shader changes over time for each particle (or radiating out from each particle) that can leave a trail of color-changing “stripes” the way satin might iridesce.
This could also be TurbulenceFD. What that package can do is just short of black-magic-wizardry.
I suppose it could be a hair sim too – with enough strands packed together you can get a sheet of satin look. Hair shaders have a really nice gleam built in that you could color and that might create those pale blue shimmers.
And then it could be Houdini – with enough code you can do anything!
I’d be curious to see it animate – the mesh might be too high to render in reasonable times.
Don’t discount traditional methods – looking closer I can’t decide if that’s canvas texture or particle resolution. This might be good old fashioned paint.
-
Steve Bentley
September 19, 2021 at 6:41 pm in reply to: Tracer rendering sometimes, and sometimes not.Thanks Jim,
I think it might have to do with the Field Force object I’m using. I’m afraid I can’t test on earlier versions as we went straight from R20 to R24 and the middle versions never got installed. (we’re finally past those legacy projects, Yay!)
The field force object got introduced in R21 or R22 I think.
(I don’t think I can save back from R24 – if there’s a way let me know and I’ll send a version for you to try)
There seems to be an inconsistency that points to either expresso or field force that might be causing this and I’m just about to type another post or two on the subject.
Just the standard renderer and physical for now with the tracer. I was going to run this with Vray but I couldn’t get the Vray hairshader to behave as well as the standard.
Am about to try the Redshift hair and see if that makes a difference – As a sidebar, we’re
just trying to pick a new render engine for a project but can’t seem to
get Redshift to install properly. Vray has been the mainstay but I’m not
sure we’re getting all we could out of it now. ( I was hoping Redshift would be native by now and I wouldn’t have to shell out for it as an extra).Cycles and Redshift look
great while working but the noise in the final renders is a little
concerning. I’ve read that by the time you get all the settings correct for theatrical output (I know… what’s a theater?), sampling, reduced noise, colordepth etc, Cycles and Redshift bog down to the speed where the other big boys run (Arnold, Octane, Vray). When we started with Maxwell back in the day, it was the
best of anything but only for stills and the denoisers were obvious when
blown up on a big screen. I don’t relish going through that pain again. -
Steve Bentley
September 19, 2021 at 5:34 am in reply to: Quick question regarding camera along splineYou can also nest your spline in a null. (Or even two nulls nested to prevent gimbal lock or keep one of the camera’s axis true to its cardinal rotation options) and then have that outer null follow the spline with an align to spline tag. Then at any time you can animate the camera to look away from the spline path without worrying about disturbing the way the null is “aimed”.
This is also good because if that was a real camera you would “lead” the spline. When riding a roller coaster you don’t look at where the car is facing (tangent to the track) you look at what is coming up, giving a sense of anticipation. A real cameraman would do this naturally so doing it in the animation makes the camera move look more real.
If you need to automate this” leading the spline” idea, you can put another null on the spline ahead of the camera rig and have the camera look at that null that is moving either at the same speed or at a speed you animate to control exactly where the camera is looking.
For extra realism, when the camera descends, (and it’s nested inside a null as I suggest above), you can have the camera float a little as it would when suddenly descending – the camera can come away from the spline a little even though the null is still locked to it. And you don’t need to worry about which direction to float in because “up” will always be perpendicular to the spline at that point and you just have to move the camera with it’s Y axis.
-
Sorry if this is redundant (the post said there was 1 reply but I don’t see it here).
Anyway, the answer is “kind of”. Exporting as OBJ, FBX, Alembic and .3ds can all have their textures transport with the geometry (adn in some cases animation too). In some cases you will get one big model as on piece when you reimport it but depending on the importing package you can often break that model into it’s original groups that it had in C4D. Now, whether the textures stay intact, stick to the faces you had intended or keep the same scale is another story – some packages even swap Z for Y.
Often when exporting you get to choose what units you are working in (m, cm ,mm etc) and which way is “up”, so check the export settings in the C4D preferences for the file format you are considering. Make sure who ever re imports it brings it back in at the same units. When exporting you don’t always get a “choose your settings” dialogue but there is one in the prefs for each format.
Keep in mind that things like procedurals (primitives, deformers etc) may not translate and should be made editable or “current state to object” to collapse them into pure polys. This goes double for matrix type objects (mograph etc)
.3ds is probably going to be the most lucky – its such an old format that things have to be made so simple, its hard to screw it up. FBX is probably the next best (and can include the animation). And Alembic the next (this one should be the most robust but not every package is supporting the full format yet). OBJ is the most simple so is usually the easiest to fix when it goes wrong but it’s a gamble – no animation here.
Things like Hair and particles won’t translate at all.
Finally, the render engine will be different so your carefully set up lighting might look very very different.
-
Steve Bentley
September 9, 2021 at 6:19 pm in reply to: Scroll wheel increments up through a list – anyway to control?Thanks Jim, It was nice to see your shining face up there on the leader board when I came back.
We had to stay so long on the Win7 side of things because of ongoing legacy projects that we are only now playing catchup. This problem wasn’t quite so bad back in R20 as the thumb wheel was all one color and therefore appeared larger (and more visible when it gets tiny from many many objects), but the stepped scrolling action was still an issue. I thought there might be more control in R24 since there have been so many crossover products with Houdini (which is infinitely customizable).
I’ve never understood the color schemes that are linked to other “master” colors. What if you don’t want element A to be the same color as what it’s parent is (in the interface color prefs). I’m sure there is a prefs file buried somewhere in text or xml or other that I could tweak manually – there used to be but the file structure has changed. Then I would just have to figure out what the name of the thing is in the list.
What really brought this to the fore is my new demon laptop with its QHD screen – so all the icons got smaller due to the higher rez (I test drove a 4K but on that I couldn’t even see the visibility buttons).
I’ve had to reverse my layout with my second monitor so that the viewport is now on the smaller higher rez screen, and the lower rez but larger HD second screen takes the pallets which lets the icons be a little bigger.
Ah well I guess this is the price of all the new cool stuff in 24.
At least my posture will improve from all the leaning forward and squinting, even though my eyesight will be the next to go.
Cheers
-
I assume that’s just geometry and not parametrics to the veins etc? If that’s the case then I’m afraid its all hard work. You can use the snapping tool to draw splines that stick to vertexes along the vein’s path and then offset them (of super accuracy is needed for a centrally located spline in the middle of the vein).
If the vertex data is organized ( such that as you go down through the list of vertexes and you get clusters of each “ring” of vertexes that make up the vein tube). You could write some code to step through those clusters and find the average of the positions of all the points in each ring cluster and then place a new vertex at the middle average and then join all the new vertexes up.There’s an outside chance that if you scale each vein they may scale to a smaller diameter only. That would let you match to vertexes located centrally to the vein tube, but this is a very outside chance.