Forum Replies Created

Page 2 of 5
  • Hello Tim,

    Unfortunately, Premiere doesn’t show waveforms while you’re actively dragging a clip on the timeline. The waveform only updates after you drop it, and yeah, it does make manual syncing kind of a pain.

    That said, if you’re trying to sync two recordings of the same audio (like camera scratch audio and external mic), there’s a quick way around it: just throw both clips on the timeline, select them, right-click, and choose Synchronize. Then use the “Audio Track Channel” option—it does a solid job of lining them up based on waveform matching.

    If you’re working with music or other elements without a shared audio source, one trick is to use markers. You can place a marker on the timeline where you want the sync point, and another on the clip itself (in the Source Monitor or in the timeline). As you drag the clip, Premiere will snap the clip marker to the timeline marker, making alignment a lot easier without needing to see the waveform move.

    Hope that helps!
    Best,

    Ivan Eldredge G.

  • Sure, here it is.

    Best,

    Ivan Eldredge G.

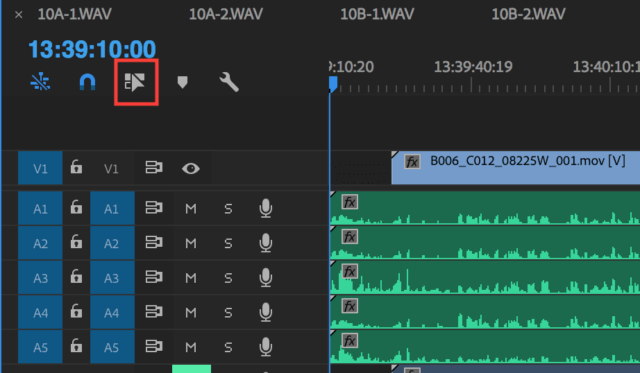
  • Hello Philippe! It seems like Linked Selection might have been turned off, which would explain why you’re only selecting the video or audio instead of both together. Try pressing Shift + L to toggle it back on, or check for the icon in the middle of the ones that are on the upper left part of the sequence panel, if it’s not highlighted, click it to reactivate it.

    If that doesn’t solve it, the clips might have been unlinked manually. In that case, just select both the video and audio, right-click, and choose “Link” to reconnect them. That should get things back to normal!

    Best,

    Ivan Eldredge G.

  • Hello Mark,

    In Premiere Pro v25.1, the Captions and Graphics Panel (Which is now called “Graphic Templates”) is now only for managing templates, both local and remote. All formatting for user-generated titles, captions, and graphics has been moved to the Properties Panel. If you need to adjust text styling, backgrounds, or other formatting, you’ll find those controls in Window > Properties after selecting your text or caption clip.

    Best,

    Ivan Eldredge G.

  • Ivan Eldredge

    February 4, 2025 at 8:54 pm in reply to: Lumetri Color Spill

    Hello Zach!

    Just to confirm, are you asking how to keep the fence in front of the subject so that the color change only affects the dress behind it? In other words, the fence should stay its original color, as if it’s naturally covering the dress?

    If so, you’ll need to create a separate mask for the fence to block the color effect when it passes in front of the subject. In order to achievete it you must duplicate the original clip and place it on a layer above the color-edited version, mask out the fence on the duplicated (top) clip so that it appears as a separate layer, track the mask to follow the movement of the fence as the subject moves, feather the mask slightly to blend it naturally into the scene.

    This will keep the fence in front while allowing the dress to remain color-changed behind it.

    Hope that helps!
    Best,

    Ivan Eldredge G.

  • Ivan Eldredge

    January 25, 2025 at 2:24 am in reply to: Lumetri Color Spill

    Hello Zach! You can control the color change spill by using a mask around the dress and tracking it within Premiere Pro. After you apply the Lumetri Color effect and make the adjustments, you can add a mask on the effect by clicking the Ellipse, Rectangle, or Pen tool on the Effects control panel. After that you can automatically let Premiere Pro to track the mask or adjust the control points as needed if the motion is complex.

    Depending on the situation you are trying to mask out you might want to try the Roto brush tool in After effects.

    Good luck with your project!

    Best,

    Ivan Eldredge G.

  • Ivan Eldredge

    January 15, 2025 at 9:47 pm in reply to: Splitting Audio

    Hello Chip! To display the two audio sources as separate tracks in Premiere Pro, you’ll need to change how the audio channels are interpreted. (Locate the File in the Project Panel, find the related clip, right-click on the clip in the Project Panel and select Modify > Audio Channels).

    In the Modify Clip window, you’ll see options to configure how Premiere interprets the audio channels. Change the Channel Format to Mono if you want each source to appear on its own separate track. Make sure both channels are assigned to their own tracks and click OK.

    Drag the updated clip from the Project Panel into the Timeline. You should now see the audio displayed as separate tracks.

    This way, you don’t have to duplicate the track and pan manually, and it’s closer to the workflow you might be used to in Avid.

    Let me know if you need further clarification!

    Best,

    Ivan Eldredge G.

  • Ivan Eldredge

    January 13, 2025 at 3:06 pm in reply to: How to make this text animation

    Hello Yuval!

    To recreate the text effect from your video, you can use the “Fade Up by Characters” Preset (Go to the Effects & Presets panel in After Effects, search for Fade Up by Characters under Animation Presets > Text > Animate In)

    Apply this preset to your text layer by dragging it onto the layer.

    To animate the character tracking, you can use a Tracking Animator (With the text layer selected, go to the Animate menu under the Character section in the Timeline, choose Tracking to add a tracking animator.)

    Adjust the Tracking Amount keyframes to create dynamic spacing changes over time.

    These combined techniques should help you achieve a similar effect. If needed, tweak the timing, easing, and properties in the Animator to match the exact behavior.

    Best,

    Ivan Eldredge G.

  • Ivan Eldredge

    December 19, 2024 at 11:44 pm in reply to: AI to find and remove objects

    Hi Hector, thank you for your thoughtful response! I just wanted to gently clarify that when using the Ultra Key effect, it doesn’t require manually locating each instance of the red and yellow dots. The beauty of this tool is that it applies across the entire length of the video, removing the keyed colors wherever they appear. So, there’s no need to search for or isolate each dot manually—Ultra Key handles it all at once.

    Sometimes we do look to AI for complex problems, but in cases like this, the tried-and-true tools can often be just as effective, if not faster. Ultra Key has been a reliable solution for years, and in this situation, it’s perfectly suited to the task. Thank you again, and I hope this helps clarify!

    Best,

    Ivan Eldredge G.

  • Ivan Eldredge

    December 19, 2024 at 6:30 pm in reply to: AI to find and remove objects

    You’re welcome! You can use this technique regardless of the video length because the Ultra Key effect applies across the entire clip, no matter how long it is. Once you set it up to remove the red and yellow dots, it will process the full 6 hours automatically, so you don’t have to handle each instance manually. For this specific case, Ultra Key might be the quickest and easiest solution for your needs rather than an AI solution.

    Best,

    Ivan

Page 2 of 5

We use anonymous cookies to give you the best experience we can.
Our Privacy policy | GDPR Policy