Forum Replies Created

Page 53 of 112
  • Graham Quince

    October 4, 2020 at 11:38 am in reply to: Time remap with adujstable length

    Been having a play around with this, as the thing that struck me is that if you’re using multiple videos of different lengths, then an expression using footage(layer).duration will probably help. And if you’re needing to drive videos based on positions which need to “pause”, then the easiest way I can think of is Layer Markers.

    This is what I have so far:

    On the animated layer, use an expression like this:

    pos1 = [0,0];
    pos2 = [500,400];
    vid1 = thisComp.layer("Arrow.mp4");
    vidMarker1 = marker.key(1).time;
    vidDuration1 = footage(vid1).duration+vidMarker1;
    if (time < vidMarker1) {
    pos1;
    } else {
    linear(time, vidDuration1, vidDuration1+2 , pos1 ,pos2);
    }

    This holds at pos1 until the layer marker is reached. Then it keeps holding, until the video has played, then it animates from pos1 to pos2

    And paste this @danebberts masterpiece into the time remap of the video layer:

    len = thisLayer.source.duration;
    L = thisComp.layer("Shape Layer 1");
    if(L.marker.numKeys > 0){
    m = L.marker.nearestKey(time).index;
    if(L.marker.key(m).time > time) m--;
    if(m > 0){
    mt = L.marker.key(m).time;
    if(time < mt+len){
    linear(time, mt, mt+len, 0, len);
    }else 0
    }else 0
    } else value;

    This looks for the marker on the animated layer, holding the video on the first frame, then it plays the entire video.

    Now this isn’t the complete solution, but might be an option. If you check out the Expressions Library(?? – the little arrow in a circle in the expressions options) and look at Interpolation, there’s different easing options.

    Hope that helps

    Graham

  • Oh, no – you’re right. Wow, what is the point of that – well done Adobe! Rage

    I did find that when I was running an expression on the Text of an essential graphic, it was necessary to use a hidden text layer for the Essential Graphic’s source and have a second visible text layer point to the hidden one for it’s source. Maybe that could help here?

  • If you go to Window > Essential Graphics, you should be able to view the comp and see it’s master properties there.

    For the Title property, I think there is a setting to enable font formatting in the edit options(?) checkbox. Then you’ll have more control

  • Graham Quince

    September 26, 2020 at 7:24 pm in reply to: How to Sync audio to animation

    I think the simplest method to explain is that if you expand the Scale property on the timeline and expand the Audio Amplitude on the timeline so you can see the keyframes.

    Then use the Scale’s pickwhip (looks a bit like an @ ) and click and drag this onto the both channels’ Slider. This will have the scale link to the Audio keyframes and if you use the down arrow which has appeared next to the Scale, you will see this expression:

    temp = thisComp.layer(“Audio Amplitude”).effect(“Both Channels”)(“Slider”);

    [temp, temp]

    Click on it to edit and and add *10 (or whatever value) to the first line, i.e.:

    temp = thisComp.layer(“Audio Amplitude”).effect(“Both Channels”)(“Slider”)*10;

    [temp, temp]

  • Graham Quince

    September 26, 2020 at 3:45 pm in reply to: How to Sync audio to animation

    In the menu Animation > Keyframe Assistant there a tool called Convert Audio to Keyframes. This will create a Null Object with the keyframe values. Generally I find these keyframes are quite low numerically. You may need to use an expression to boost the animation.

  • Graham Quince

    September 20, 2020 at 6:04 am in reply to: Linking 2 Keyframes to 1 Marker

    A way to achieve the convenience you want, but in a slightly different way would be to use a linear expression to control the animation between the two keyframe values and trigger this from a single marker.

    This is the expression I use to trigger a highligter in my tutorials which I have on the opacity:

    fadetime = 0.5;

    dur = 2;

    if(marker.numKeys > 0){

    m = marker.nearestKey(time).index;

    if(marker.key(m).time > time) {

    m–;

    }

    if(m > 0){

    mt = marker.key(m).time;

    if(time < mt+dur){

    linear(time, mt, mt+fadetime, 0, 100);

    } else {

    linear(time, mt+dur, mt+dur+fadetime, 100, 0);

    }

    } else {

    0

    }

    } else {

    0

    }

    This expression sets a fadetime of 0.5 seconds, sets a dur(ation) of 2 seconds, so that the highlight fades up in 0.5 seconds, and spends 2 seconds onscreen before fading out again.

    The first IF statment if(marker.numKeys > 0){ checks to see if there are any markers on the layer and if not, sets the opacity to 0.

    If there is a marker, when the current time indicator hits one it sets the mt to be the time stamp of that marker: mt = marker.key(m).time;

    Then the linear expression kicks in, linear ( current time , start time, end time, starting value, ending value.

    My expression also triggers the fade out, but if that isn’t needed in your, something like this would work just as well:

    fadetime = 0.5;

    if(marker.numKeys > 0){

    m = marker.nearestKey(time).index;

    if(marker.key(m).time > time) {

    m–;

    }

    if(m > 0){

    mt = marker.key(m).time;

    linear(time, mt, mt+fadetime, 0, 100);

    } else {

    value

    }

    } else {

    value

    }

    I’ve used value here, so that in “rest” the Position Y property can be set to whatever initial value you want.

  • Graham Quince

    September 12, 2020 at 11:10 am in reply to: Italicizing only certain word in a line in .mogrt

    Adobe have posted in 2019 saying they no this is a feature people want. https://community.adobe.com/t5/after-effects/essential-graphics-custom-font-style-italic-or-regular-or-bold-within-a-paragraph/td-p/10199219?page=1

    I think in the meantime, you’ll have to provide different text layers for the different formatting.

    You could probably use a form of markup to get users to denote italics:

    e.g. “word [i]italic_word word ” or “word *italic_word word”

    then use an expression to break up the text by these tags, but it feels a bit overkill and you’ll end up offering more support to people who don’t understand compared to just having two text boxes labeled: Book Title and Studio/Director etc…

  • Graham Quince

    September 12, 2020 at 10:56 am in reply to: NAB said WHAT?

    I work for an education software company. Each year we exhibit at the UK’s education equivalent of NAB and it’s just not worth the money. Fewer and fewer people were attending before Covid. (I shudder to think of all the handshakes and close contact I had at the end of January). I’d be very surprised if we’ll attend again.

    I think @timwilson is right with his Sony Tsunami analogy. 2020 has accelerated what was already declining.

    Slightly different note, my company runs it’s own conference each year and we moved this one online and ran it as a live, 4-hour broadcast. We had guest speakers, comment areas, published the schedule etc… No one needed to travel, pay for hotel rooms or in some cases, miss work. And as a result we had much better attendance than recent years. I don’t think we’ll be moving back to physical conferences.

    I can see the problem for hardware demos online – it’s not quite the same if you can’t pick up a camera/tripod/light, but for software? Not sure what a physical exhibition offers. It’s a shame in some ways, you miss out on all the hard-to-define experiences, but then you also miss out on catching a bug and being laid up for days when you get back too.

  • Graham Quince

    September 9, 2020 at 2:11 pm in reply to: Expression or Essential Graphics template advice

    Oh that’s brilliant. Thanks for sharing this @filipvandueren

  • This question has been bothering me since I read it yesterday. Probably because I couldn’t get near AE until this morning 🙂

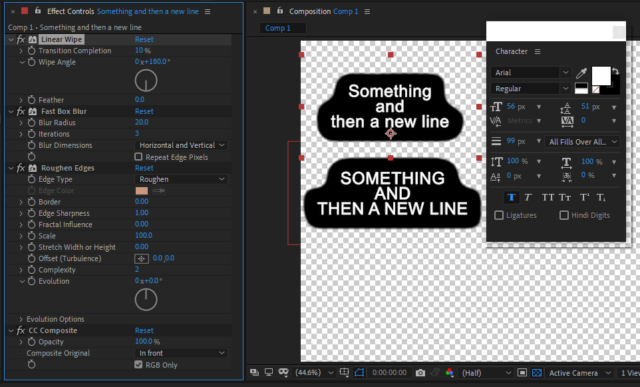
    I quickly tried just using an extreme Stroke on the text, but that left lots of spikes, so I added a Fast Box Blur which softened the spiky bits. Then used a Roughen Edges to make the blur more solid. Then CC Composite to return the Text.

    With block capitals that got the look you were after, but when lower case is included, the top line was wavy – unlike your screenshot. So I added a Linear Wipe to shave the top down.

    Here’s a screenshot:

Page 53 of 112

We use anonymous cookies to give you the best experience we can.
Our Privacy policy | GDPR Policy