Xavier Bonet
Forum Replies Created
-

Xavier Bonet
January 13, 2022 at 4:27 pm in reply to: Help with mechanical motion rigging (circular to linear motion)For some reason neither the images nor the C4D project file I mention in my original post were uploaded to my original post… I’ve zipped them all here and 🤞 this time it works.
-
Xavier Bonet
December 17, 2021 at 12:01 am in reply to: Getting very bad results with Position Pass and Depth of Field in After EffectsSteve, can I further pick your brain? What do you do in terms of Pos Pass when you use tele cameras? When working with a sort of isomorphic aesthetic, I find that the only thing that gives me control is to use a camera from 135mm up. And when I really need to crank it up in order to get a very flat effect, there’s no way I can get the Pos Pass to work correctly…
-
Xavier Bonet
December 13, 2021 at 11:28 am in reply to: Getting very bad results with Position Pass and Depth of Field in After EffectsMan, this is the kind of empirical wisdom I wish I would always get when I come here with an issue! Clearly you’ve been through these 3D existential doubts before and to get a glimpse of your workflow is much more valuable than just getting a quick solution or workaround for one specific issue.
I don’t do much photo-realistic work (just play around with it for my own amusement), so I’ve yet to be able to justify the expenditure of getting Octane, Redshift, etc. But every time I watch a tut that uses them I want them!
This weekend I had a lull in my work, so I decided to go ahead and update to C4D r25. As I feared, they’ve changed things around quite a bit! So that’ll take me a couple of weeks of slower workflow before I get the hand of stuff. But I’m hoping there are some improvements.
-
Xavier Bonet
December 10, 2021 at 10:36 am in reply to: Getting very bad results with Position Pass and Depth of Field in After EffectsI agree that doing everything inside C4D isn’t practical. It’s hardly a one-touch software, even if you don’t go for external compositing (maybe Blender is more one-touch), but, as you mention, I find that it often takes MUCH longer to do things that you can do yourself in, say, AE. And I also find there are some things C4D simply can’t do… which is a bummer. I sometimes feel like I’m making more work for myself but even in this project I’m talking about I’ve had a couple of scenes I’ve opted to export in different layers: subject, foreground, background, etc., and then recomposite in AE. That way I’ve been able to export just one frame of whatever is static, which has saved me a lot of time.
Really, the only time I do everything in C4D is when it’s a still image… and even then I almost always bring it into AE (sometimes PS) to play around with the colours and levels, which I find is much better to do manage outside of C4D. And only when I have, say, 12 hours of render time, do I use C4D’s built-in Physical DoF. I must admit that for photo-realistic work it’s often the only one that really does the job for me.
I’ve got to run some specific tests. Try exporting at 16-bit and 32-bit, even when the preview looks wrong. Hopefully over Christmas I’ll get a couple of days off to go down that rabbit-hole. Honestly, according to what you’re saying, my exports might become much easier, as one of the most tiresome tasks for me is finding the correct Pos Pass value…
Would you say that having “the beans” modelled at real-life scale makes for a better Pos Pass? Or should they be scaled down OR scaled up? Because in order to avoid Pos Pass issues, I’ve stuck to what works for me–which as I mentioned is 0.0001 and around that value, hehe, so you might guess that my scenes are smallish. I started out doing miniature scenes, wanting to have that miniature DoF. Yeah, after finding the “bean tut” I realised I could get effectively get that aesthetic in AE after the fact, but as I started toying around with my miniature scenes that were already done, that’s what stuck. I’ve since tried making real-world scale scenes, and I haven’t quite got the same level of results. Perhaps I just have to play around until I get a good value and stick to that. (BTW, the problem scene I’m talking about here is real-world scale.)
Maybe this is also why I’ve never really been able to effectively crack the Motion Blur part of the tut… I get pretty crummy results all the time.
It’d be great to have that look at your workflow! Thanks a lot. I’m on AE 2020 17 and C4D r21 right now. 😊
-
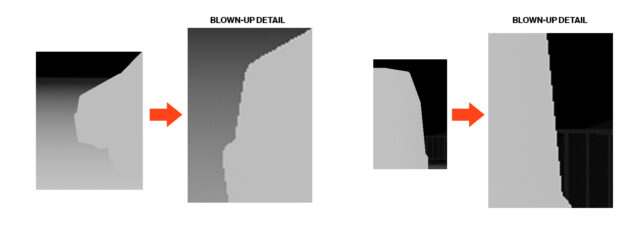
Xavier Bonet
December 7, 2021 at 12:21 pm in reply to: Getting very bad results with Position Pass and Depth of Field in After EffectsUPADATE: I realised I should’ve added an image of the actual Pos Pass, to see if there are any issues you might pick up on. As you can see here, the edges are quite jagged, but there’s no AA, which is good, and the gradient is good (it spans the entire depth of my scene). So it should work correctly… BTW, this is the Pos Pass without any tweaking of levels or B&W points; just inverted.

-
Xavier Bonet
December 7, 2021 at 12:18 pm in reply to: Getting very bad results with Position Pass and Depth of Field in After EffectsI realise now I should’ve added an image of the actual EXtracted result, which would clearly show any issues with my Pos Pass. As I can’t edit my post, I’ll add a reply to my post with the new image below. As you can see there, it looks fine; I can’t see there’s any AA. It should be working correctly.
I always try to get a good gradient from C4D that shows everything in my scene that needs to interact with the DoF. Often, if I’m not careful, I get a Pos Pass that shows absolutely nothing, ie it’s full black or white. Or it’ll show just part of the scene and the rest will probably be “in shadows,” so to speak.
Indeed, I’ve even tried making displacement maps from some of my models (mostly for textures: say a microphone grill mesh), so I’ve needed to add a camera fairly far from the object and at, say, 300mm, in order to ensure everything is perfectly flat. And no matter what I did (I mean, I’ve gone from 0.000001 to 1000), it was impossible to get the Pos Pass to generate a full gradient for the object…
I probably don’t really understand fully how it works… But IMHO it’s the opposite from being a straightforward tool, haha. For instance, it may just be the way I set up scenes, but I’ve NEVER had it over 0.001… So I feel like there’s some room for improvement there. (Especially when you take into consideration that once you go below 0.001, you’re basically driving blind, as it shows up as 0.)
As to the other things you mention:
I always render my EXRs at 16bit at least (in fact, I still follow exactly the same recommendation give in that tut).
I’ve never had that issue with EXtractoR you mention. I always set all channels to blue, and it stays there. Furthermore, because it only turns into a grayscale gradient image when all channels are set to the same “colour,” and I always have to add invert and usually add levels after, as we’ve mentioned, I always have time to realise if there’s an issue as the one you mention. And it’s improbable I would mistake all 3 channels. However, what you tell me doesn’t surprise me; and I wouldn’t fault the tool, but rather Adobe: their CC is the MOST buggy set of software I have on my computers! (And that’s saying a lot, because I mostly use a Windows machine for my 3D stuff! And we all know what Windows is like…)
Then, when I say i export in 4K and then scale down to FHD I mean that I scale the final output, after the DoF has been applied. If I were to scale it down, say, in the Pre-Comp used as the reference for the DoF, then, yes, it would be AA’d by that–and the resulting artefacts would be much worse!
I’ll watch that tut again this weekend to see if there’s any “bad habit” I’ve adopted since I first watched it. But I’m pretty sure I’ve maintained the settings recommended there. If I remember correctly, it’s called “your depth pass is wrong” because people normally use the Depth Pass to get a Z-gradient for DoF, and that pass does use AA, so there aren’t any defined borders. So the tut says that, it might be counterintuitive, but instead of using Depth Pass you should use Pos Pass, which doesn’t apply AA. And Pos Pass is the only thing I use.
-
Xavier Bonet
December 5, 2021 at 1:55 pm in reply to: Getting very bad results with Position Pass and Depth of Field in After EffectsThat’s very interesting, what you say about the using the B&W points (on EXtractoR, BTW) instead of levels… I sometimes have used the B&W points when it’s just a matter of bringing up one or the other level so the gradient is actually visible; but as the levels UI is so much more practical, and “visual,” I almost always use the levels instead. It’s much faster: drag 1-2-3 and you’re done! But I never thought there might be OR later realised there was a difference in using one or the other. As soon as I’m able I’ll test this out on the project that prompted this post. I’m not too hopeful, as I’m pretty sure that a first test I did (to see if the scene was set up correctly to have a nice DoF) I just used EXtractor, Invert and that’s it; I didn’t touch levels or B&W points, as I wanted to see if I got a nice DoF “out of the box,” so to speak. Still, I would like to see what the difference is between using one or the other.
What do you think might be causing the halo or rather bleed, though? I don’t think I’ve ever seen that… at least not that I remember.
-
Xavier Bonet
December 3, 2021 at 5:20 pm in reply to: Getting very bad results with Position Pass and Depth of Field in After EffectsThanks for your response! Indeed, that’s the tut I watched many years ago that taught me this process that usually works very well.😁
Thing is, in the same scene, another camera, another object, the jaggedness isn’t so noticeable.
I’m constantly toying around with the value, as you mention (though for some reason my scenes always tend to go down to 0.001 and thereabouts), to always try and get a good gradient that catches all the depth of my scene. Indeed, when I get stuff like too much jaggedness, I play around more, but nothing changes. I’ve always got it on Camera (as a pose to World, etc.) Also, in AE I invert the gradient you get with Extractor, as by default it puts black as the closest to the camera and white as the farthest; I don’t remember if that tut mentions it (it’s been ages since last I watched it all) but if you don’t invert it you get issues with the blur not looking right. I use levels to get a shallower depth of field (as I find that upping the Radius value on the FL Depth of Field makes the render much slower, when you can get the same result by upping the contrast on the EXtracted sub-comp and keeping the Radius lower). Also, I always keep that <i style=”font-family: inherit; font-size: inherit;”>EXtracted sub-comp on top of the Adjustment Layer that applies the effect. Etc. Basically to show that I think I’ve covered all the bases, but still can’t get perfect results every time.
But what worries me more in this case (because the jaggedness I can solve) is that “bleed” you can see from the focused object into the background. With everything correctly set up… I really can’t think of any other instance in which I’ve had this issue. Or at least it’s never been as evident as to call my attention to it.
As it stands, because this project has a tight deadline, I’m going to have to export each plane separately and then add Gaussian Blur to each, and animate it manually. But I really would like to get to the bottom of this for the future.
If you have any other tuts that you think might come in handy, please do let me know! That one was great when I found it. Unfortunately, there aren’t many… Some years back I also found that wonderful plug-in Z-Blur, which would come in to save the day when Position Pass was being capricious, as in this case… unfortunately, it stopped working afer R19, and I don’t know if there’s an equivalent for newer iterations of C4D.
-
Xavier Bonet
July 12, 2021 at 4:13 pm in reply to: Suddenly having severe issues exporting with Premiere Pro CC 2020Hi, Jerry. Thanks for your answer. I’m trying both! Usually I use AME but it’s failing too much. So right now I’m exportin directly from PPro and that’s having a bit more success. Still, there’s something seriously wrong. Unless the source files from the camera are somehow corrupt, I don’t know how this could be happening, as I’ve made 20 different projects and they all have issues (some more, some less).
As to your second question: after each successful export I’m deleting basically EVERYTHING from my computer… everything I can think of that may contain any temp file from Adobe. Still, I’m having to export each video an average of 5 times before I can get it to export without any issue.
For some videos I’ve had to end up exporting 10 secs. at a time in TIFFs and then recomposing the correctly exported sequences on top of the audio.
I’m at the end f my tether with this project… ?
-
Hi, Eric, thanks for your response! This is definitely a quicker solution than exporting/reimporting. But it still is a workaround in my opinion, when it could (and indeed I’m sure it used to be) as easy as one click. It’s not something I’ve needed too often, but the couple of times I have I have in my mind that there was literally a mixdown option, that is it said “mixdown audio” or “mixdown audio into new track”, something like that. I don’t know… maybe I’m crazy, haha! But for now, until I get to the bottom of this mystery, I’ll be using this trick you linked to. It never occurred to me that by nesting the clips and then replacing them with a rendered version they would render as one file (which is basically a mixdown, granted); I figures that they would always be rendered and reimported as individual clips, albeit within a nested comp. Thanks again for the tip!