Forum Replies Created

Page 9 of 1014
  • Mark Suszko

    February 6, 2021 at 4:58 am in reply to: Entering a hole in the ground — Help?

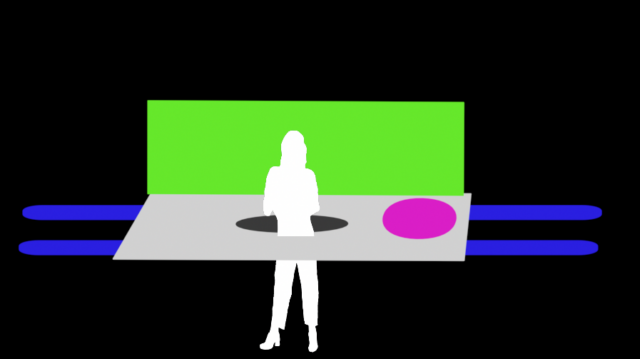
    Part of this, you solve with the choice of camera angle. You can shoot down from a high angle, and make a very small chromakey set work. Heck, the sunroof of a car could be used as the hole from that angle. With a low angle, you’re doing old-fashioned trick photography, layering a fake foreground, and using a discarded cardboard fridge shipping box from the alley behind the appliance store, painted green with a hole cut out. It’s sexy to make the shot a “one-er”, but, easier to break it into three angles and use cutting to help transition your actor at and into the hole.

    Also, shoot it with a good camera, then make it look like grungy CCTV in post; results will be much better.

    This is a trick you might not have considered, and it’s based on the very old concept that the eye only sees what the lens captures. You can make the hole VERTICAL in a wall, or just on a driveway, or in a garage, and show your actor in one continuous shot, working into or out of it. Nobody is expecting it, so they won’t recognize it. Because you laid in greenscreen cloth and/or paint (again, a big sheet of cardboard or 4×8 insulation foam sheet will do), the replaced background and the right kind of lighting angle will sell the viewer that it’s a hole in the ground.

    If the manhole cover isn’t too heavy, attach it to the wall section with a magnet, so the actor can reach for it and slide it around, but it otherwise looks like it is held down by gravity. Ernie Kovaks would LOVE this trick. And probably used it at least once himself.

    Another variation is, to take a 4×8 sheet of wall board from the Home Depot, cut a manhole aperture in it, add 2×4’s across the underside that extend like a medical stretcher. Add fake grass or actual sod, or use paint to make the board seem to be concrete. Your actor stands on regular ground, two assistants lift or lower the device, WHICH HAS THE CAMERA MOUNTED RIGHT ON IT. Because the audience doesn’t expect the camera to be mounted to the “ground” , the mental relationship they get is that the “ground” is stable and the person is the one moving. They think the thing that is moving, is the person standing in the hole. The background should be in soft focus and you use short depth of field. Pick the right real-life exterior backdrop and it should,”read” like what you want, because the sunlight hits everything the same angle, or green screen the wall, or add the green or blue screen to the back of your hovering hole sheet, at a right angle. The wallboard for this is like, 20 dollars a sheet. Less, if you buy an ugly one on clearance.

    Check this example of a guy “hanging: from an elevator car in an elevator shaft. He’s just laying on a board attached to a forklift, driving up and down a hallway. What sells the effect is the prop elevator car floor attached to the front of the forklift, and the Dutch Angle the camera is set in, plus the type of lens setting. This is my favorite scene in the movie because it was effective but also super-inexpensive. Creativity and imagination can make up for a low budget. https://youtu.be/T5YTXnnQjC4

    Some contents or functionalities here are not available due to your cookie preferences!

    This happens because the functionality/content marked as “Google Youtube” uses cookies that you choosed to keep disabled. In order to view this content or use this functionality, please enable cookies: click here to open your cookie preferences.

  • In addition to the good advice already given, try to capture a full frame from each camera of a real color bar or chip chart, not the internally-generated camera bars which are useless. Shoot the charts under the show lighting, then you have a real point at which to line up a split screen and tweak while watching the scopes.

  • Mark Suszko

    January 18, 2021 at 10:57 pm in reply to: Anyone have a rec for a portable green screen?

    Due to covid making so many working from home, wanting to spiff up their online look with a key, the portable pop up type of screens have gone way up in price and down in availability. You can buy big rectangular cloth screens on ebay and amazon, I did, but most of these are not fully opaque, requiring them to be doubled-over if there’s any kind of light behind the cloth, or the addition of a black cloth behind them. i ended up hanging black cloth behind my green, but I knew it was not the best and was picking it based on size/dollar. It works for my uses. Photographers paper rolls remain a reasonable option, Savage is one such company but there are others. If you can get matte vinyl instead of paper, I think that’s more durable, but will cost more. I have never heard a bad word about Rose Brand in New York, and they will send you, (on request) an actual sample card of their green and blue screen materials for evaluation. Rose brand serves TV and Stage pros.

    The other thing I always suggest for home studio greenscreen is cheap kitchen vinyl sheet flooring; the cheapest, marked-down, end-roll stuff they sell, as long as the reverse side has a nontextured, coated base. These take chromakey or limbo cove paints well, (after a primer coat of Killz brand latex primer) and are much more durable than paper, if heavier. They curve great. It’s a little too heavy to be really very portable, though it can be rolled up and stored more compactly in the studio.

  • Mark Suszko

    December 30, 2020 at 5:00 pm in reply to: Black bars fill effect

    I have one other idea for you, Luigi:

    MPEG 2 isn’t always wide screen; the default can be SD TV 4×8 screen ratio for old fashioned DVD content. There is a widescreen SD anamorphic mode that converts to 16×9 screen ratio. Maybe try looking for that? If you sent in your files as mpeg4 I don’t think you would have the problem, but I know many producers are at the mercy of the very cheaply-operated local cable stations that don’t always run the most modern tech facilities. I used to have to re-master our high def programs into cropped 4×3 versions for certain cable access channels because of those exact reasons.

  • Mark Suszko

    December 29, 2020 at 9:37 pm in reply to: Black bars fill effect

    Hello Luigi. If the station shows your program with bars on the sides, but the program itself is not stretched or distorted, then there is a mis-match in the technical format of your finished and delivery recordings. You will need to make a change in the rendering settings of your editing system. I have no experience editing with Vegas, but I’m sure that at some point in the project settings or rendering settings, you get some options for the frame size and ratio of pixels. The display is 16:9 but your 480 pixel width does not stretch to fill that ratio. Do a very short test project with the mpeg2 settings changed to 1280 x 720 for your screen dimensions, and I hope your problem will go away. Have a great New Year, and success in your next season of shows!!!

  • There were three main brands of electronic graphics back in the beforetime, but Chyron was the most popular. My experience of it was the Chryron VP-2: Two fonts (they came on eprom chips and had to be installed), six sizes, and eight colors, yee-ha! It had a few tricks you learned over time: those eight colors could be “animated” by sequencing them rapidly – I could create an animated marquee light effect with that, or a tripped-out pulsing color effect.

    Before electronic type on screen, back in my college days, and in the early eighties at my first TV job, they still often used “Title cards”; White letting on black cardboard, or white cards with black lettering, shot with a dedicated camera and luminance- keyed into the video. Our art department would make the art cards for us using hot press type or “Zip-a-tone” rub-on transfer lettering. If you wanted a fancier font than Times New Roman or Arial from the VP-2, and color and other effects, the women in the art department had to hand-make each graphic. Some time later, they got this very expensive machine (at the time) that could electronically make color slides, imagine that!

  • Mark Suszko

    December 24, 2020 at 7:53 pm in reply to: Working w/AE Editors

    If you are farming out the AfterEffects work to a sub contractor, yeah, you’ll need to talk to them first and give them as much info about the job as possible, to get their estimate on time and cost. You also need to figure in that the AE person’s first try at it might come back with changes needed, either by you, or the client, so that time for changes needs to be figured into the overall bid as well.

  • Mark Suszko

    December 22, 2020 at 10:37 pm in reply to: Working w/AE Editors

    You bill the client by the project, the editor bills you by the hour. You bill the client in three phases: a third down to start the work, a third at some agreed mid-point, the final third upon delivery. You should have a similar deal with the editor. It starts with a very detailed briefing to describe the actual deliverables and schedule. You have to see a script and storyboards to help gauge how much time will need to be spent in post. Those time estimates are calculated against your established internal hourly or day rate, to get to a ballpark figure for the project. But there’s a lot more to it than that, and typically AfterEffects is just one component of the many post production tasks involved.

  • Mark Suszko

    December 19, 2020 at 6:02 pm in reply to: Audio monitoring level change

    In my analog days, this was often caused by phase cancellation. If you shift an audio track by one frame, ignore the ensuing echo, but tell me if the loudness is then correct. That would prove it was phase cancellation

  • Mark Suszko

    December 6, 2020 at 2:48 am in reply to: Alternative to Vimeo for business use

    “…the upload from QT to flash is fantastic and it streams great….

    (Checks calendar, confirms it is 2020) “Um, okay…?”

Page 9 of 1014

We use anonymous cookies to give you the best experience we can.
Our Privacy policy | GDPR Policy