Kevin Camp
Forum Replies Created
-

I don’t believe you can affect the point size of part of a singe source text with expressions, but I’ve done something similar with two text layers and a sourceRectAtTime() expression to make the second text layer follow the first.
Try this:
Create two text layers and type Hello into one and World into the other, then parent World to Hello (this isn’t totally necessary, but it makes the expression a bit simpler and you probably want them to stay together anyway).
Add this expression to the World layer’s position property:
rect = parent.sourceRectAtTime() ;
w = rect.width ;
value + [ w, 0 ]
The World layer should now follow Hello and you can change the point sizes of the layers independently, but both layers are right next to each other.
Assuming you want a space between them, you can add that in the expression by adding the amount of pixels you need between them, something like this:
rect = parent.sourceRectAtTime() ;
w = rect.width ;
pad = 30 ;
value + [ w + pad, 0 ]
-
To do it for free (if there aren’t any free plugins) look for tutorials for analog video to get some good techniques — there are probably good posts and tutorials here on the Cow.
Some basics for that Kerrang! logo would be to use a layer with fractal noise where the height scale is scaled way down and the width scale is scaled up, so it creates a horizontal texture. Hide that layer and then create an adjustment layer with the Displacement Map effect and chose the fractal noise layer as the Layer Map. Set the Vertical Displacement to 0 and then animate the Horizontal Displacement and you should start to see a similar distortion.
Unsharp Mask can start to create the ghosting around the edges.
That’s just to get you started : )
-
Do you want the logo to move at some angle and then bounce off the edges and continue bouncing (like the logo for some dvd players/devices when they are in sleep mode), then I think you can use Particle Playground.
Try this:
Create a comp, add your logo, hide it and then create a new comp-sized solid, then double click the rectangular mask tool to create a layer sized mask and add the Particle Playground effect.
In Particle Playground, in the Cannon settings, key frame the particles per second to go from 1 to 0 over 1 second and set those keyframes to hold keyframes. This should produce one particle to be emitted.
Set the Direction property as needed, set Direction Random Spread to 0, Velocity to around 500 (you can adjust later) and Velocity Random to 0.
In the layer Map settings, set Use Layer to your logo layer (note you will want to have the logo at the scale you need before you bring it into your comp).
In the Gravity settings, set Gravity to 0.
In the Wall settings, set the Boundary to the layer size mask (probably called ‘Mask 1’)
If you preview, you should have a logo that travels around the screen, bouncing off the edges, but it will probably rotate a bit as it bounces.
To fix that, add a new 50% gray solid and hide it. Then in the Persistent Property Mapper settings set the Use Layer as Map to the 50% gray solid layer and set Map Red to Angle and Map Green to Angular Velocity.
At this point the logo should travel around the screen, bouncing off the edges and remain straight. In the Cannon settings, adjust the Direction and Velocity as needed.
-
You may be able to use Compound Arithmetic. I’ve used it in similar situations, but it depends on what you needs are for the ‘copied’ text layer….
Try creating a new solid and adding the Compound Arithmetic effect, then selecting your text layer as the source and ‘ARGB’ as the channels in the effect settings.
You should get a perfect copy of the text layer, however, it is a rasterized text layer which may or may not work for your needs.
-
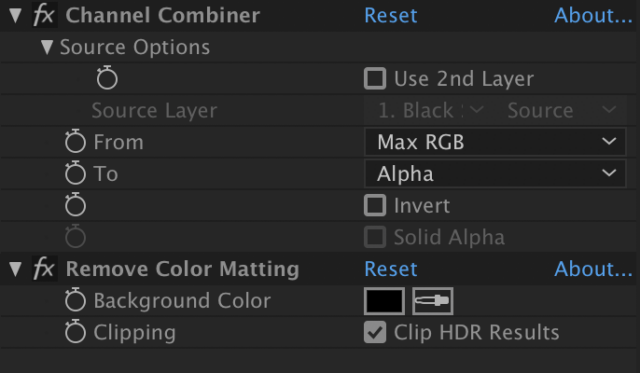
You could try replacing Unmult with a couple standard effects.
This is what I started using when Unmult stopped being free briefly about a decade ago.

-
CC Force Motion Blur is used for other effects that do not support AE’s native motion blur rather than adding motion blur to footage.
ReelSmart Motion blur is a third party effect that does an excellent job of adding motion blur to footage.
Depending how much movement you have between frames, Wide Time may be able to help, it simply composite frames in front and in back of the current frame, which can have the effect of motion blur when the motion is no too fast, but may not give the desired effect on faster motion.
Timewarp can also be used, it’s closer to ReelsSmart Motion Blur, just set the speed to 100 (so you don’t effect the time, and then enable motion blur in the effect and tweak setting from there. I’d suggest using the manual shutter control and adjust the shutter angle and samples.
-
I’d try to compare the sampleImage() of a single point to the sampleImage() that averages the whole image (or a big radius).
Technically it won’t be fool proof, but try this: add a checkbox control to a image layer and then add this expression to the checkbox:
p = [ width / 2, height / 2] ;
s1 = sampleImage( p, [ .5, .5 ] ) ;
s2 = sampleImage( p, p ) ;
if ( s1[0] == s2[0] && s1[1] == s2[1] && s1[2] == s2[2] ) true else false ;
If the center pixel of the image has different RGB values to the average of the whole image, the checkbox should be unchecked.
If the center pixel has the same RGB values as the average of all the pixels, then the checkbox should be true.
Kevin Camp
Art Director
KCPQ & KZJO -
Kevin Camp
September 11, 2018 at 10:14 pm in reply to: Aerial real estate motion tracked property linesin the comp that you have your camera track and the solid with the mask on it, remove the stroke effect (so you just see the solid), and then hide the drone footage layer.
bring that comp into a new comp and add the drone footage too (bellow the comp with the camera track and solid — so you basically have hat you had before).
now select the camera track comp and choose layer>layer styles>stroke. layer styles>stoke should add a stroke around the alpha of the masked solid in your camera tracked comp, but not have any perspective to the stroke.
to show only the stroke (and not the masked solid) twirl down the layer styles>blending modes>advanced blending property and set the fill opacity to 0%, and I think you’ll get what you are after.
Kevin Camp
Art Director
KCPQ, KZJO & KRCW -
it looks like Videocopilot’s Sure Target plugin:
https://www.videocopilot.net/tutorials/sure_target_2/
Kevin Camp
Art Director
KCPQ, KZJO & KRCW -
Kevin Camp
June 4, 2018 at 6:45 pm in reply to: Scale a rounded rectangle in a non uniform way without edge deformationit depends on how the rounded rectangle was made.
If it is a rasterized layer (like a png) then you won’t be able to do it.
if it was made as a mask on a layer, then you won’t be able to use the scale property, but you could select point and move them manually.
if it was made as a shape layer, then you’ll want to use the size property (contents>rectangle #>rectangle path #> size) to change the width or height while maintaining the roundness of the corners.
Kevin Camp
Art Director
KCPQ, KZJO & KRCW