



Darby Edelen
Forum Replies Created
-

[Steve Roberts] “But yes, doubling layers with screen mode can sometimes look good.”
Doubling up Soft Light (or Overlay/Hard Light for more drastic effects) can give you good contrast without crushing any part of your range, as well.
Darby Edelen
DVD Menu Artist
Left Coast Digital
Aptos, CA -
Particular automatically uses the composition’s active camera.
Darby Edelen
DVD Menu Artist
Left Coast Digital
Aptos, CA -
Darby Edelen
June 27, 2007 at 9:34 pm in reply to: Range Selection Properties – Ease High and Ease Low – layman’s terms pleaseTo retract and restate what I said in my previous post, the slope doesn’t change at higher ranges with Ease High, it is based on the selected value. So the graph for something like Triangle with 100% Ease High will look much like the default graph for Round. The point at the top of the triangle (where the selected values are higher, not range values) will be more rounded.
The same is true for Ease Low, only at lower selected values.
Darby Edelen
DVD Menu Artist
Left Coast Digital
Aptos, CA -
Darby Edelen
June 27, 2007 at 9:17 pm in reply to: Range Selection Properties – Ease High and Ease Low – layman’s terms pleaseI will be your Adobese translator this evening… For this journey we’re going to pretend we’re animating the Scale property to 0% using a text animator. Beware! This is going to be a hefty explanation.
This is sort of a preamble to get us in the right mindset:
It’s valuable to think of the selector as determining what percentage of each character (or word, or line) is affected by the property. If a character is selected 100% in our example then its Scale will be 0% of its original Scale value (set in the Transform properties group). If it is ‘selected’ 50% by the selector then it will be scaled to 50% of its original Scale.
Now, imagine that the selectors have a physical shape (which they sort of do) as in: Square, Ramp Up, Ramp Down, Triangle, etc. Imagine each of these shapes on a graph, where the X-axis reads “Range” and the Y-axis reads “Selected.” So at a ‘range’ of 0% we are at the ‘start’ of the range selector and at an ‘range’ of 100% we are at the ‘end’ of the range selector.
A ‘Square’ shape means that the transition from unselected (0% selected) to selected (100% selected) happens immediately at the ‘start’ of the range and remains at 100% (or whatever you specified in the Amount property for the selector) until the ‘end’ of the range.
The ‘Ramp Up’ shape, in contrast, means that the characters are 0% selected at the start of the range and 100% selected at the end of the range. All pictures in this posting will refer to the selection graph for the Ramp Up shape. Thus concludes our preamble =)
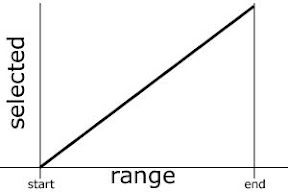
Ramp Up
Here’s the break down on what it says in the Help file:
“Determines the speed of change as selection values change from fully included (high) to fully excluded (low).”
This line is basically saying that Ease High/Low changes the shape of the graph we discussed earlier.
“For example, when Ease High is 100%, the character changes more gradually (eases into the change) while it is fully to partially selected.”
When you set Ease High to higher levels the slope of the graph becomes lower at the high end of the range.
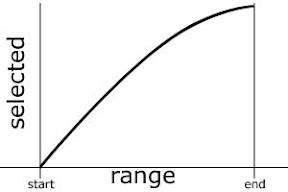
Ease High: 100%
“When Ease High is -100%, the character changes quickly while it is fully to partially selected.”
When you set Ease High to lower levels the slope of the graph becomes higher at the high end of the range.
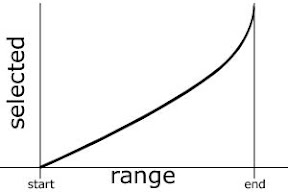
Ease High: -100%
“When Ease Low is 100%, the character changes more gradually (eases into the change) while it is partially selected to unselected.”
When you set Ease Low to higher levels the slope of the graph becomes lower at the low end of the range.
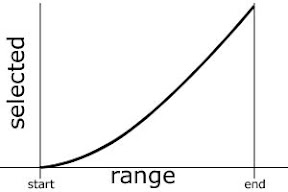
Ease Low: 100%
“When Ease Low is -100%, the character changes quickly while it is partially selected to unselected.”
When you set Ease Low to lower levels the slope of the graph becomes higher at the low end of the range.
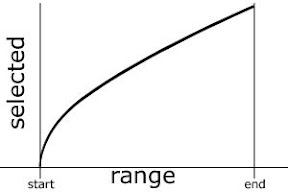
Ease Low: -100%
Note: The values in these graphs are my own interpretation of what I’ve seen happen when these properties change, it most likely doesn’t represent exactly what’s happening inside AE.
Darby Edelen
DVD Menu Artist
Left Coast Digital
Aptos, CA -
Assuming that your source footage was interlaced, AE will attempt to de-interlace it by interpolating the fields. It’s pretty good at guessing the correct way to do this, but you can tweak a couple of the settings to double check it.
If you right click your footage in the Project Panel and go to ‘Interpret Footage>Main…’ (or press cmd-f/ctrl-f with the footage selected) it will open the Interpret Footage dialog.
Under the Fields and Pulldown section there are options for separating the fields (deinterlacing) and removing pulldown. You probably don’t need to worry about removing pulldown (especially since you’re dealing with PAL) but you should see what the setting for Separate Fields is. Generally it is my understanding that PAL will be Upper Field First. If you’re not resizing or moving your footage in the AE comp you might be able to change this to ‘Off’ and get better results. If you find it works better when you separate fields, then you might try using ‘Preserve Edges’ to see if that helps as well. You can check the pixel aspect ratio of the footage (as opposed to the comp) here as well.
Darby Edelen
DVD Menu Artist
Left Coast Digital
Aptos, CA -
My suggestions would be to double check your footage interpretation. If you want your footage de-interlaced, make sure that you have the correct field first in the interlacing section. Also make sure that your composition has the correct pixel aspect ratio.
I would also recommend rendering out to Lossless.
Darby Edelen
DVD Menu Artist
Left Coast Digital
Aptos, CA -
Double check the alpha channel in your file, keeping in mind that black represents transparent and white represents opaque. If these are reversed you can select the alpha channel and hit cmd-I/ctrl-I to invert the values.
Darby Edelen
DVD Menu Artist
Left Coast Digital
Aptos, CA -
[Steve Roberts] “To render with alpha channels, you need to render to a codec that supports alpha channels, such as the Animation codec, at millions+ colours and RGB+alpha.
Then in Premiere, you need to recognize the alpha there.”
This becomes slightly complicated by the fact that there are two different ways to save/interpret alpha: premultiplied and straight.
Premultiplied means that the areas marked as transparent by the alpha channel are filled (‘multiplied’) with a color (usually black) in the RGB channels of the footage. If the program you are importing the footage into doesn’t know how to handle premultiplied footage then you will see a black (or whatever color the footage was premultiplied with) fringe around your footage where the pixels should be semi-transparent. After Effects and many other programs can be told to interpret premultiplied footage as such and remove the black matting from the semi-transparent portions of the RGB channels.
If you render it Straight then the RGB channels will spill out over the bounds of the alpha and you will not see any fringing, but the footage will look very strange if you view it as RGB without alpha transparency.
If you’re not familiar with handling Premultiplied footage then I recommend using Straight.
Darby Edelen
DVD Menu Artist
Left Coast Digital
Aptos, CA -
I’d really like to compile something like this sometime, but for now you’ll have to look at the AE help file (as previously suggested) and ask on here for anything that you can’t find.
Frame by frame movement on the timeline has a few shortcuts:
One frame forward: cmd/ctrl-right arrow key or page down
One frame backward: cmd/ctrl-left arrow key or page upYou can move ten frames at a time by holding the shift key while you use any of the above.
Scaling the timeline can be accomplished easily if you have a scroll wheel:
Zoom In: opt/alt-scroll wheel up
Zoom Out: opt/alt-scroll wheel downDarby Edelen
DVD Menu Artist
Left Coast Digital
Aptos, CA -
Center align your text using the Paragraph panel.
Darby Edelen
DVD Menu Artist
Left Coast Digital
Aptos, CA