Forum Replies Created

Page 7 of 10
  • Aivis Zons

    May 30, 2023 at 11:08 pm in reply to: Go-To filetype for rendering

    There still are MainConcept templates, but I suggest you go with “MAGIX AVC/AAC MP4” and under templates I recommend you make your own and favorite them or just favorite the ones you like. You can then toggle to show only the favorite templates to make the UI less cluttered (Filter button at the top). If you have an NVIDIA gpu, use and/or customize the templates with (NVENC) in the titles – you should get better rendering performance.

    What you want from your template is to match your client requirements, match platform guidelines and to be at least somewhat storage efficient. There’s a lot of “best template” guides around and the gist of it is – higher bitrate = less quality loss. Otherwise just set everything to “best”.

    To render without a sound track simply click on “Customize Template” -> go to the Audio tab -> uncheck “Include Audio”. Might be worded a bit differently if you go with a different format.

  • Aivis Zons

    May 30, 2023 at 10:34 pm in reply to: Track Motion questions

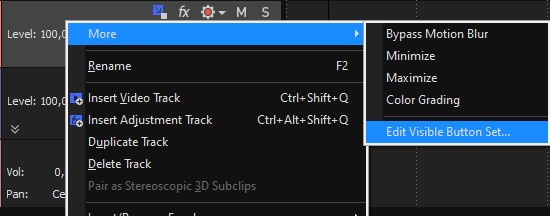
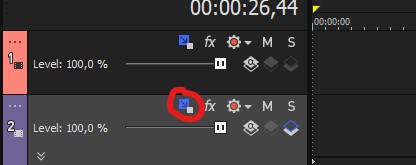
    1) There’s a button for Track Motion that might be hidden by default. To enable it see first image: Right click on your video track -> More -> Edit Visible Button Set -> Toggle Track Motion -> OK. It will then appear on your video tracks as the button I’ve circled in the 2nd image.

    There isn’t a keybind for it by default and I don’t think you can actually add one. I tried and it just didn’t do anything. If you want to try your luck: Go to Options -> Customize Keyboard and search for “TrackMotion” in the top bar. Select it, click inside the shortcut keys field and set it to anything you like. It will show potential conflicts at the bottom.

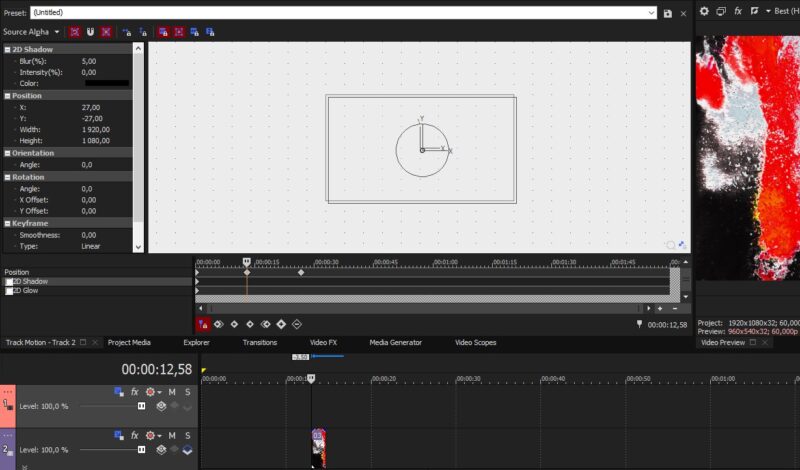
    You can dock this window and have it as a tab next to Project Media, Explorer, etc. – see 3rd image.
    To dock it, you need to open it as you usually would, but hold Ctrl when you move it – this will enable docking. Then drop it into your desired place. Can be a bit finicky, but you only need to do this once. It has “Track 2” in the tab name of my example, but really it shows the last selected Track Motion.

    2) I haven’t encountered this problem myself, so I don’t really have a fix in mind, but there might be a workaround that doesn’t require a restart.

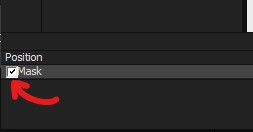
    Technically if you expand the track keyframes by clicking on the arrows highlighted in image 4, you don’t need to see the diamonds in the Track Motion timeline. You can add/move/delete them there; can also right click to change interpolation there for motion (didn’t actually work for other effects in my case).

  • Aivis Zons

    May 29, 2023 at 1:11 pm in reply to: Upgrading my VEGAS Pro 11

    For Vegas Pro – that’s mostly plenty I’d say. If possible I suggest you go for a CPU that has a higher base clock. Might be less power efficient, but I reckon it’ll be worth it overall.

    However, one thing I’d definitely recommend you up is RAM. Go for at least 32GB (2×16) and pay attention to the frequency. Essentially the higher the better. Especially important if you work with higher definition footage.

    GPU and storage looks fine. Just don’t go for the super cheap storage options as they might actually lack some features or be surprisingly slow.

    If you haven’t built systems before I strongly suggest you visit pcpartpicker and first build it there, see if everything’s compatible. You can also check some completed builds there – don’t hesitate to borrow some ideas from those.

  • Aivis Zons

    May 27, 2023 at 6:24 pm in reply to: Move “auto-ripple” button vegas 17

    If auto-ripple is something you toggle often, then I suggest you use a keyboard shortcut instead of pressing the button each time. I believe it’s Ctrl+L by default, but you can change the keybind in Options -> Customize Keyboard and search for “AutoRipple” in the top bar. Select Options.DoAutoRipple, click inside the shortcut keys field and set it to anything you like. It will show potential conflicts at the bottom.

    You can also manually ripple by pressing F after making an edit (F for affected tracks, Ctrl + F for all affected, Ctrl+Shift+F for all).

    As far as moving the whole timeline and/or the attached buttons – I know you can move them to the top of the window instead of having it at the bottom (Options -> Preferences -> Display), but not to the sides. Seems that those buttons are attached and the only way to see more of them is by shrinking the track panel all the way to the left.

    However, if you’re set on using the mouse for this function toggle you can also do it via Options -> Ripple -> Auto Ripple

  • Aivis Zons

    May 18, 2023 at 2:15 am in reply to: Place video on a TV in a shot in a movie

    Assuming the best case scenario where this is a static shot and there’s nothing in front of the TV, you can get by with using the “Picture In Picture” plugin + color correction. So place the TV video above your main footage, add Picture in Picture, change mode to Free Form and move the corners to fit the TV. On top of that add Color Correction/Levels/etc. – whatever you prefer for color correction. This is because there’s likely some light falling on the TV, so it won’t be full bright, there might be a LUT on your main footage, etc. Basically it shouldn’t stand out too much or it will be distracting. Add some blur if it’s out of focus.

    If the scene is not static, you could look into Motion Tracking, but that’s a bit more complex if you haven’t used it before. Though you could also manually keyframe the Picture In Picture corners if you really wanted to (actually wouldn’t take too long if it’s a linear movement).

    If the TV isn’t a perfect rectangle you might have to add a mask either on your TV footage or your main footage. If you go with the latter I recommend you place your TV footage below main footage. Also I suggest you add at least a bit of feathering to your mask(s).

    For best results you’d have to make this setup more complex than what I’ve described and in that case I might recommend you make this scene in something like After Effects instead. I reckon it’d be a better experience. But that depends on your setup, really. If it’s static you can get by with Vegas, but might have to use some track parenting and extra compositing modes for absolute best results.

  • Aivis Zons

    May 7, 2023 at 7:07 pm in reply to: VEGAS Pro 19 build 651 Emergency Patch

    Vegas would suddenly just not start up at all. Workarounds were disconnecting internet before opening a project or setting your date & time back a couple days.

    Weird bug to say the least. Only limited to V19 and V20 as far as I know.

  • Do you have QuickTime installed?

    Vegas Pro can open .mov files, it just needs the QuickTime plugin enabled (Options -> Preferences -> Deprecated Features -> Enable the QuickTime plugin)

    As for the loss of color – it’s likely a difference in color space or something related to HDR or format incompatibility. Hard to say without you sharing the original file. Video players such as VLC typically auto-detect that and correct for it automatically in most cases.

    Solutions – I can only guess… try to install and use QuickTime if you haven’t already (both as a media player and Vegas Pro plugin), when importing the file into Vegas you can open up Properties for that media and change the color space to Rec.709 (just a guess, might not be the one) or you can also do that in project properties (change the pixel format to 32bit to unlock those options).
    On the recording end – see if you’re recording in HDR – that might be the source of this problem. Might be called “Smart HDR” in Camera settings or something along those lines.

  • Aivis Zons

    April 23, 2023 at 10:46 am in reply to: Sony Vegas Pro Replace Background

    Hey Greg, the solution here might be surprisingly simple – you haven’t enabled your Mask.

    To the left of your keyframes, under “Position” – you need to tick the box next to “Mask” for it to be enabled.

  • Have you enabled the QuickTime plugin in Vegas Pro?

    Options -> Preferences -> Deprecated Features -> Enable the QuickTime plugin

    If that didn’t fix it you can render your animations as .png sequences. Just make sure that the framerate is correct when importing in Vegas Pro.

  • Aivis Zons

    April 21, 2023 at 3:18 pm in reply to: Requesting Help on my PC build

    1. I reckon that AMD should come out on top in multi-threaded tasks, but perhaps that’s no longer the case at this price point. I wouldn’t really give much thought to e-cores though. If the pricing and performance makes sense – just go for the better deal, but don’t forget to take the motherboard pricing into consideration.

    2. Quick Sync is likely beneficial in some cases, but can’t really comment from experience. I believe it depends on which codecs you use as I doubt that completely everything is supported.

    3. DDR5 is still pricey and I’d say that the benefit isn’t worth it yet.

    4. Haven’t used an AMD gpu in a very long time, but from what I’ve heard CUDA is still preferred. I’d suggest you look for something with at least 8GB of VRAM and do consider the used market. There should be plenty of 30 series sellers who are selling just to upgrade to 40 series.

Page 7 of 10

We use anonymous cookies to give you the best experience we can.
Our Privacy policy | GDPR Policy