Forum Replies Created

Page 29 of 1278
  • Rather than trying to invert the time-remapping, you can use .valueAtTime() expressions to link a follower camera to the retimed comp’s camera.

    I’ve set this up in a sample project. Take a look and please feel free to come back with questions.

  • Instead of True Comp Duplicator and name-based expressions — which are extremely fragile! — I’d build this setup with Essential Graphics. Then you will only have ONE template comp of each type, and you can build other comps that use it as an instance, passing different data into the Essential Graphics comp and getting different renders back.

    This will make much more sense after you read through a couple of relevant links to get you started:

    https://helpx.adobe.com/after-effects/using/creating-motion-graphics-templates.html

    https://www.schoolofmotion.com/blog/essential-graphics-panel

  • Walter Soyka

    July 26, 2021 at 1:40 pm in reply to: after effects error: invalid image buffer size

    The biggest image Ae can work with is 30,000 pixels in any dimension. Something in your comp is too big.

    If you don’t know which layer it is, I suggest stepping through your comp and turning layers off one at a time until you find the culprit.

    Note that some effects (like blurs, glows, drop shadows, etc.) can expand the image buffer for a layer.

  • Walter Soyka

    July 21, 2021 at 8:01 pm in reply to: 3D camera angles

    Adobe added some new 3D camera control tools to After Effects late last year — well worth a look:
    https://helpx.adobe.com/after-effects/using/work-in-3D-space.html#camera_controls

  • Walter Soyka

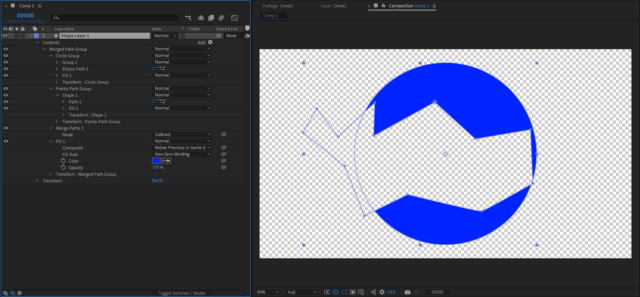
    July 21, 2021 at 11:52 am in reply to: Group KO/Trim Paths

    The order of the groups matters. Here’s an image that shows how to set it up:

  • Walter Soyka

    July 20, 2021 at 6:53 pm in reply to: Editing video with AfterEffects

    Premiere can play back a lot more in real-time, you have all kinds of trimming and rippling tools, so many keyboard shortcuts for editing, better organizational tools…

    There’s no technical compromise in final render quality, but you can work much, much faster in Premiere for most editorial tasks. That means you can iterate more, and that means you can improve the quality of your video (from a creative/editorial perspective, not just a technical pixels perspective).

    I’ve been encouraging people on my team to move more of their work into Premiere for exactly this reason. We do shots in Ae, and sequences in Premiere whenever possible.

    I’d heartily encourage you to spend a few days digging into Premiere and getting comfortable with the tools if you spend any time editing at all.

  • This looked both fun and useful, so I wrote a quick little script to do it. There’s no error-checking in here to speak of, so use it at your own risk, but it should work fine if you set everything up the way the script expects.

    The script requires you to set up a comp for it to work in. You should set the duration of the comp to be the total duration you want the final output to be. Next, add one each of all the elements (footage, comps, whatever) as layers in the working comp. Right-click one of the column headers in the timeline, then choose Columns… and make sure that the Comments column is visible.

    In the Comments column, you can put any integer as the “weight.” This will govern how often you want that particular layer to appear in the final. The default weight is 1, so if you want something to appear twice as often as the default, put a 2. If you want something to appear three times as often, put a 3.

    If you things to appear fractionally more often, you’ll have to do a little math yourself. For example, if you have three layers and you want one of them to appear only 20% more often than the other two, you’d weight the two layers 5 and the third layer 6.

    Once you’ve completed that, with your working comp as the active item with focus in Ae, run the script.

    The script will read the weights for each layer in your comp, and duplicate that layer that number of times, multiplied by the number of complete sets necessary to hit the target length. Next, it will randomize the layer order. Finally, it will prune any layers that begin after the comp ends.

    I hope this can be at least a little educational — let me know if you have any questions!

  • Walter Soyka

    July 16, 2021 at 2:58 pm in reply to: adobe after effects – transparent background

    Tough to tell without the footage, but maybe some of the graphics you’ve imported do not have transparent backgrounds?

  • Walter Soyka

    July 16, 2021 at 2:43 pm in reply to: Constant Value Masking

    If you can get away with using a monospaced font (so all the text aligns to a regular grid), then you can build a luma matte with the Mosaic effect (set to match the text grid) and a Threshold effect (to make the luma matte either full-on or full-off).

    If you cannot make the grid regular, then you’ll have to break each element apart and use a sampleImage() expression on each to look at your matte layer and control the opacity of each element individually. This will be a little slow to evaluate and render.

  • Walter Soyka

    July 16, 2021 at 12:26 am in reply to: Depth of Field Adjustments

    You’re right that both of those should affect the background blur. Make sure you’re in the classic 3D renderer, that you’re viewing the active camera, and that the viewer is not in draft mode.

    If none of that works, maybe post a screenshot of your complete UI so we can see what you see and try to help you troubleshoot.

Page 29 of 1278

We use anonymous cookies to give you the best experience we can.
Our Privacy policy | GDPR Policy