Mike Sevigny
Forum Replies Created
-

Here’s the Final Version of the expression I came up with in case it helps someone.
// ---------------------------------------------------------
// Replicate Auto-Orient > Along Motion Path
// Apply Expression to 3D 'Orientation'
// ---------------------------------------------------------

// FUCNTIONS //
function arraysEqual(a, b, eps){
    for(var i=0; i<a.length; i++){
        if(Math.abs(a[i]-b[i]) > eps) return false;
    }
    return true;
}

function betweenEqualKeys(prop, eps){
    if(!prop.numKeys || prop.numKeys < 2) return false;
    var nearest = prop.nearestKey(time).index;
    var prevIndex = (prop.key(nearest).time > time && nearest > 1) ? nearest - 1 : nearest;
    var nextIndex = prevIndex + 1;
    if(nextIndex > prop.numKeys) return false;
    return arraysEqual(prop.key(prevIndex).value, prop.key(nextIndex).value, eps);
}

function len(v){return Math.sqrt(v[0]*v[0] + v[1]*v[1] + v[2]*v[2]);}

// CODE //
var eps = 0.0001; // Tolerance
var step = thisComp.frameDuration/10; // Divide by 10 for better accuracy
var v = position.velocityAtTime(time); // Current velocity

// If Motion Speed meets threshold
if(len(v) > eps){
    lookAt(position, position + v);

// If Motion Speed does NOT meet threshold
}else{
    result = [0,0,0]; // Default to Zero

    // If the current frame is NOT between 2 identical keyframes
    // This condition matches the original behavior but may not be desirable
    if (!betweenEqualKeys(position, eps)){

        // Crawl Forward frame by frame until motion is found
        var tFwd = time;
        while(tFwd < thisComp.duration){
            var p1 = position.valueAtTime(tFwd);
            var p2 = position.valueAtTime(tFwd + step);
            var disp = [p2[0]-p1[0], p2[1]-p1[1], p2[2]-p1[2]];
            if(len(disp) > eps){
                result = lookAt(p1, p2); // Found Forward Motion
                break;
            }
            tFwd += step;
        }

        // If Forward motion was NOT found
        if (tFwd >= thisComp.duration){

            // Crawl Backward frame by frame until motion is found
            var tBack = time - step;
            while(tBack >= thisComp.displayStartTime){
                var p1 = position.valueAtTime(tBack);
                var p2 = position.valueAtTime(Math.min(tBack + step, time));
                var disp = [p2[0]-p1[0], p2[1]-p1[1], p2[2]-p1[2]];
                if(len(disp) > eps){
                    result = lookAt(p1, p2); // Found Backward Motion
                    break;
                }
                tBack -= step;
            }
        }
    }
    result;
}
NOTE: this expression has the potential to read every frame in your timeline making it computationally expensive in some cases. Save your project before using it.
I was able to match the behavior of the native Auto-Orient > Along Motion Path very closely. What the expression doesn’t account for is when the native function randomly flips all the axis’ 180 degrees or when it sometimes defaults back to [0,0,0] at the beginning/end of the timeline if there are no keyframes. In that respect, the expression might be better.
I tried using toWorld for the velocity to evaluate the parented motion but things became understandably very slow at that point.
-
Here’s a cleaner expression of the 3D version I replied earlier:
// Auto-Orient along Motion Path //
var eps = 0.0001;
var step = thisComp.frameDuration;
var deltaT = step;
function len(v){return Math.sqrt(v[0]*v[0] + v[1]*v[1] + v[2]*v[2]);}
var v = position.velocityAtTime(time);
// --- Case 1: Layer is moving this frame ---
if(len(v) > eps){
lookAt(position, position + v);
// --- Case 2: Layer is stationary ---
}else{
var backwardResult = null;
var forwardResult = null;
// --- Backward search: last moving tangent ---
var tBack = time - step;
while(tBack >= thisComp.displayStartTime){
var p1 = position.valueAtTime(tBack);
var p2 = position.valueAtTime(Math.min(tBack + deltaT, time));
var disp = [p2[0]-p1[0], p2[1]-p1[1], p2[2]-p1[2]];
if(len(disp) > eps){
backwardResult = lookAt(p1, p2);
break;
}
tBack -= step;
}
// --- Forward search: next moving tangent ---
var tFwd = time;
while(tFwd <= thisComp.duration - deltaT){
var p1 = position.valueAtTime(tFwd);
var p2 = position.valueAtTime(tFwd + deltaT);
var disp = [p2[0]-p1[0], p2[1]-p1[1], p2[2]-p1[2]];
if(len(disp) > eps){
forwardResult = lookAt(p1, p2);
break;
}
tFwd += step;
}
// --- Check if we are in a motion pause (no motion currently) ---
if(!backwardResult && forwardResult){
// No backward motion found, but forward motion exists
result = forwardResult;
} else if(backwardResult && !forwardResult){
// Only backward motion exists (motion ended): hold last moving tangent
result = backwardResult;
} else {
// Fallback to default orientation
result = [0,0,0];
}
result;
I removed some of the unused variables/conditions I was playing with earlier. It works perfectly in a lot of cases, but not always.
-
Thanks Dan,
I should have mentioned, it’s actually 3D (orientation) I’m looking for. This 2D version works similarly to what I have in 3D. It has difficulty when the motion is ‘paused’ mid timeline, or if the motion starts later in the timeline, or if the motion ends before the end of the timeline.
Here’s the butchered version I have so far:
var eps = 0.0001;
var step = thisComp.frameDuration;
var deltaT = step;
function len(v){return Math.sqrt(v[0]*v[0] + v[1]*v[1] + v[2]*v[2]);}
var v = position.velocityAtTime(time);
// --- Case 1: Layer is moving this frame ---
if(len(v) > eps){
    lookAt(position, position + v);
// --- Case 2: Layer is stationary ---
}else{
    var backwardResult = null;
    var forwardResult  = null;
    var isPaused       = false;
    // --- Backward search: last moving tangent ---
    var tBack = time - step;
    while(tBack >= thisComp.displayStartTime){
        var p1 = position.valueAtTime(tBack);
        var p2 = position.valueAtTime(Math.min(tBack + deltaT, time));
        var disp = [p2[0]-p1[0], p2[1]-p1[1], p2[2]-p1[2]];
        if(len(disp) > eps){
            backwardResult = lookAt(p1, p2);
            break;
        }
        tBack -= step;
    }
    // --- Forward search: next moving tangent ---
    var tFwd = time;
    while(tFwd <= thisComp.duration - deltaT){
        var p1 = position.valueAtTime(tFwd);
        var p2 = position.valueAtTime(tFwd + deltaT);
        var disp = [p2[0]-p1[0], p2[1]-p1[1], p2[2]-p1[2]];
        if(len(disp) > eps){
            forwardResult = lookAt(p1, p2);
            break;
        }
        tFwd += step;
    }
    // --- Check if we are in a motion pause (no motion currently) ---
    if(!backwardResult && forwardResult){
        // No backward motion found, but forward motion exists
        // We are in a motion pause: use forwardResult until motion picks up
        result = forwardResult;
    } else if(backwardResult && !forwardResult){
        // Only backward motion exists (motion ended): hold last moving tangent
        result = backwardResult;
    } else if(backwardResult && forwardResult){
        // Both tangents exist: pick closer in time
        var distBack = time - tBack;
        var distFwd  = tFwd - time;
        // Bunch of conditions I added to deal with 'pausing' in certain cases (still not perfect)
		if( (((distBack > step) && (distFwd > (step)))  && ((distBack > (step*2)) || (distFwd > (step*2))))
			|| ((distBack > step*2) && ((distFwd > 0) && (distFwd < step*1.1)) ) ){
			result = [0,0,0];
		}else if(distBack > step){
			result = forwardResult;
            // result= [0,0,0];
        } else {
            result = distBack <= distFwd ? backwardResult : forwardResult;
        }
    } else {
        // No motion anywhere: fallback to default orientation
        result = [0,0,0];
    }
    result;
}
I managed to match most of the abrupt turns in the motion but I’m continuing to add conditions to match the behavior of the ‘pausing’. I still can’t seem to get it 100% the same. At this point I feel like I’m making it more complicated than it needs to be.
EDIT: I realize that this expression will be slow, but it’s being turned into keyframes right after so I’m not so concerned about the speed of it.
Mike
-
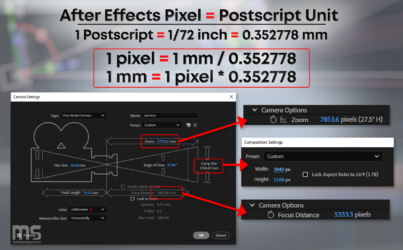
In case anyone is interested, I made a graphic to show the pixel/mm relationship
-
I know this is an old thread, but I recently made a script called Tracker Solver that allows you to add 3D nulls in custom locations after solving the camera in After Effects.
Here’s a short video on how it works:
https://www.youtube.com/watch?v=YZnQF2DVhc8 -
In After Effects 2025, you can “Save as..” and select “Save a Copy as 24.x”
-
Mike Sevigny
January 2, 2020 at 5:48 am in reply to: get bad background with simple light on a solid backgroundHey Bern,
As Greg mentioned, it’s a common problem.Try creating an adjustment layer and adding the Effect ‘Add Noise’. Set it to a low number like 3% and it should smooth out your gradient. ‘Add Noise’ is a lot more cost effective than ‘Add Grain’.
Mike
-
It depends what you’re trying to do. I personally use AME unless I need to do otherwise. For example, when AME couldn’t compress h264s larger than 4096×2304 I used MPEG Streamclip.
Everyone should have MPEG Streamclip kicking around. It’s 100% free and mac/pc compatible.
https://www.squared5.com/Mike
-
Mike Sevigny
March 27, 2019 at 11:52 am in reply to: Scripting – DropdownList Selection/Enabling issueHey Will,
I’ve been working with dropdowns for a while now and I’ve never had to de-select anything. If I programmaticly select a new item in the dropdown, the previous item is automatically de-selected. I’m surprised to see that both items are selected in your screengrab so maybe I’m missing something but try to comment out the lines where you de-select the item and see if it works for you.
It’s a bit difficult to put your code to the test with the given excerpt. I’ve found that I get a better response if I can boil the problem down to a small GUI (dropdown and checkbox) running the problematic function so that the code is easily executable for anyone to help. This is useful to help solve particularly sticky problems and it frames it in a way that is easy to post if it still can’t be solved.
Mike
-
Mike Sevigny
March 27, 2019 at 10:34 am in reply to: Is there any way to seperate a foreground motive via keying?Hey Stefan,
Keylight does not key white/grey/black, only colors. There are other plugins that do but I don’t think this particular clip will key very well. You can try it for yourself though.Keying > Extract
This plugin is native to After Effects. It clips the White/Black of the image into Alpha (like crushing the blacks but the crushed pixels become alpha).
Red Giant Primatte (Keying Suite)
This keyer will key Black/White (as well as color) and has some interesting features that keylight does not
Composite Brush
This might be your best bet at an automated solution. It’s a new plugin that is producing the best results I’ve seen yet. I don’t know that it will be able to extract her shirt but it’s worth trying. (https://aescripts.com/composite-brush/)If you can’t get a clean automated solution, the sure-shot method is to rotoscope the target area and treat it on its own layer.
Mike