Forum Replies Created

Page 42 of 112
  • I hate to promote my own content, but when I made a tutorial for social media callouts, I had the same issue to explain:

    https://www.youtube.com/watch?v=cobn_x6tqHc

    There’s a project download and the tutorial was getting a little long, so in the Description you’ll find the expressions you need for position and anchor points.

    Some contents or functionalities here are not available due to your cookie preferences!

    This happens because the functionality/content marked as “Google Youtube” uses cookies that you choosed to keep disabled. In order to view this content or use this functionality, please enable cookies: click here to open your cookie preferences.

  • I’m in the early stages of planning a tutorial for this sort of thing. (Meaning I’ve written the title on a list, but not yet tried it out.) Here’s my thinking:

    • Create a comp with each glyph on a separate frame
    • Add the comp to another comp and turn on Time Remapping and turn off the second keyframe.
    • Create a text layer
    • Add the expression to the Time Remap property.
    • Once that’s working, duplicate your glyph comp a bunch of times, positioning them next to each other so that when you type in a word in the text layer, each glyph will display. You’ll need to include a space option and possibly something for when there’s no value.

    textArray = thisComp.layer("ab").text.sourceText.split(""); // this puts each letter into its own space in an array.

    glyphObject = { "a": 0, "b": 1}; etc... // use a Javascript object to store the letter : timestamp relationship

    letter = textArray[index-2]; // this layer's level in the comp, ignoring the text layer

    glyphObject[letter];

  • Graham Quince

    May 15, 2021 at 9:32 am in reply to: Trapcode suit clone

    I take it you have an old version you need to use for a project and it won’t run in the updated versions? The folks at Red Giant support are probably the only ones you can help you with this.

  • Alternatively, there’s another approach, where you apply effects to the text layer to draw your text box’s background:

    https://www.youtube.com/watch?v=hjxGLOWrmD4

    Some contents or functionalities here are not available due to your cookie preferences!

    This happens because the functionality/content marked as “Google Youtube” uses cookies that you choosed to keep disabled. In order to view this content or use this functionality, please enable cookies: click here to open your cookie preferences.

  • Graham Quince

    May 15, 2021 at 9:28 am in reply to: Ye Olde LoopOut Problem

    Could you post a link to the YouTube tutorial you’ve used. I think the clue might be there.

    But in the meantime:

    • Time Remapping lets you alter the duration of a video. Using a loopOut expression get the video to loop between its first and last times. Moving them keyframes apart means that the video will take longer to get from the start to the end.
    • Assuming this is a loop of fire, what you need to do is grab the end of the video and extend that. Put you mouse over the right-hand end of the video, until you see the horizontal resize and then click and drag that to the right. Your video will continue to loop.
  • Thank you for sharing. Especially as they are free. I have to confess I hadn’t heard of Bedlam Noise Aparatus, but found a promo for it. To be honest, I can’t see what it does as the cuts are really quick. Could I suggest you post screenshots / videos for each of the plugins /scripts you’ve made.

    I know you’ve offered up MKV files, but (and this is just a suggestion), if you posted them to YouTube, you could more easily get noticed and get the recognition you deserve.

  • Graham Quince

    May 2, 2021 at 8:26 am in reply to: Form particles to a shape

    Have you tried the scatter effect or maybe CC Ball Action?

  • Graham Quince

    April 21, 2021 at 8:54 am in reply to: Intersecting Animated Shapes

    Take a look at the difference layer transfer mode.

    Make sure both circle shapes are on different layers and white, and set background to white as well. Then use the Difference transfer mode on both circle layers.

  • Graham Quince

    April 21, 2021 at 8:51 am in reply to: Straight edge warping

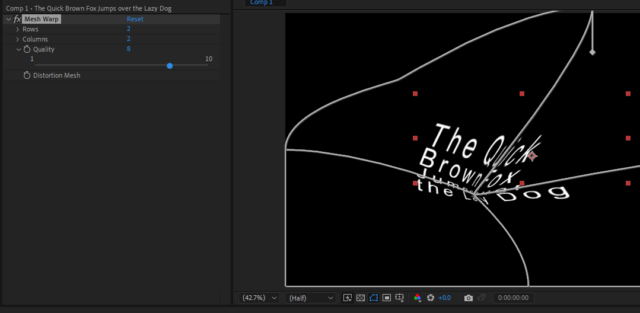
    Check out Mesh Warp. You can reduce the handle to be next to the points, which creates a less curved distortion.

  • Graham Quince

    April 21, 2021 at 8:45 am in reply to: Matching a camera zoom in After Effects

    MochaAE which is included in After Effects might be worth a try. It’s a planar tracker and generally performs better (in my opinion) with these kind of things. AE also includes a camera tracker which recreates a 3D camera – although often the results are difficult to work with. There’s also the original motion tracking that can capture scaling.

    Sometimes you just can’t get a good track. Depending on the shot and the length of it, you could at a pinch, take a still frame of the shot and split it into background and foreground layers, position them within 3D space and use an AE camera. There’s lots of work needed to add subtle movement and grain etc…, but sometimes this is still easier than trying to fix a wobbly track.

Page 42 of 112

We use anonymous cookies to give you the best experience we can.
Our Privacy policy | GDPR Policy