Forum Replies Created

Page 3 of 7
  • Ann Foo

    June 17, 2021 at 12:27 pm in reply to: MC Crash during Audio Mixdown

    Just checking – do you have sufficient space to save the file in the location you are exporting to?

  • Ann Foo

    June 17, 2021 at 12:18 pm in reply to: MC keeps freezing up with Braw and AMA linking

    Avid is a pretty memory intensive piece of software, built and patched from much older and clunkier code. Unlike Premier which is very light and streamlined. So, it’s typical that you can run Premier fine on an older system, but it still struggles with Avid.

    Add to that complication that Avid was never designed to utilize AMA linking (unlike Premier, which was built around the concept of reference media). Avid was originally designed to use it’s own codec (MXF), so it really likes to stick to that. AMA was a feature Avid tacked on to compete with FCP and Premiere, but in my and many others’ experience, it doesn’t work great and you’re better off either transcoding to MXF or cutting in Premiere if you want to stick to reference media.

    The fact that you have to be on half res to play, and it still keeps giving you the beachball, is a pretty strong indication that your system is not handling the b raw footage well. If you’re not too far in, I would strongly recommend transcoding to an offline resolution for ease of editing, and then onlining to full res once locked.

  • Ann Foo

    June 17, 2021 at 12:02 pm in reply to: Exporting AMA linked sequence

    Yes, the mixed frame rates came into avid with no problem. And editing was no problem, it was just exporting which was problematic.

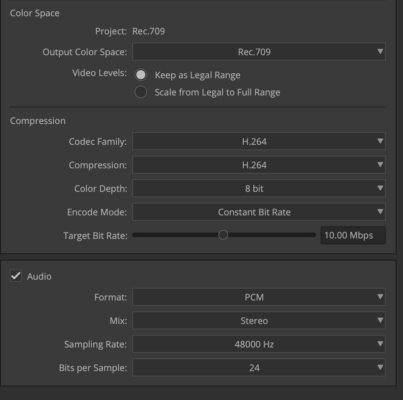
    As I said in the OP, sequence was just 10 mins long, very simple compile of 5 clips. Some clips had stereo audio, some have 5.1 mono mix. (Although pretty sure that wasn’t the problem, since I tried changing the stereo tracks to dual mono with no success.) I posted my export settings above already – stereo mix.

    I think also my setup isn’t the best config for avid. I’m an offline editor so I don’t have the most powerful workhorse. Cutting on a 2019 16-inch MacBook Pro, 2.4 Ghz 8-core Intel i9, 32GB RAM. I offline features with minimal FX and GFX fine, but I always get nervous on export.

  • Ann Foo

    June 16, 2021 at 5:13 pm in reply to: Blowing up 8K/4K footage for different delivery specs?

    You have to punch the numbers of the resolutions. Which is hard when terms like ‘HD’, ‘2K’ and ‘4K’ are thrown around, without specifying what the actual resolution is. Such terms are just umbrella terms for describing a range of resolutions.

    HD usually means 1920×1080 (or ‘Full HD’). But sometimes people call 1280×720 HD also.

    2k can mean either Native (2048 × 1080), Flat cropped (1998 × 1080), or Cinemascope cropped (2048 × 858). I’m going to assume that if you’re delivering for web, they want Native. But, it’s best to confirm with the client exactly what resolution they want.

    4k can mean either Full Frame (4096 × 2160), Flat cropped (3996 × 2160), or Cinemascope (4096 × 1716). You should check with the DOP exactly what resolution they are shooting.

    Once you have confirmation of the exact pixel resolution of how youre shooting and how you’re finishing, then you can punch the numbers. So lets assume they want a 2048 × 1080 delivery, and the DOP is shooting 4096 × 2160. Shooting resolution divide by finishing resolution is 2, meaning that you can scale the footage up by 200% without loosing any quality at all.

    The general rule of thumb is that you can scale up an additional 10-20% and the quality loss will be negligible (ie. imperceptible to the naked eye). Although I personally don’t love doing that because even if quality loss is imperceptible, it still might compromise the colorist/VFX artist’s ability to work, also that you never know how someone later down the track will compress your film, and any compression will be aggravated by quality loss.

    If you’re finishing a HD/2K format, and shooting 8k, your laughing. 8k includes a bunch of different resolution which I can’t be bothered listing, but it genrally just means a pixel width of approx. 8000 pixels. So you could essentially scale up 300-400% or thereabouts without any quality loss – this is approximate, and again you need to confirm the precise resolutions before getting precise calculations.<font color=”#888888″>
    </font>

  • Ann Foo

    June 16, 2021 at 5:12 pm in reply to: Exporting AMA linked sequence

    Thanks Glenn,

    I had actually already tried that, and each clip output fine individually. This is what led to my suspician that the problem was not an individual corruption, it was a frame rate compatibility problem across the whole sequence.
    Curious, if you’ve a lot of exporience exporting AMA on features – did you ever have mixed frame rates, and how did it go?

  • Ann Foo

    June 15, 2021 at 4:35 pm in reply to: Exporting AMA linked sequence

    UPDATE:

    I think the problem is caused by mixed frame rates. 2 clips were 25fps and the project is 24fps. So I transcoded ONLY the 25fps clips, and since David says the error message pertained to audio, I striped back into the sequence ONLY the audio of the transcoded clips (in an effort to keep video as native as possible). This worked. However, it again reinforces that AMA is a pretty useless function if the odds are that transcoding at least some of your sequence will be needed at some point anyway.

  • You can add a marker on the mark in point if you really need to keep that mark.

  • Ann Foo

    June 15, 2021 at 12:59 am in reply to: Exporting AMA linked sequence

    Thanks for your reply,

    If audio related, I thought maybe the problem was I had mixed audio tracks (some stereo some mon), but I just changed all to mono and it hasn’t had a difference.

    I already tried MXF op1 but it also crashed on export. Might try again later. Right now I’m exporting a wav of the audio (which is taking way longer than it should), so I can try restriping audio with a single wav and getting it out that way….

  • I think the answer is no. If you have an in point marked, thats what you’ll get pasted into the sequence, that’s the whole point of a mark-in. Only way around that is to delete the mark-in.

    My question is why are you using a Mark-in as a sync point anyway… this all sounds very clunky. You should be creating sync-ed subclips to edit with. If you do that, you’ll never have to worry about finding a sync point again.

    If, for whatever reason, you are hell bent on marking that sync point in your master clips, I suggest you mark it with a Marker instead of with a Mark-In.

  • Ann Foo

    November 30, 2020 at 4:35 pm in reply to: Zoom/magnify composer monitor

    Ok I fixed this but posting in case anyone needs to know:

    In the end I never found out what the keyboard shortcut was that I accidently hit. But the buttons controlling this function are called ‘Reduce’ and ‘Enlarge’ in the ‘Other’ tab of the Command Pallette. So just map them onto new keyboard shortcuts to fix.

Page 3 of 7

We use anonymous cookies to give you the best experience we can.
Our Privacy policy | GDPR Policy