


Forum Replies Created
-

I shoot a lot of things on my D7000, and rolling shutter is a non-issue at least on what I’ve been using it for (and that includes driving and running shots). Excellent ISO and great overall image quality make it a very useable system. The D800 and D4 look utterly awesome.
The only issue for me with all of these dSLRs is that it is still only 8 bit.
I’ll get really excited when we have a 10 bit log or better camera in this market segment. Till then we’ll still be renting Sony F35, Alexa, or Red for “real” shoots.
-
Andrew Somers
February 15, 2012 at 7:26 am in reply to: Should I upres 1080 DSLR footage to 2048 for R3DLacking information: What is your FINAL DESTINATION format?
TIP: Avoid as many transforms as possible. Specifically, as far as your final output is concerned, *all* of your camera original footage should go through no more than ONE transform.
Tip TWO: Do not scale anything for *final* in Final Cut Blow – the algorithms are terrible. After Effects is okay.
Determine your delivery format, and work backwards from there.
-
I use a Nikon D7000, and love it – excellent low light performance, great image quality, etc etc.
If you want manual aperture while shooting you need a D series (not G series) lens. But other than that, it works splendidly. What follow is a comparison to the oft mentioned (in this thread) Lumix GH2, and also to your Canon Vixia, and your specific requirements.
I have yet to play with the Nikon D4 (out of your stated price range at $6000) but from the specs it blows anything Canon makes, and indeed most dedicated camcorders – out of the water.
One nice thing about a Nikon D7000 – the lenses you get will work on not only the D4 should you upgrade, but also on F-mount RED cameras.
The D7000 DX format is essentially the same size as “Super 35” motion-picture imaging area, and so you also get the same relative depth of field, and same focal lengths for a given angel of view.
The Micro 4/3rd systems are smaller, though not as small as super16 (Super 16 is a 12.5mm x 7.4mm image area, and Micro 4/3 is a 17mm X 13mm image area). So the 4/3 system is somewhere between Super35 and Super 16.
The biggest problem I have with the Micro 4/3 such as the GH2 is the lack of really top quality glass. The line has no fast zoom lenses, and only a handful of fast primes. While there are some good lenses from Olympus, they are as expensive as good pro Nikkors.
Since the single most important part of a camera system is the lens, I’d suggest going where the good glass is – Nikon or Canon.
Since the second most important aspect is the image sensor size (size in terms of height and width, NOT in terms of pixel density), then I’d suggest a camera with at least an APS-C or DX format sensor.
The larger the sensor, the less you have to worry about diffraction limited f stops – while it may be true that a smaller sensor give you greater depth of field (important for documentarians), the small sensor also limits small f stops. such as f11 and f16. (A DX format sensor will let you stop down about one full stop more than a Micro 4/3rd camera before diffraction limiting comes into play).
https://www.cambridgeincolour.com/tutorials/diffraction-photography.htm
A 75mm lens on Micro 4/3rd is roughly equivalent to a 100mm lens on a DX nikon. With each focused at 10′, if the Micro 4/3rd’s 75mm lens is at f8 (diffraction limiting starts to come into play) and the DX’s 100mm lens is set to f 11 (where ITS diffraction starts to come into play), then they both have about the same depth of field.
The thing is, the Nikon has such amazing low light performance, you can seriously stop down and get greater depth of field before diffraction comes into play.
Compared to the GH2, the D7000 has better color depth, two and a half stops better dynamic range, and nearly a full stop better ISO performance.
https://www.dxomark.com/index.php/Cameras/Compare-Camera-Sensors/Compare-cameras-side-by-side/(appareil1)/677|0/(brand)/Panasonic/(appareil2)/680|0/(brand2)/Nikon
And one other thing worth considering – even though the Nikon does have full time autofocus in video mode, in most situations manual focus is preferred during a take.
As such, you can get very high quality used pro lenses for Nikons that are not auto-focus – many excellent lenses for fairly low dollars (Nikons can use any Nikon lens built since 1976).. Even the older, non-VR AF lenses are very reasonable, and excellent bargains.
Summary:
As such, the Nikon D7000 is in your price range, and beats the pants off everything else in that range in terms of image quality and low light performance.
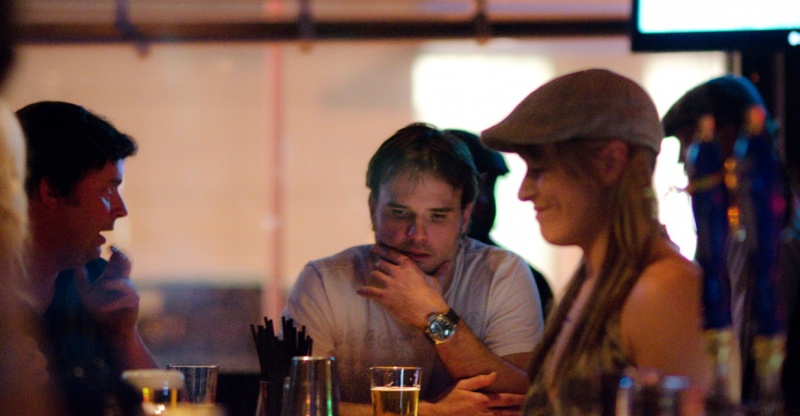
Just for laughs, here’s a shot taken in a dark bar at night, ISO 6400. No flash. It was so dark I had to focus on the profile of the guy’s head because I could not see his face.
To answer your questions, the D7000:
ISO: The only cameras with better low light performance are the Nikon full frame D3S, D4, D800.
BATTERY: I’ve shot full HD 1920×1080 video ALL DAY on a SINGLE BATTERY.
No overheating issues, 20 minutes per shot no problem.
Stereo mic input.
Dual UHS SD cards can make auto backups, or use an EyeFie for auto transfers to your laptop/iPad.
Full manual control of video (to adjust aperture while shooting requires a D lens or a manual AI-S lens, but shutter and ISO are fully adjustable while shooting regardless.)
LAST THING:
I saved your “biggest” issue for last.
You stated that you need a camera that does 30P at 1920 x 1080. the D7000 does 24P at that size, but does 24, 25 and 30P at 1280 x 720.
Okay, you stated that you need 1920×1080 at 30P, and I assume to match your Canon Vixia HF M40. However, your Canon does NOT shoot at a true 1920 x 1080 resolution. Yes, I know you can “shoot” 1920 x 1080, but the *actual camera resolution is only 900 x 800. This is due to the very small (1/3″) single-chip design. It is not a “true” 1920×1080 as the sensor must be “debayered”, resulting in a lower true resolution.
The Nikon D7000 has a 16 MP sensor, so it over-samples by a factor of 8 to 1, and when you are shooting at 1920×1080, you are getting *”true” 1920×1080 resolution. When you shoot at 1280×720, you are *still* exceeding the resolution of the Canon Vixia.
For the record, I worked on a film some years ago, released on 3000 screens nation-wide by FOX, that was shot *entirely* on a Panasonic DVC-PRO HD, and that is only 1280x720P.
In all honesty, once you see the images from a D7000 with a good lens, I’ll wager it will become your “A” camera, and the Canon Vixia will be your new “B’ cam.
-
Assuming you want to be finishing at 24 fps, then shooting at 30 fps will “take the edge off” without being overly slow.
Also, if shooting at 60, try using the longest shutter speed possible (should be close to 1/60), and then use “Twixtor” or “Kronos” (plug ins for after effects), or AE’s own time remap option (with flow field analysis).
In any case, avoid using a shutter speed faster than 1/125 when shooting at 60fps, as motion will tend to be “stroby/stuttery”.
A combination for flow and frame blend should give you some decent variable rates out of the 60 fps.
Don’t waste your time trying to varispeed in Final Cut Blow, as that will only lead to frustration.
-
*And* (to chime in with one additional caveat), what you see in your *viewer* may not be reflected in the render. For instance, if you have OpenGL previews ON, when you render, OpenGL will (normally) be OFF.
This will cause a change in appearance, especially if working in 32 bit-linear colorspaces. Your render will not match what you see in the viewer (your mileage may vary, depending on a lot of variables in your workflow).
TIP: Your OpenGL preview settings (and other color manglement settings) follow the comp – in my templates I have an “output comp” that is setup so the viewer will match the render, and I place the working comp inside the output comp to render, but also to pre-flight before renders to check any potential color or blending issues.
-
Oliver: “The screenshot you made, is that from the original or post? Yes, we used sharpening both on the camera side and post side – the customers wanted more ‘crisp’ and well defined edges. Should I have no sharpening from the camera side – a neutral picture style with no sharpening? What about contrast, saturation and colour tone?”
From the original. To look at independent channels in AE (i.e. see red only) click on the red/green/blue dot icon on the bottom of the VIEWER window.
And yes, to reiterate, set SHARPEN to ZERO in the camera. Do not use sharpen, nor any color correction, at any time before the keying plug in.
SHARPEN MUST BE OFF.
Also, use no color filters on the camera (I once worked on a film where the DP put a *yellow* filter on the camera while shooting green screen making a key impossible. Huh. Can you say “manual roto”? lol).Since you are shooting to an 8 bit H264, I won’t say that you have to totally neutralize the image, though you may find that shooting lower contrast and then boosting contrast in post is helpful. I don’t suggest lowering saturation, since saturation is important for the key. Also, it tends to be easier to reduce saturation later, as opposed to attempting to increase it.
Mainly turn sharpen OFF, keep the highlights in range so you don’t lose detail, and try not to crush your blacks.
Oliver: “regarding keying – we follow this workflow:
1) Effect > Color Key – turn tolerance up to 20, turn feather up a little bit;
2) repeat Color Key 3-4…..Okay, I’d suggest that you don’t use the “Color Key” plug in *at all*. Simplify your effects stack. Use KEYLIGHT only. Or use Primatte. (I would say use Ultimatte Advantedge, but it is no longer supported).
Here are a couple down and dirty keys I puled from your footage, on two different backgrounds (and two different settings). There is one instance of Keylight and then one instance of levels below it. The layer is then duplicated (with keylight) and the keylight settings are very different (much wider choke), with ADD transfer mode for that layer.
Even so, there are still problems due to having to fight the sharpening effect, such as the bits under her arms. And if doing this for real, we’d probably want to paint out that flyaway hair, lol.
Oliver:
3) I don’t understand what you mean here?
6) What screen shrink setting did you use?
7) Should sharpning come before or after keylight?”3) In keylight adjust the black clip to clean up the BG screen noise, in conjunction with GAIN, instead of trying to get a clean screen with gain alone.
6) It depends on the material, but basically just enough to hide the edge.
7) Sharpening should always be after any keying or comping operations, and in fact in most cases it should be last. “Sharpen” does not sharpen the image – it just highlights the edges by increasing edge contrast.. Ypu may find that you can help apparent sharpness by adjusting contrast, using levels or curves, and I suggest trying this before using the sharpen filter.
Hope this was helpful – I think you’ll find that you’ll get an easy key if you:
CLIFF’S NOTES:
1) Turn off sharpen.2) Expose your subject a stop or two brighter than the screen. As a rule of thumb, the green screen should never be brighter than an 18% grey card. In fact, if you took all the red and all the blue of of a grey card, leaving only green, it would be roughly equal to a 7% grey card, which is roughly one and a half stops darker than the 18% grey, and this is about where you want your green screen exposed – 1 1/2 stops under subject’s meter.
3) Consider a back-light/rim light if it will work with your comp background.
-
I agree with Dave in that this does not seem particularly well lit, though you seem to have other issues too.
Footage notes:
I’m not sure if this is your camera, of if this happened wen you created the frame for posting here – but there is sharpening going on!! BAD! If you look at the red channel in your green screen element, you will see a white line around your subject. This indicates that you are using some type of sharpening. This will prevent you from getting a clean edge.Can you upload a bit of the camera original, that has NOT been transcoded – i.e. something straight out of your camera, for analysis?
Look at the RED channel of the image – this is with no keying or any other effect:

Since you used no rim light, there should not be this white line around the subject. This is consistent with an artifact of sharpening.Lighting Notes:
1) A green screen can be as much as two stops UNDER key. In other words, it does not have to be “bright” – it just needs to be as evenly lit as possible, and you can make it two stops darker than your subject. Keep in mind that we are looking for saturation of green here – as you increase brightness/exposure, you tend to decrease saturation. Under-expose your screen relative to the subject.2) If you place your subject farther from the screen, three good things happen:
a) It is easier to keep subject light off the screen.
b) It is easier to make the screen softer/out of focus.
c) You will find it easier to reduce spill on the subject.3) Have as little green in FRONT of the subject as possible. If necessary, lay down duvetyne (black cloth) in front of the subject. This will reduce spill on the first of the subject. Alternately lay down highly reflective mylar on the floor, instead of green on the floor – here, the background green will be reflected in the mylar on the floor, but the mylar will not cause spill on the subject. However, you will have to roto out the subject’s reflection if it is in frame, and you lose natural shadows if you want them.
4) I don’t know what you are planning on comping this over, but that is a factor – in some cases you might want to add a rim light, but not in others. Knowing what this is intended to be comped onto will guide some of these choices.
On Keying:
Despite the problems, I was able to pull a reasonable key using Keylight, thought it’s hard to say for certain with a still frame as some artifacts rear their head more in motion.
In looking at your “keyed” clip, it looks like you are “pushing too hard”.
TIPS:
1) Turn off all color correction for the layer, and make sure any adjustments layers with CC are turned off, as we want to make sure we sample only the original image color. (Also, any color correction on a layer with Keylight should be AFTER the keylight plug in).2) When you use the eye dropped to select the screen color, click on an area of the green screen that is darker. Don’t use the brightest portions of the screen for sampling. I sampled in an area of shadow behind her feet camera right. (Tip: look at the red channel alone, and find an area of the screen where the red channel is the blackest, then turn all channels back on and sample that point).
3) Use a bit of black clip, so you don’t have to crank GAIN too high – but be careful of clipping too much.
4) Adjust gain/clip in “status” mode so that solid areas are white, edges and transparencies are grey, and screen is black.
5) Use a garbage matte, so that you only have to worry about the area around the subject, and ignore the screen areas that may be uneven.
6) Use the “shrink” to hide the edge, and avoid too much screen “blur”.
7) Because the images seems to have sharpening turned on, I cranked up pre-blur a bit
-
Conrad: “and are suggesting the most complicated solution possible. Why not go with the simplest solution first and then work up from there if that doesn’t work?
“It’s not the “most complicated” possible – Having a ton of manual paint/roto is complicated too, not to mention labor intensive.
Manual paint/roto can work well, and it generally the easiest solution for really fast light changes, like camera flash pops, muzzle flashes, etc.
But here we are talking about things like overhead street lights coming in from a distance, then passing,, then leaving for a distance. If the track is traveling at a constant speed, the speed of the light passes will be “variable” in that they start slow, speed up to the pass, then slow down post-pass, as the of the angle of incidence changes non-linearly.
The lights create highlights, and also cast shadows. The shadows in particular move a lot relative to the passing light(s), getting longer, shorter, deforming on the walls and across objects and corners.
Making a bunch of rotos to emulate light and shadow, and animating them to create a convincing effect is complicated and time consuming.
On the other hand, creating a 3D track in something like PFTrack is relatively trivial.
Using the track data to locate shadow catchers is also fairly trivial. The most primitive method – using flat 3D layers in AE with masks to shape the layer to the set geometry is also straight forward.
Animating the AE lights in this situation is trivial. This level is simple, and works surprisingly well. flat layers work find as shadow catchers even on curved object like car hoods. And if the object is static in the scene, these catchers don’t even have to be animated.
In the case of a person in a truck bed, you could have catchers for the sides and floor, and then just deal with the body of the actor with a couple mask-shaped layers that bisect and are at 90 degrees to each other (i.e. the paper cutout man trick).
To improve the results, the next step up is to use 3D objects instead of flat layers – primitives, or something more complex like a body – detail is not critical for shadow catchers (since these are to be used to control an exposure adjustment layer), and so library mannequins can typcially be dropped in. An app like C4D is better suited to this more advanced method than AE, as AE’s object support is poor – but using a 3D app like C4D that does not mean the method is overly complicated.
Both the AE flat-3D-layer and the C4D 3D object catcher method allows for things that are hard to mimic as a 2D paint job. Specularity on shiny objects, shadow,s and highlights that all move together in response to the lighting conditions, against the objects and set, and without concern for camera motion.
Let’s assume his camera is handheld an/or being rocked to mimic truck motion. Or it has a lateral move. Now not only are you trying to animate masks to emulate light over the course of the truck passing under a light, but also keep those masks oriented against the objects they need to affect while the camera is moving.
So, you are going to have to track the shot so you can have a layer with masks that move relative to various objects/set elements. Well, if you have to track it for the roto/paint method, then why not just use a good 3D track and use catchers?
Here are some advantages of using 3D catchers:
1) You can add, change, or remove lights at a later time without having to re-do a ton of animated rotos – all that is needed is a new render pass after the lights are changed. SInce you (in most cases) only need a single channel, and not ray traced, this is a quick render.2) You can add atmosphere/smoke to the lights as a separate channel to increase scene integration.
3) You can have realistic reactions on specular, reflective, transparent, etc. objects.
4) Since you have the environment at this point, it’s trivial to add in reflection maps
5) You can use multiple channels for different lights, and then use the different channels to have color variations between the light sources, as well as using separate channels for the left and right side of the truck, to allow for greater control in the final comp.
Now in contract, the roto method may seem simpler because it does not need any 3D build, and sure, it may be a fine cheat on very short light passes, like a car whipping by in the opposite direction – but how is it going to look on extended light passes that take a few seconds to complete? – these slower, natural light passes are going to be harder to make convincing than a quick flash of light.
Here’s an example of real night driving:
https://www.youtube.com/watch?v=efyvZAesTUQ
This is just some youtube video of a guy driving at night, under street lights. Note the complexity of the interplay of light and shadow. Note that a typical light pass is two to three seconds long over the small space of the dash board, but this would probably play longer over the entire space of the truck bed.
To emulate this look with a bunch of masks is quite complicated – I will not agree that masks are some how “simpler” just because they are 2D. You still have to track, animate, adjust, and spend time on this.
—
Having said all of this, I use 2D cheat techniques whenever appropriate, or a combo of 2D and 3D, etc. It all depends on what kinds of compromises you need or want to make. And certainly it depends on your staff and their capabilities. And it depends on the shot.
Conrad: ” you haven’t seen the shot either and are suggesting the most complicated solution possible. Why not go with the simplest solution first and then work up from there if that doesn’t work?”
The method I outlined in my previous post details a method that will give good results regardless of what the shot is. Now, if that shot is setup is such a way that a 2D cheat will work, sure – use the cheat. But the OP asked for how to make lights “reactive” after the fact – shadow & light catchers are the easiest way to reliably create an element to do this. You may not have tried or used the workflow, but I do and in fact I am doing a series of shots right now using catchers. 2D masks will not work in most of these shots, while the catchers are nearly effortless to setup and provide excellent results.
-
Conrad stated: “This is overkill. Some 2D roto shapes and some luma keying will give you a decent enough result.
“Is it? Maybe – maybe not – I haven’t seen the shot. Without seeing it, and without knowing the context that it will play in, you can’t say if it is an approach that is useful. 2D roto shapes may or may not work well, and you don’t know what “decent enough” will be for the shot/client/film etc.
The point with my post is that this kind of effect is *easiest* to create as a practical on set.
Nevertheless, 3D light catcher/shadow catchers are not difficult to make – and while creating catchers may consume some time, getting roto shapes to work correctly and look convincing also takes time.
Relatively flat light/shadow catchers can be made directly in After Effects (walls, ground, even car hoods, can be cheated this way, etc).
It depends on the shot and the desired effect if the catcher method is the way to go, vs. rotos or other 2D methods.
-
Andrew Somers
February 13, 2012 at 10:33 pm in reply to: I need a recommendation for 3rd party Memory dealers (as opposed to Apple’s expensive sticks)Yes, I believe that install article war written before 8 GB sticks were available. In order to go over 32 GB, you need to use 8 GB sticks. When the article was written, only 4 GB sticks were available, and thus the upper limit was 32 GB.
EDIT TO ADD:
You may find this article relating to triple channel memory interesting:https://www.barefeats.com/nehal02.html
