-
Weird Magenta and Green Bars on my Video
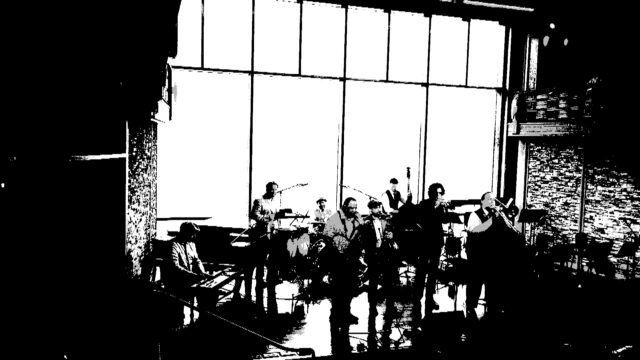
Posted by Gary Thomas on August 15, 2023 at 2:01 amI recently filmed a concert and got these weird, green and magenta hum bars. I’ve shot in this location before with the same camera and settings and did not get the bars. I used a Panasonic HC-V770 in HDR mode. My question: How can I get rid of those damn bars! Something tells me it won’t be easy.
Some contents or functionalities here are not available due to your cookie preferences!This happens because the functionality/content marked as “Google Youtube” uses cookies that you choosed to keep disabled. In order to view this content or use this functionality, please enable cookies: click here to open your cookie preferences.
Aivis Zons replied 2 years, 11 months ago 3 Members · 9 Replies -
9 Replies
-

Hector Vera
August 15, 2023 at 8:36 pmI just checked the video and I am not really seeing the green bars in that clip from the link you provided. If it worked for you before, maybe try a restart on your computer and see if the bars are still there after editing in Vegas Pro, if not, perhaps cleaning the cache temp data on your Vegas Pro can help. Here it is: https://www.vegascreativesoftware.info/us/forum/tips-clean-up-of-vegas-temp-files–104216/
If you can provide a screenshot where the green bars are appearing in your Vegas Pro directly, I can probably get a better idea on whats causing it.

vegascreativesoftware.info
(Tips) Clean up of Vegas Temp files
This tips is written by Joseph S Testa in Sony Vegas editors Facebook group.(With some editing by me) If Vegas Pro has appears to gone off the deep en...
-

Gary Thomas
August 15, 2023 at 10:29 pmThanks for your reply Hector. If you look at the piano player’s shirt and the stone wall to his left you can see the bars. I double checked that they are visible in various video players and other devices and they are. They are kind of subtle, but annoying. They are visible in Vegas also but I didn’t think it necessary to show that. I did a test render and they were still there. I will use Vegas to correct it, if I can figure out how to. Also, it’s highly possible I’m not describing them with the correct terms. Check the piano players shirt though. That’s where it is most noticeable. I had another camera on the other side of the room and it did not have the problem.
-

Aivis Zons
August 16, 2023 at 6:19 amThe banding is definitely there, not a software problem.
I believe this is down to the shutter speed setting on your camera. If the settings are the same then it could be that something changed about the lighting on location and that’s what caused this. This really is something you should correct on location, but there are some things you can do to fix this issue in post. At least a bit.
1) Apply Color Corrector (Secondary), click on “Select effect range” and click on one of the green bands. This will give you a reasonable starting point. In your case you might want to disable “Limit luminance” and “Limit saturation”. To better see what you’re selecting – toggle show mask. You need to fiddle with the “Limit hue” sliders until you visually see that you’re isolating the bands. I’ve attached an image where I played with the sliders a bit, might help as a reference point.
If adding it once is not enough – add another color corrector (secondary) and make further changes, select a different point, focus different areas. Stack the plugin multiple times. It likely won’t be perfect, but you can improve your footage to an extent, it will at least be less distracting.2) Look into some “deflicker” plugins. I personally haven’t had a use case for them, so sadly there’s nothing I can recommend, but I’m sure there are some out there from multiple sources.
3) AI tools? Just throwing this out there. There might be something, might not – worth a quick check.
Option 1 will alleviate the problem somewhat.
Option 2, 3 could fix it the rest of the way. Emphasis on could. Giving it a brief look – seems like these are more focused on more obvious shutter speed flickering, not this colored bands situation.And a side note – I picked the green band as I believe “magenta bands” to be the actual color. Could be the other way around – it’s one of the two, but I reckon green would be easier to try and fix.
-
Gary Thomas
August 17, 2023 at 12:10 amThank you @aiviszons. Those are really good suggestions. I will give them a try, starting with the secondary color correction.
-
Gary Thomas
August 23, 2023 at 10:16 pmHere’s an update. I tried secondary color corrector and did not have much luck. I tried to reduce magenta since it is most noticeable but that only increased the green, since it is the opposite of magenta. That’s one of the problems here. To reduce one you have to increase the other. Perhaps if I were an expert I might have different results but I gave up after several hours.
Then I tried a demo of RevisionFX Deflicker. It allowed me to zero in on the bands but I never got a satisfactory result. Also, I can’t pay $250 for a plugin. Which led me to Digital Anarchy Flicker Free. Both of these apps have a rolling band function but Flicker Free was not able to help. The bands are so subtle when compared to the rest of the data in the video that I think it’s hard for software to identify it.
I tried creating horizontal bars of alternating green and magenta and syncing them with the rolling bands but I almost lost my mind and gave up on that idea.
I am currently trying something a little different. I have two tracks of the same video and set the upper one to 50% opacity. Then I advance the upper one forward until the magenta cancels out the green and vice versa. Of course everything is ghosting(?) now that the videos are twelve frames out of sync. This method reduces the flicker on stationary objects though so I thought I could Mask out the parts of the video with movement and at least the walls won’t have as much banding. At this point it’s better than nothing. Here’s a sample:
If anyone has other ideas I’m down to try it. Thanks for your help.
Some contents or functionalities here are not available due to your cookie preferences!This happens because the functionality/content marked as “Google Youtube” uses cookies that you choosed to keep disabled. In order to view this content or use this functionality, please enable cookies: click here to open your cookie preferences.
-
Aivis Zons
August 24, 2023 at 4:59 amUsing/creating an opposite color banding to counteract what’s currently there is an option that I considered, but decided not to include in my list, because I reckoned you could get “good enough” results through color correction and it would take a fraction of the time. Counter-banding felt like too much of a longshot.
This offset track idea is cool, but has an obvious downside. I don’t think it’s better than source material. If you’re going with the duplicate offset track approach then an easy way to improve it is by creating masks with a bit of feathering around the static parts (walls, some instruments). That way you can exclude all the people.
This duplicate offset track might be more viable if vegas pro had more compositing modes. In something like After Effects you could set the blending mode to color, which would make the upper layer affect only the colors. There would still be ghosting on moving objects – sure, but only in the colors – vastly less obnoxious.
Creating bands yourself and moving them to offset the color – the problem here is that the bands aren’t visible everywhere. They’re only where that specific light was shining. So you’d have to do some masking again.
So my suggestion – go with the duplicate offset track, but create masks for the static areas.
For the active areas with people and such – apply a color corrector (secondary) and try to isolate the green band, try to correct that. I don’t recommend you target magenta, because I think it’s the actual color of the set + it’s a bit closer to skin tone. You don’t want to target magenta.
Or if you have After Effects at your disposal – this is where you want to do this, but use the “Color” blending mode.+ Some more “out there” bonus suggestions:
1. Check out the Colorization plugin in Vegas Pro. It’s used to color black and white footage, but might help equalize color. Added some extra artifacts in my case.
2. Consider black and white? -
Gary Thomas
August 26, 2023 at 5:04 amThank you very much for your help Aivis.
I tried masking out the static areas while using an offset track to cancel out the banding. It had potential but it would really be a lot of work for a two hour video, having to constantly adjust the mask so no one enters in to it while also maximizing the static area.
The banding seems to be most noticeable on the light sections of the video, such as white shirts. I would like to create a mask using a duplicate video and make it high contrast so just the light areas pass through it. That way I can use one or more instances of the secondary color corrector to reduce the banding colors but it would not affect the darker portions of the video. My problem now is I don’t know how to do it. I googled it but all the tutorials only talked about using a pen or rectangle tool etc, to make the mask. How can I make something like this into a mask?

-
Aivis Zons
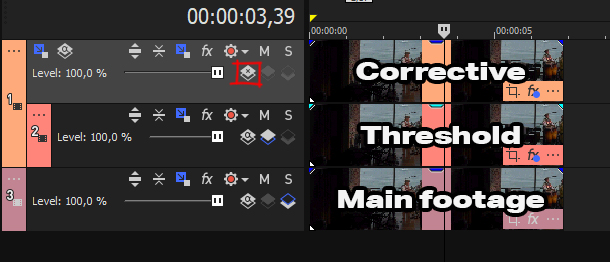
August 26, 2023 at 3:19 pmYou need to use track parenting and the Multiply (Mask) compositing mode.
I’ve attached an image with the setup you’re looking for.
Bottom track: your main footage.
Middle track: child of corrective track. This contains your threshold footage – what you attached in last reply. You need to add a Chroma Keyer plugin with pure black as the color to it. Might want to fiddle with the thresholds & blur there.
Top track: copy of your main footage, but with corrections applied. You need to set this track’s compositing mode to Multiply (Mask) – highlighted in red.If you can’t see the compositing mode button and/or the parent/child buttons – click on the three dots in top-left corner of track -> Edit Visible Button Set… -> tick Make Compositing Child/Parent and Compositing Mode.
Parent/child buttons are right next to the compositing mode button. First arrange your tracks and click the appropriate one.
-
Aivis Zons
August 26, 2023 at 5:25 pmActually on second thought – the parent track setup would work fine, but you can also skip it and just use the Color Corrector (Secondary) for that – it has such masking built-in, I briefly touched on it in my first reply.
Expand all of the dropdowns and leave enabled only “Limit luminance”. Then tick “Show mask”. Find the range you’re looking for and disable “Show mask”. In your case this is basically the same process as using a clip duplicate for the threshold, but I prefer the smoothing that comes from Color Corrector limiters.
Once you’ve selected the right Luminance you can proceed to hue/saturation. It’ll be the same process as with a duplicate track adjustment.The advantage of using the parent track setup is that you get more flexibility. The corrective content doesn’t need to be a duplicate of original, could be offset, lowered in opacity, etc.
Reply to this Discussion! Login or Sign Up