-
Matching settings of original DV Prores 422 footage in exports for Resolve
Hi Everyone,
If I have missed these topics in my searches for existing posts, forgive me. I found zero results in multiple different searches, but I may not be using the right search terms.
I have to use DaVinci Resolve 19.1.4 on a Mac for an archive project where I just need to take some DV Prores 422 footage and either split it in two or add two clips together. Very simple. But I don’t want to change any parameters of the footage. In other words, I don’t want my exports to downres the footage. I’m used to Premiere where I can a) match the timeline settings to the original footage and b) match the export settings to the original footage. But apparently you can do neither in Resolve. And even if I’m exporting compressed footage out as Prores in Premiere,
the settings are pretty simple. I’m not finding the settings simple in
Resolve. All I can find online is the best export settings for youtube videos or for 4K, which is not what I want.So, I have several questions for you Resolve experts:
1. Are the Project Settings in Resolve exclusively for just the monitoring of your footage while you edit or does it affect exports? In other words, even if my Project Settings are set wonky, will the export still be made from the original footage?
2. For Export Settings, Is constant Bit Rate best?
3. For Advanced Export Settings, What’s best for Data Levels; Auto, Video, Full or Retain sub-black and super-white data?
4. For Advanced Export Settings, What’s best for a) Color Space Tag, b) Gamma Tag and c) Data burn-in?
5. Finally, should Enable Flat Pass be On or Off?
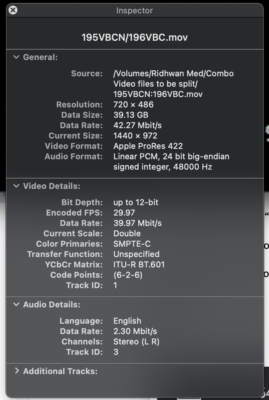
Again, I just want to match the original footage. Don’t need to upres it and certainly don’t want to downres it. Attached is a screenshot of the Quicktime Movie Inspector window for the original footage (the footage is 720×486. Don’t know why the inspector says it’s 1440×972). Any help anyone can be is appreciated tremendously! Thank you!!