Creative Communities of the World Forums

The peer to peer support community for media production professionals.

Activity Forums Adobe After Effects inconsistencies in saturation/color and shadow quality when exporting

  • inconsistencies in saturation/color and shadow quality when exporting

    Posted by Francesco Barese on February 6, 2021 at 3:41 pm

    hey guys,

    i got a problem with “desaturation?” when exporting from AE.

    im working on a 30+ minute long video with tons of moving parts, animations, title cards ,2x hd footage(PiP style),dynamic backgrounds, drop shadow (the works).also everything needs to be timed and synced down to the frame.

    my rig is not powerful enough to handle this in AE (gtx1060 6gb/ryzen5 OC to 3.8).

    so i decided to export each “moving part” as a separate transparent to alpha video or png

    and then rearrange them in premiere pro as needed.

    my problem is, when i export from AE as a video, it looks 1:1 as it does in AE.

    but when i try to recreate it in premiere using the png/video elements, there is inconsistencies.

    its not lossless. (is that to be expected when doing it this way?)

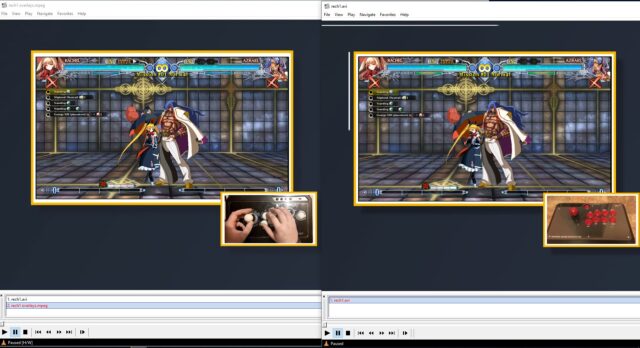
    if you look at the picture, you will see how the one on the left looks desaturated.

    the colors arent as rich,deep and vibrant and the shadows are too soft.

    now, i know this wouldnt be a problem for viewers, however i spent a lot of time

    meticulously trying to get everything to look exactly the way i want it and these inconsistencies are unacceptable for me.

    colors have hex values, so why would it change it when exporting?(and its not a premiere issue). the pngs and video look dull before importing the footage into premiere.

    to be honest, i kinda suspected transparent footage wouldnt be truly lossless, thats why i been trying to avoid doing it this way. however i cant think of any other options.

    the final product would have like 200+ separate tracks and be 30+ minutes long.

    my pc simply cant handle that in AE even with skipped frames in preview and set to 1/4

    and all motion blurs turned off etc.

    and importing moving parts as separate ae projects into premiere would also lag me up way too much.

    any suggestions? i dont know what to do, or how to distribute my workflow in a way that wouldnt compromise on quality and yet not lag my rig into oblivion.

    thank you in advance

    Francesco Barese replied 5 years, 5 months ago 4 Members · 9 Replies
  • 9 Replies
  • Brendon Murphy

    February 6, 2021 at 4:57 pm

    What’s your working color space in AE? Pngs are 8 bit, so if your AE work is being done in 16 or 32, you will lose info no matter what. Try exporting with higher quality formats that support alpha channels and more than 8 bpc. For instance, tiff, exr, prores 4444, etc.

    Also, if your shadows in-comp have blending modes, you will need to export them separately with the blending mode set to “normal”, and then adjust the blending mode within premiere

  • Francesco Barese

    February 6, 2021 at 5:24 pm

    oh,right. my projects in 32bit. thank you i will try that!

    my shadows dont have blending modes (its just the “drop shadow” effect preset.)

    i guess maybe because the background is lighter the shadows appear lighter too (+ loss of date from exporting in 8bit color depth format png).

    i will try again using the settings you suggested.

    how about the video tho? i have some motion elements that im exporting with transparencies(same as i did with the pngs). but i exported in avi.

    whats a video format that supports 32 bit?

  • Brendon Murphy

    February 6, 2021 at 6:29 pm

    Exr and tiff can be used to export 32 bit image sequences with alpha. When you import to premiere, just pick the first image in the sequence and make sure the image sequence box is checked. It will come in just like any other video clip.

    I will note that if you are displaying this on the web, your resulting format will inevitably be 8bits, and look more like the pngs in the end.

  • Chris Voelz

    February 6, 2021 at 8:44 pm

    Also check that you don’t have a color profile enabled and when exporting with alpha make sure to use straight and not premultiplied.

  • Francesco Barese

    February 7, 2021 at 2:17 am

    thank you!

  • Francesco Barese

    February 7, 2021 at 2:18 am

    (yes, its for youtube).

    so basically, from now on i should be working with 8 bit by default, and get the colors and shadows looking the way i want them to in an 8-bit environment to begin with?

  • Brendon Murphy

    February 7, 2021 at 3:31 pm

    You could certainly do that if your video will only ever be in an 8 bit environment (or if the source material is all 8 bit).

    In general, I tend to work in 16 unless there’s a specific reason to do 32. High end footage is usually 10bit or 12bit, and AE was not really designed for a 32 bit workflow, so many features work differently or not at all. You will get better blending and color adjustments in 16bpc than in 8bpc. An 8 bit export will not look QUITE as good as your 16 bit comp, but should not feel drastically different.

  • Tristan Summers

    February 9, 2021 at 12:29 pm

    So.

    Your final deliverable will be 8 bit.

    What ever it is finally viewed on will be 8bit.

    Ideally you should have AE as a 32 bit project but the working space should be set to Rec709.

    That way you will not be creating saturation that can never be in the final rec709 deliverable

    Premiere works in Rec 709 by default. It is faking and fudging it HDR workflows

    You don’t need to work in 8 bit AE project, keep it 16 or 32

    Your system can handle it fine, just get as much RAM as you can, and maybe get a second NVME drive for cache

    Export as Pro Res 4444 as RGB+Alpha and Trillions+ but be aware that this is full range RGB and your final video will probably be video range

    You now have 10 bit clips with alpha that Premiere should interpret correctly

    PNG are a bit didgy and the gamma gets misinterpreted a lot

    Tiffs or EXR can be 32 bit but you don’t really ever need that and your system prtobably can’t play them properly

    If you export Pro Res 422HQ Masters from Premiere and use AME to encode deliverables you should be seeing what you want. You should be judging on an extrernal monitor, ideally via decklink.

    Be aware the viewer in Premiere is usually wrong.

    In a year or so HDR workflows will mature and you will be able to have wider colour gamut RGB video deliverables but at the moment it is far far safer to stick to Rec709.

  • Francesco Barese

    February 9, 2021 at 5:17 pm

    thank you very much, im gonna give it a try!

    however i found a workaround (writing this for anyone that is facing the same problem and is looking for a workflow solution)

    what im gonna do is edit the entire raw footage with proper scaling (gameplay+joystick+voiceover) in premiere from start to finish. then split it into 20 segments (1 for each trial), delete 19 segments,leave only “segment 1” delete gameplay and save it as “joystick premiere projects”, then undo, delete joystick and save it as “gameplay+voiceover premiere project”. then import both as individual fully edited clips onto the timeline in AE and place them on top of their respective boarders elements in the AE template.

    the footage is already edited,now all i gotta do is move the elements around when i need them.

    once im done with segment one, i will precomp the whole thing and save.the adjustable/editable template is done so all i have to do is rinse and repeat for the next 19 segments of the raw footage and save them as their own precomp. and when its all done i will just import the 20 finished precomps one right after the other and export as one file

We use anonymous cookies to give you the best experience we can.
Our Privacy policy | GDPR Policy