


Todd Terry
 1
COW Coin
1
COW Coin
Forum Replies Created
-

On location and don’t have that gear with me… but easy to describe. Just four short pieces of 1″ black elastic, one attached at each corner. Each piece crosses each corner about 4″ from the “point” so you just slip it over the corner of a frame. Exactly like the elastic corners on a pro rag from Matthews, etc.
T2
__________________________________
Todd Terry
Creative Director
Fantastic Plastic Entertainment, Inc.
fantasticplastic.com

-
Cool, Ben… glad they worked out.
[Ben Rickert] “metal wasn’t very thick and it flexed a little … bolted it back together with the brace in place”
We did exactly the same thing, you might be able to see that strut in the pics of ours… that was one of the things I left out in my very abbreviated DIY instructions. Our fixtures have a very similar aluminum stock brace on both the inside and outside… no flexing anymore.
[Ben Rickert] ” this one appeared to emit the most light because of the reflective silver interior.”
Yeah it might. We bought the cheap white fixtures, but I painted them silver on the inside, and black on the outside.
Looks like a successful project… I think they will work out well for you.
T2
__________________________________
Todd Terry
Creative Director
Fantastic Plastic Entertainment, Inc.
fantasticplastic.com
-
Hi Nik…
Mine is a little bit of speculation here. I do use the C300. And I do have radio mics. But I’ve never used them together. As luck would have it, although we have been using the C300 for almost a year I just have not had any need for that combo (I rarely use radios or hardwired lavs either, we almost always boom for sound).
That being said, it shouldn’t be too hard. Sounds like you have a male shoe of some kind on your receivers. Well, the C300 body has one shoe on top. You need one shoe to attach the monitor/audio module. But if you put the handle on top, there are two shoes there. One will go for the monitor, and the other you can use for your receivers. If you want two receivers in two shoes, you just need a dual shoe adapter. There are tons of them, but here are a couple… two double-shoes and one “channel” type…
https://www.bhphotovideo.com/c/product/303528-REG/Frezzolini_96316_FDSA_Dual_Camera_Shoe.html
https://www.bhphotovideo.com/c/product/126229-REG/Cool_Lux_MD3000_MD_3000_Light_and_Sound.html
https://www.bhphotovideo.com/c/product/931792-REG/tether_tools_rsex8_rock_solid_hot_shoe.html
However, if I’m using two receivers, I just stick ’em together with Velcro. Ours are Lectrosonics, and even for high-end pro mics they are still small enough to do that with. The receivers are about the size and shape of a pack of cigarettes (maybe a little bigger), and we have Velcro on both sides… hooks on one side, loops on the other. So after one receiver is mounted, we just stick the other one on top of it.
I think you’ll find though that most people don’t use the shoes for mounting receivers (our receivers don’t have any kind of shoe provisions on them). Probably like most C300 shooters we always have our body mounted on a baseplate with rods (for matte box and follow focus). When I have the need for the radio mics (and I’m sure it eventually will happen) I’ll probably just use longer rods so they stick out the rear a bit, long enough to put an accessory plate on the rear rods and stack the receivers up there.
T2
__________________________________
Todd Terry
Creative Director
Fantastic Plastic Entertainment, Inc.
fantasticplastic.com
-
I’ll leave the computer nerdom to the other much more learned experts on this forum.
I’m going to make a complete non-hardware recommendation, in the lighting arena… since that’s often an area where just a little bit of tools/technique improvement can do wonders for getting better results.
I certainly do NOT intend to cast aspersions on Alan’s ability (and for all I know he might light better than Haskell Wexler and Roger Deakins combined). BUT… he did say he was coming out of news, and I know enough news guys (and have been there myself) to know what the usual lighting/cinematography levels and expectations are there.
I’d suggest saving a little bit of the budget to bring in a “real” (i.e., at least “pretty darn good”) DP (or gaffer) for a day or two, someone to show you a few tips-n-tricks to get the most out of your shiny new gear… and to impress your new bosses with something a lot better than the “news-quality footage” they might be used to seeing.
As some of my friends here know, in my misguided youth I was a wanna-be actor before I was a wanna-be director and DP… and I know personally for me, I learned more about lighting and cinematography by watching the DP in my first four hours on a real movie set than I did in four years of film school (and that is, sadly, not an exaggeration).
You might even bring this guy or gal in before you make your big gear investment, seeing what you can accomplish and what tools it will take might help you decide what kind of gear to put on your wish list.
T2
__________________________________
Todd Terry
Creative Director
Fantastic Plastic Entertainment, Inc.
fantasticplastic.com
-
Thanks Rick… yeah this fabric-store stuff is great. I found it and just bought it on a lark several years ago, and keep going back for it. Give it a try.
I do wish it was a bit wider so you could make a 6×6… but you can get it in any length so you could make one bigger with a seam if you wanted.
As I said I usually use it in 4x frames, but I did drill holes in the barn-doors ring of one of my HMIs to make sort of a half-assed speed ring… so I can put some salvaged softbox rods in it to hold the silk (can you call it silk if it is vinyl?).
You can see that in the top pic in the trio of pictures on this page…
https://fantasticplastic.com/portfolio/news081.html
…and unbelievably, no it doesn’t melt or even get warm (not that I would leave it unattended).
By the way the same store, in the same department sells this window-tint film, also dirt cheap…
…that is perfect ND for big windows (self-cling, too). I’d estimate it to be about a .9 ND. I’ve never put a meter on it, but looks about 3 stops to my eyeballs.
Would love to hear others’ favorite light-mod tools as well…
T2
__________________________________
Todd Terry
Creative Director
Fantastic Plastic Entertainment, Inc.
fantasticplastic.com
-
We have a decent lighting and grip arsenal… but my most useful lighting control tool?….
My top two things on the truck are super cheap and super easy…
4×4 white foamcore bounce card. Easy, cheap, versatile, and in my opinion much prettier bounced lighting than any commercial or “pop up” reflectors. We have bunches of pop-ups, but never even unpack them if we have 4x4s around. Use ’em until they get ratty, then throw ’em away.
Easy to prop up, tape up, or mount almost anywhere in any position quickly with just a C-stand, grip head, and quacker clamp. We usually order 4’x8′ sheets from a local art supply store and cut them in half to make 4x4s. You can also score a 4×4 and fold it in half for easier travel/packing (put gaffer tape on the “hinge” for longer life). If you can get it, get white on one side and black on the other for a negative fill when you need it.
My second most useful?… homemade 4×4 diffusers. We make them out of vinyl shower curtain material from the fabric store. Actually this is the stuff…
Use it as diffusion and it gives a nice look about like Lee 250, or maybe slightly more diffuse. Dirt cheap at three bucks a yard. Put it in a 4×4 Hollywood frame for beautiful diffusion for sunlight with really nice soft shadows but almost no loss of punch. Or hit exterior talent with a 1200w HMI through it for a very nice but soft kick (and yes, even though it is vinyl we put it in front of HMIs all the time and never had it even begin to melt). We cut it into 4×4 squares, hem it with gaffer tape all around, and put elastic loops on the corners. Fold or wad it up and stick it in your rags bag and it bounces right back. When I first started using these my intention was to get a couple of shoots out of them and then throw them away since they are so cheap… but we have some that have been in play for years now.
My two (cheap) cents…
T2
__________________________________
Todd Terry
Creative Director
Fantastic Plastic Entertainment, Inc.
fantasticplastic.com
-
Craig makes some great points…
It would probably be helpful for you to describe the type of work a little more… the type of things you will be shooting and projects you will be asked to produce. An in-house web video, for example, could have very different requirements than, say, a broadcast television commercial or a national trade show marketing video.
And, while I realize you might not be able to share this exactly, at least a hint of what a “robust” budget is would probably go a long way in determining what some of your best choices are.
T2
__________________________________
Todd Terry
Creative Director
Fantastic Plastic Entertainment, Inc.
fantasticplastic.com
-
NIck…
Yeah the C300 definitely gets my endorsement. But as I freely admitted I’m completely biased.
[Nick Ravich] “Wondering what you’re preferred configuration is for the C300 in a more run and gun/doc-style shooting situation?”
The short smartass answer to “How do I run-n-gun” is, “I don’t.” But it’s mostly true, I rarely am in run-n-gun or doc style situations. I do mostly commercial production and almost all of my scenes and setups are fairly planned out. So, I really don’t do run-n-gun… and I almost never do handheld… I’m almost always on sticks, a dolly, a slider, or a jib. But, that being said, as luck would have it I spent this afternoon doing run-n-gun handheld. Go figure.
As it happens someone asked me about my particular config just a couple of days ago in another thread so I already had a couple of pics…
My usual studio setup is Zacuto plate (they make this ultra-low-profile rods plate for the C300/C500 since it is so top-heavy), 6″ rods, follow focus, matte box, swingaway bracket, prime lenses…

My usual handheld setup is Zacuto plate, 12″ rods, shoulder mount, swingaway bracket (locked), zoom lens, matte box, and two additional grip handles…

…it’s not what I’d call ideal though, or super comfortable. If I did very much handheld I’d probably opt for the “C-shooter” rig from Zacuto which looks like this…
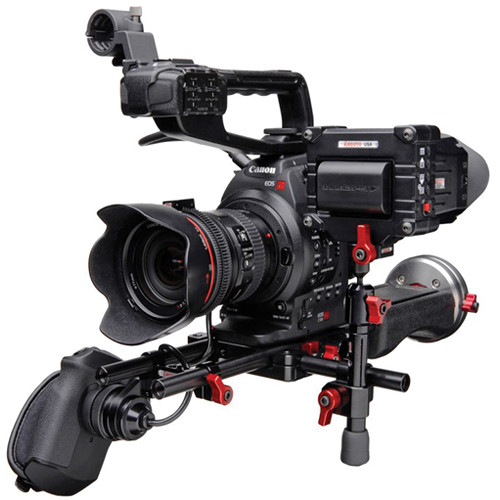
It looks like it would be a nice workable rig, and I like the re-positioned handgrip. I haven’t bitten the bullet on that yet since I haven’t needed it. Actually I only need the some of the parts since I already use that exact same baseplate and rods.
Let us know what you decide to do. Always like to find out what others figured out as workable.
T2
__________________________________
Todd Terry
Creative Director
Fantastic Plastic Entertainment, Inc.
fantasticplastic.com
-
Well I can only speak to what I shoot, everything else is anecdotal.
I shoot with the C300 every day, and have never had an overheating issue (or heard of anyone else overheating theirs, either). I think it’s definitely a viable choice.
Anecdotally, yes, I’ve definitely heard of overheating issues with both of the other cameras you mentioned.
Since you already shoot C300 you know what a pleasure it is to use. I think it would be exponentially better for documentary-type work than any DSLR would. Scarlett, too, frankly. They can both give great images, but are both high on the “clunkiness” scale for ease of use in my opinion, where the C300 is definitely a grab-it-and-go camera (depending on how you have it configured).
I will admit that I’m biased, too. I got the C300PL right when they came out, and have been shooting with it constantly since. It’s my favorite camera, ever.
I don’t know if you are shooting in Las Vegas in the city itself, but remember that Vegas is very permit-restrictive as far as pro shooting goes. And some areas like Fremont street require another additional permit for shooting as well… and they are not cheap. And yep, they will stop you (unless you are shooting during NAB week when claiming “demo” goes a long way). Whip out any professional-looking camera and within 15 seconds you will be joined by at least two bicycle cops asking to see your paperwork.
T2
__________________________________
Todd Terry
Creative Director
Fantastic Plastic Entertainment, Inc.
fantasticplastic.com
-
Hi Ben…
[Ben Rickert] “Where did you find that short threaded rod for attaching to a C Stand? “
They are just plain ol’ 5/8″ bolts from the nuts and bolts aisle at Home Depot. If you’ll notice, most of the bigger bolts aren’t fully threaded, most of them are only partially threaded, like this…

…so if you cut the heads off you have a standard 5/8″ post that is also threaded on one end. You can cut excess threads off, too… obviously. I can’t remember what I used, I think I probably used a metal-cutting blade in a Sawzall. Then clean up and round the cut edge just a little on a bench grinder.
[Ben Rickert] ” have you changed the design of this setup at all?”
Hmmmm, good question. No, I don’t think so. If I was going to build another one today it would probably be exactly like the ones I already have. The only thing I can think of if I was going to get really fancy is maybe put in multiple switches so I could independently control the bulbs. As it is now, if one instrument is too much we sometimes give one of the tubes a quarter-turn twist to turn it off. I’m not sure about independent switching, that might require a different ballast that the stock one that comes in the cheap units.
Aside from that, they work just fine… same as the first day I put them together.
Good luck…
T2
__________________________________
Todd Terry
Creative Director
Fantastic Plastic Entertainment, Inc.
fantasticplastic.com


