Creative Communities of the World Forums

The peer to peer support community for media production professionals.

Activity Forums Adobe Premiere Pro Underexposure?

  • Underexposure?

    Posted by Robert Gilbert on May 31, 2024 at 2:25 pm

    Peace to all!

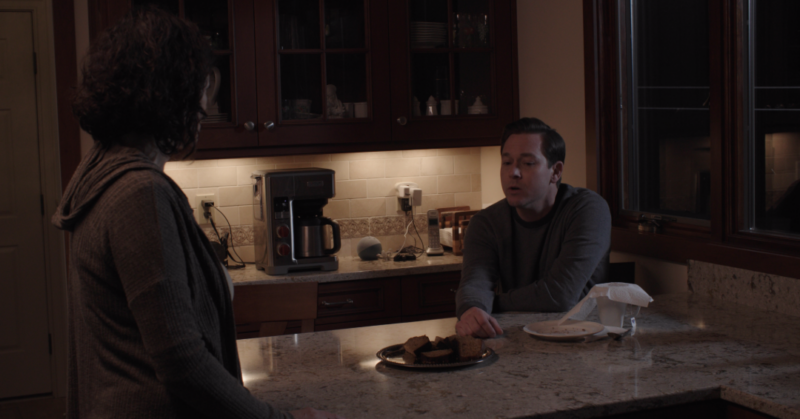
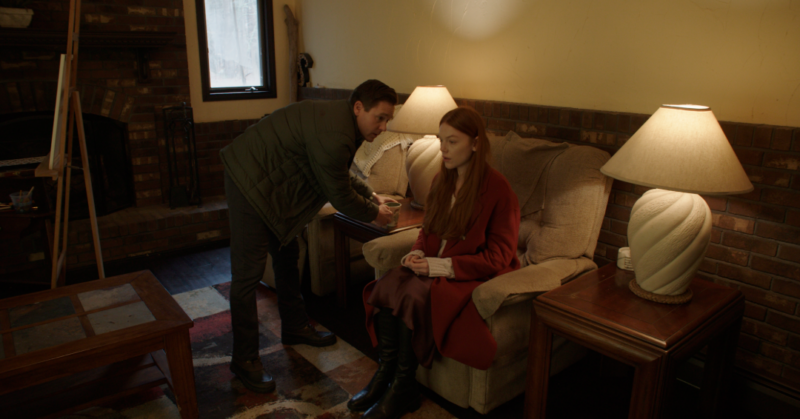
    I’d really appreciate your input on this problem! When I started to color correct my movie I saw that many scenes became way too dark with the standard rec709 LUT applied. The camera operator (who imported the footage) says that the problem is that the scenes were not properly lit during the shoot. But the DP said he always lit well and that the problem must have been an IOS error on importing.

    The operator said that the fact that the electric lights in the scene look normal is proof that the damage was not in the importing, but rather on set. It is true that the DP habitually shot in very low light, but I can’t understand how he could make such a blunder since he’s a veteran who has made many fine films and also a friend.

    Could you please look at these shots and tell me what you think the cause was, and even more importantly, what would be the best solution?

    Mads Nybo jørgensen
    replied 1 year, 11 months ago
    4 Members · 5 Replies
  • 5 Replies
  • Tod Hopkins

    May 31, 2024 at 9:50 pm

    At the risk of oversimplifying with too little information, those two screenshots are certainly poorly lit for the actors but not necessarily underexposed overall. As the camera person points out, the contrast between the background lights and the actor’s faces is problematic, but I don’t see a fundamental problem that can’t be addressed in grading.

    Simply applying a LUT is not the solution though. LUTs are just as likely to foul an image as fix it. They are simply shortcuts, not solutions. First, you need to know the color space the footage was shot in, then use the proper LUT to adjust to what you want, but that’s just a baseline and even the “correct” LUT is not necessarily going to result in a good image. Remember a LUT goes from one space TO another. For instance from Canon Log3 to Rec709. Not to mention you need to apply the transforms properly and be in a properly set and calibrated environment to make good judgements.

    There is another issue specific to modern Premiere. Premiere now makes many color space adjustments automatically which may result in doubling up corrections if you don’t take proper steps in the proper order.

    My solution when I don’t have the proper information from the shoot and the footage doesn’t look right is to strip all corrections away and correct manually. LUTS are just shortcuts. If they don’t work, ignore them.

  • Kendall Hoover

    May 31, 2024 at 10:14 pm

    It very well looks like an under exposure problem.

  • Mads Nybo jørgensen

    May 31, 2024 at 11:18 pm

    Hey Robert,

    Film making is fun, and laborous, right?

    with the standard rec709 LUT applied

    Why are you applying a LUT?

    And, more to the point, why use a rec709 LUT?

    If you shot either RAW of LOG in 4K, maybe a rec2020 LUT would be better?


    Setting that aside, the professional LUT is not really desinged to change the basic “exposure” of a shot.

    Which raises the question: Who was in charge of the camera and its output?
    The DP or the Camera Operator?
    How did image look on set when you were shooting, and playing back?

    As Tod suggests above, without the actual file info, there is not much anyone can do in form of suggestions. Some cameras will shoot 3 different file formats simultaniously (Proxy MP4, LOG whatever and RAW). If your operator has not transferred all of tem, you might be on the road to nowhere.

    But rather than listening to your operator, I would bring the DP back in the room for a couple of hours grade – he might even have shot a color-chart, or know what LUT he had in mind (maybe invite the operator too just to make fly-on-the-wall film on that discussion – you won’t see either of them again if one blames the other 😉).
    Bring out the scopes.
    Push the exposure up as far as you like it to be, and a bit more.
    Pull down highlights.
    Pull down shadows (black).
    even out in the midtones.
    Go back and adjust other levels as you see fit.
    And, you might find something that you are much happier with.

    Hope that this helps?

    Atb
    Mads

  • Robert Gilbert

    May 31, 2024 at 11:57 pm

    Thank you all very much. The idea of not using a LUT might be the way to go. I just wanted a quick way to correct the LOG footage. The number of choices is daunting and I can’t delve too much into color, so when I learned about rec709 I thought I had found my quick solution. But when I added the LUT it was like pulling down the curtains! Yipes!

    I would really hope to get better exposition without the LUT: in fact, the LOG footage never seemed underexposed to me. We shot in both LOG and RAW 4K. I’m actually a film director, and editor. I don’t know much about cameras or color. It looked good in the monitor on set and didn’t seem underexposed as LOG in Premiere.

    The important question for me now is: how can I correct the LOG footage without darkening it? You did suggest some methods of correcting it manually but I’m a little bit color blind and don’t have a whole lot of time or knowledge of color, so a headstart like a LUT would have been great.

    Any other suggestions would be much appreciated. I would be happy to provide any specs I can. Thanks!

  • Mads Nybo jørgensen

    June 1, 2024 at 12:25 am

    Hey Robert,

    If it looked good on the monitor on set, then you should be able to make it look good in the editing suite too.

    Using the Log or RAW codec really depends on where you go next with the film, and whether your editing system can handle the file-size and processing.

    If you don’t have the knowledge of doing a grade inside Premiere Pro, it is going to be difficult to even give you even a basic introduction apart from the one in my previous post. Not least, as if you don’t have a calibrated monitor, colours won’t really matter when it comes to the export of the master.

    When I say “exposure”, that might say “brightness” just under your hue setting in the Lumetri panel.

    I recommend that you go here for a crash course:
    https://helpx.adobe.com/uk/premiere-pro/using/color-correction-adjustment.html

    Short answer: When doing all this, keep “the end” in mind for the grand opening of your film!

    Will you be relaxed, or will your toe-nails make a high-pitched noise across the floor in the darkness?
    (Don’t worry, your toe-nails will make that noise no matter how perfect your film is, as that is their job).

    Good Luck!
    atb
    Mads

We use anonymous cookies to give you the best experience we can.
Our Privacy policy | GDPR Policy